Wednesday, March 31, 2010

Our Easter Croppers are so good they are having 2 ....

... CROPS!!!!

Thats right 2 Crops - due to the Easter Sunday trading "stuff" we are closed on Sunday which would be our normal crop day.  After much tooing and froing (not sure if thats the right spelling) we decided that Saturday was the day for the crop.  However after more deliberation (some can some can't on the Saturday) we are having one on Friday too!!! 

So basically what that means is you can come for both if you like!!!

As always it's just £5 for the day all your tea, coffee and juice included and biscuits (maybe cake!!!)

The normal cropping hours are 11am-4pm but we're open 9.30am-5pm on both of those days so anytime between those is fine with us!!!

So you can book by calling us 01386 831123
or

Hope thats ok and any questions give us a call

Take care

Sam xxx


Tuesday, March 30, 2010

Money money money!!!!

Hiya

I'm not one for giving money really but sometimes there just isn't anything else to give - some people have really just got everything!!!
So how about this for a way of giving money
It's just a nice little way (that you can change dependant on the size of note you're giving)
So here's how to do it

Take 2 squares of chipboard
Then a strip of card or paper that will be the "spine" this needs to wrap around both pieces and attach
leave a half cm gap for the spine to be able to bend without looking shabby
Next choose some patterend paper - I went with Basic Grey Scarlets Letter this needs to have enough rom to fix around the covers and stick on the inside - it doesn't have to cover entirely as you'll cover this later
attach the covers until you have something that looks like this - then cover the inside with 2 identical squares - I chose plain black card as it matched the patterened paper.
I have covered the joins in paper with some black gros grain ribbon
take a length of ribbon and tie around the spine of your card - this will be where you tuck the money - make it tight enough to hold it but loose enough not to make further creases in the paper.
Then tuck the note under.
I have stamped on some swirls to add more detail.
To finish I have added some Rainbow drops to the swirl stamps and a Happy Birthday epoxy tag
And thats it!!!


Once again I had great fun doing these and they will all be in the shop from tomorrow should you wish to have a look at them.

Take Care

Sam xxx

Monday, March 29, 2010

Hanging "Scrap"

I've been at it again
So here's what I did
Take 5 Beer mats - and strip the coated layers they have on them

Then choose some patterened paper - I am using Basic Grey Aged and Confused
Cut squares a half inch smaller than the beer mats and round all of the corners - should the beer mats be rounded.
Add some letters of your choice, I have also stamped some swirls onto the patterened paper with the addition of some sticky embellishments.
take a length of Gros grain ribbon - I've chosen baby pink and then stamped over with the swirls used before (it was a small stamp so I just threw it all over the ribbon)
oh and i notched out the end too
I have also added a button - this was more to weigh town the ribbon and stop it sort of pointing out from the wall when hung.
then it's back to the hanging up - I used a buckle (thats actually for fastening mini books) and turned it on it's end threaded the ribbon through and away we go - it's on the wall.

Again hope you enjoyed it - and thanks for keep coming back - I am enjoying these projects very much.

Take Care

Sam xxx

Sunday, March 28, 2010

I've been inking again!!!

and here's what I made!
I took a picture off the wall to hang it on!!

And heres a quick guide of how to do it

Take a rectangle of cardboard and cut an arrow/house outline
and peel one side you should get this...

cut some patterened paper to fit the body and roof - I have used Basic Grey Blush and cut them with a Victorian edge on the Fingerguard Trimmer
I have inked around the edge with a brown ink and added another piece at the bottom (it was left over and looked like it needed a job!)
then added some strips which I will later add some words to
I have inked in brown and gold 3 grungeboard embellishments
Then added it all together with some ribbon and fibres for the handle/hanger
I had great fun doing this - any questions let us know. 

Take Care

Sam xxx

Saturday, March 27, 2010

Easter Holidays have begun....

... so here's a little easter idea

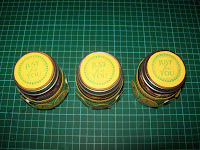
Mini Egg Jars!

These are Baby Food jars but you can use any sort
Then cut 4cm strips of Yellow A4 Card on the shortest side.
3cm strips of green gingham vellum on top
a length of ribbon on top and secure around the jar
Stamp the names of who the jars are going to - longer names will need smaller stamps depending on the size of the jars you are using
adhere onto the jars with foam pads
then the best bit - putting the chocolate eggs in!!! (I may have stolen just a couple)
To finish them off I stamped a circular Just for you stamp - you could handwrite these or use flowers instead (which in the first picture was my intention but I changed my mind)
Hope you like it - I had great fun!

Take Care

Sam xxx

Friday, March 26, 2010

Anyone fancy a little Blog hop?

Hiya everyone

How are you doing - something a little different this evening, what i'd like to do is provide you with a link to "The Boss" (mum/Julie)'s Blog.

Today she has had a most rare "day off" so she did what anyone does on their day off and did the same at home as she would at work!!!

But behold because she made these..............


and...


Arent they gorgeous ... and she assures me nice and "easy" to make.

If you would like to view her tutorial on these then please follow this link to her blog.

Have fun and take care

Sam xxx

Thursday, March 25, 2010

Would you look at the time!!!

Hiya Everyone

So there I was in the Craft Room  (dining room!) playng with my lovely new papers and getting a few photo's on the go and here we are


So I have used the Blips and Beeps Geared Up 12x12 Paper as the backing.
There are 3 cogs popped out from the 2 die cut sheets within the same range.
The Arrow is from the Twiddleybitz Basic Arrows bag
The saying just came of a random sheet I had but I just liked how the colours tied in with the papers and the photo.

Oh and I edged the page with a red inkpad.

This is just the "so far so good" stage.  There is every possibility that I will add other things to it the more I look at it or it may just stay as it is - this is the best bit about scrapbooking I guess - you can do as much or as little as you please.

Hope you like it

Take care

Sam xxx

Wednesday, March 24, 2010

That wasn't quite what I had planned...

...I had planned to be doing some lovely crafting tonight!!!

I however found myself helping my darling son with his Easter Card competition!!!

So there I was today gently admiring the new Bo Bunny papers and suddenly found myself holding a few sheets that were definatley coming home with me!!!  Then there was the Blips and Beeps and it was all over - so I then had more paper but that was ok because I was going to come home and make something wonderful!!!

In fairness with paper like this...


how could I not!!!

The sad reality is that my oldest son had to do his easter competition card this evening.  With us mums that do the whole papercraft thing I know i get very excited when projects that I can get more involved in come home.  I had it all planned out in my head what would be a good idea and what would work ..... but no!!

He had his own ideas and almost 2 hours later we have this........


I actually happen to think he's done a great job!!!

My craft room is an absolute bombsite now but we had great fun and he used some great colours and had a dip into my Organza Bags of flowers these onese came combining the Greens and the Yellows and Oranges bags.

So I hope to bring you a slightly different kind of sample of work tomorrow - this was a great project though and I hope that your kids and grandchildren have as much fun making easter projects as me and Alex had making this!

Take Care

Sam xxx

Monday, March 22, 2010

oh my goodness!!!

Hiya everyone

Mum (Julie) and Bev attended a suppliers new premises launch yesterday - and it would appear that they brought a couple of things back for you

They have brought back a few paper ranges so I thought I would just show you a couple and then you can adventure off to have a look and find them,

What I will say is there are some great pieces within the ranges that are great for any project - cardmaking or scrapbooking.  I'm often stuck for journalling blocks that are right but there is a nice sheet with a few on there. 

So anyway the first one I thought I'd show you is the Aquarious from the Flower child range


oh and they are double sided too!!

Then I thought you might like a look at the Persuasion this particular sheet is the pesuasion blooms

and they are double sided too!!!

There is another range called Sophie too but I'm sure you can find that on your own - they are all HERE so have a look and see what you think.  I can't show you any samples we have made yet with them as they literally came out of the box until this morning and we had a workshop so no time today - I do however think there is a possibility that I may get a chance on Wednesday - however Bev and Mum might just get in there before me!!!

Hope you like them

Take care

Sam xxx

Saturday, March 20, 2010

What a day!!!

Evening everyone

Firstly can I just say a very big thankyou to Lucy and George again for a wonderful demonstration.  These ladies are very talented and commit to coming into Bee Crafty once a month and showing you various techniques and tools.  If you haven't yet seen the demo date for something you are waiting for - let us know - we plan in what we think is right at the time - but if it's not on that list and you want it - tell us and we'll do everything to accomodate you.

Now it was my youngest sons Birthday today and it was his very first one!!!!

A massive Happy Birthday to him and I thought I would show you the cards we made for him.

ok so this one was my effort - a stepper card.  I used and A3 sheet as the base, score into a tri fold and then the outer sections in half.  Then slice (I used a metal edge ruler and a finger knife) from the 1st fold to the last - I went 5cm from the top and bottom.  Then it's a case of picking the right embellishements to suit your project.


This was Mum's (Julie)  she used the Nana's nursery stack.  The skeleton of the card is a 12x12 scored and folded in half.  The Balloons have been cut on the Craft Robo as has the birthday sentiment.  With Ribon to hold the balloons and the letters were from an alpha sheet within the stack.  I think you would all agree that this card is lovely and the colours are wonderful.


Now this one was from Aunty Bev!  I absolutely love the colours she has used here (even if they did make it difficult for me to get a good picture).  Bev really gives her cards that Scrapbook feel - lots of layers attention to detail - notice the letters - cut on the original sizzix (we can cut these for you at the shop) she has inked teh edges and then faux stitched them with a white pen as is the number.

I love each of these cards and think we all did very well - I also think Harry did even better he got some lovely cards and presents and a lovely day was had by all.

Hope you liked them as much as we enjoyed making them.

Take Care

Sam xxx

Thursday, March 18, 2010

Julie and Bev have been playing with the Promarkers....

...and look at these little stunners


and last but not least

Now all of these are the Wild Rose studio stamps that I have told you about before. However what is noteable about all of the above is how they have been toned in with the colour choices from the promarkers. What this means is that as long as your colours are toned together they don't need to be identical - like the first one - all in pinks and creams - a great choice but by using a varied range of papers (and you can use your leftovers from other projects) it means that we can make creations for everyone - suited by their particular favourite colour.
As the title says these cards were made by Julie and Bev in the shop and for any further informaton please don't hesitate to contact us.

Take Care
Sam xxx

Monday, March 15, 2010

Did you all you mummies get spoiled yesterday?

Hiya everyone

I hope you all did.  I was very lucky to get some nice photo's that were taken at the Studio on the business park where we are located.  This is the third or fourth set of pictures we have had taken there and they are absolutely fabulous!!!

We had some lovely new inkpads in today.  The memento inkpads is fast drying and fade resistant. The innovative pad delivers finer impressions and exceptionally even coverage.


In a great selection of colours you can find them on our website here as these only came in today the section hasn't completed the update yet - please keep checking back.

We've still got a couple of spaces on the Distressed Notebook workshop on Monday 22nd March


This class is running 10am - 12noon and is £10 per person.

You can book a place on any of our workshops by clicking here and if there is something you would like to do but can't see then let us know and we'll do what we can to help.

Take Care

Sam xxx
Saturday, March 13, 2010

Glitzy Handbags Complete!!!


This was the very early stages of todays class with MJM - The Art Tart.

Michelle never fails to deliver on the fabulous teaching with her wonderful projects she's sharing with us and the ladies had a fabulous day.  The table got a bit messier than this though but I wanted you to see what I was talking about!!! 

There are still places (not many) for the next class she is doing 

 The Princess Pop Up Castle


This fantastic all day workshop runs from 10am - 4pm

The book closed is 12''x6'' opening to the pop up. Come and make your own magical kingdom, imagine it in blue for a boy or even a haunted castle!!!

Workshop includes the full instructions by Michelle Jackson-Mogford, use of all equipment, includes all necessary products, tea/coffee and freshly baked cakes from the on site bakery, and a full buffet lunch.

All for just £40

Hope you're all well

Take Care

Sam xxx