Wednesday, September 30, 2015

Marleen DT - Trees & Winter Wonderland

Hey guys..

Wednesday again and this weeks post for 

For today, Ive made a little christmas card. I normally start making christmas cards in the summer holiday, but as I still have left over from last year I didnt have to start too early this year..
So with that, it IS time to start though lol..

For today Ive used the "Trees & Winter Wonderland" stamp from the STORE.


 I really like simple christmas cards. Often because I have to make around 60-70 every year but often also because I know that after christmas they will all be binned.
I fully respect that but it does mean that I tend not to add too much embelishments on them.
And with that in mind, I love making the most of stamps and tools that can be used over and over to keep costs down yet still make fantastic looking projects.

This card is simple matting and layering with the stamps stamped with Archival ink. My background is made with an embossing folder and to finish it all off, I made a sparkle spray to jazz up the whole card.

If you wanna see how to make your own shimmer spray, Ive made a little YOUTUBE on how. Pop over to check it out.

And that is all from me for today.
Thanks for popping by and for any comments left behind.


Monday, September 28, 2015

Kerrie DT - 'Believe' - Black, White & Silver

Hiya and welcome to my Monday Post for Bee Crafty's Blog 

For this week's Project I could not resisit using my New Stamp 'Believe' from the Yuletide Collection, it's such a big big word stamp and I love it 

I really fancied a change this week so I grabbed my box of embossing powders and chose a silver and a black to use - I then raided my offcuts box again for some large pieces of Black, Silver, White Pearl and Silver Mirror Cardstock - I also grabbed a 7x7 Cardblank such a good size to use its become a fave of mine


To start I trimmed a piece of Silver Mirror card to a few mm smaller than the 7x7 cardblank, then a piece of White Pearl card a few mm smaller than the Silver Mirror card. I fixed them centred on the card front. I then chose a piece of Black Textured card and a piece of Music Score backing paper, these were both a little small for the card front but I got around that by cutting them to meet in the centre of the card front leaving a 6mm border on the White Pearl but before fixing these layers down I inked the edges of the music score using Black Soot Distress Ink, I randomly stamped the smaller Snowflake from the 'Yuletide - Snowflakes' stamp set using clear embossing ink which I then covered with Silver Embossing Powder, tapped off the excess and heated using my trusty old Heat Gun. I fixed both these layers onto the cardfront being careful to make sure they were straight, I used a wet adhesive so I had wiggle time.

I stamped the 'Yuletide - Believe' stamp onto a piece of plain black cardstock (which i had already trimmed to the size I wanted which I had measured and marked by eye and trimmed using a guilotine) again using clear embossing ink, tipped the silver embossing poweder over, tapped off the excess and heated using my Heat Gun, I then ran the clear embossing ink pad around the edge of the black card which I then dipped into the silver embossing powder, when i heated this it created a pretty frame. A pieve of White Pearl cardstock trimmed to size and used as a matt to the Believe topper I've created added some depth I inked that pearl white piece using the Black Soot Distress Ink and fixed to the card using foam tape.

I wanted to add some extra detail so I made the cute Snowflake embellishments by stamping the Large Snowflake from the 'Youtide - Snowflakes' set using clear embossing ink, tipping over some black embossing powder and heating, once cooled I fussy cut them, curved them using a bone folder and attached at the corners of the Believe topper using my Hot Glue Gun.


I really like how this card turned out, it was nice to get my older craft supplies out for a change and reminded me that I dont always need to have the next new thing I can use my old stuff and make pretty things 

Thank You so much for visiting today, please come back to the Bee Crafty Blog again soon for more Gorgeous Projects by the Amazing Design Team 

Krafty Hugs

Friday, September 25, 2015

Emily DT - Love

Hi everyone I hope you're all having a good week. 
This week I haven't used any stamps on my card. I have used the Love stencil and some glitter paste I have in my stash. 

Here is the finished card 


I taped down the stencil and used four colours of glitter paste. I tried to blend them so they all mix together a bit and I'm happy with the result. I love using a splash of colour on black card. 


I mounted it on silver glitter card and then onto my card blank 


It was very quick to do but takes a little while to dry! 

I hope you like it 

Emily x

Wednesday, September 23, 2015

Marleen DT - Mica Tags

Hi Blogger Friends.

Today I want to share some tags Ive made for 
Bee Crafty.

I have been busy lately with my online course that Tim holtz was teaching. Its called
Creative Chemistry 101 &102 and has really thaught me some new ways to make backgrounds.

The tags I made today I made while playing with some of the tecniques I learnt on the course.
Today I played with mica powders and an aray of stamps from the Bee Crafty STORE.


Both tags was made by first using distress inks to make my desired background. I then took my Bee Crafty Stamps and stamped with versamark and dusted with mica powder.
Yep it was really that easy.
I love the results and something I will deffinately do again.

And that is all from me for today.
Thanks for popping by and for any comments left behind.

Monday, September 21, 2015

Kerrie DT - Spookylicious Abi Grace

Hiya and Welcome to my Monday Post for Bee Crafty

Wowser these weeks are flying by so fast and Autumn is in full swing so out came my Halloween Stamps and papers 

I had a lot of fun making this card using the Gorgeous 'Spellbound Abi' stamp set, Ive added lots of layers and extra stamps 'Spooklicious' from the Spellbound Abi set, 'Spiderweb' & 'Spooky Scene' from the All Hallows collecion and the BEAUtanicals 'Large Branch


I coloured Spellbound Abi using my fave Alcohol Markers after stamping her using a pale grey inkpa to give the no lines look which I love. 

I stamped the Spooky Scene, Large Branch and Spooylicious onto a gorgeous Halloween Backing Paper from my stash to create the background of my card. I then added a few offcuts from my scrap box which I matted using silver mirror board off cuts (using offcuts for smaller layers is great as you then dont have to cut into new sheets and you save a lot of wasting)

The music score I cut from another seet of Halloween Backing Paper from the same pad as before - I love this paper pad and will be making a few more Halloween makes from it this year 

To finish up my card I have used lots of matt & layering, Diecuts, lots of distress inks for edges and I layered the elements using foam tape and jaunty angles 

Thank you so much for visiting the Bee Crafty Blog today, come back soon for more Gorgeous Makes by the Amazingly Talented Design Team I am always in Awe of the stunning creations they make 

Krafty Hugs xx

Friday, September 18, 2015

Emily DT - Balloon Girl

Hi everyone, hope the horrible weather has given us all an opportunity to do some crafting!
I have had my brusho paints out this week and this card is what I have made with them.


I have used my favourite colours which are blue and purple. I started by making lots of brusho backgrounds in all different colours. I chose this piece for this card because I thought the shape of the brusho pattern worked really well with the stamp. The brushos used on this background were ultramarine, turquoise and lemon.


Once it was dry I stamped the balloon girl in Momento ink as I find it gives a nice solid black image on the silhouette stamps.


I mounted it onto black card then put it to one side. For the back piece I used the inkables dots stencil and picked some distress ink colours to complement the topper. I used squeezed lemonade, dusty concorde, seedless preserve, salty ocean and chipped sapphire.


I also mounted the back piece onto black card and stuck it onto a card blank. The topper I mounted on raised sticky pads.
 I think the colours work really well together and I love having a black silhouette stamp on a coloured background.

I hope you like it!

Emily x

Wednesday, September 16, 2015

Marleen DT - Family Masterpiece

Hey everyone
And welcome to my blog.

Today I have a post for 

Ive used the stamp called "Family Masterpiece". You can find it in the STORE with all the other goodies.


This card is made using a tonic studio die. I simply just cut out the different parts and layered them all up.
I cut the heart (also using the die) and stamped my stamp in the middle and layered on the card.
I finished with a flower and some foliage and a little butterfly gem.

And that is all from me for today.
thank you for popping by and for any comments left behind.

Monday, September 14, 2015

Kerrie DT - Never Regret - simple card

Hiya and Welcome to my Monday Post for Bee Crafty

Today I'm sharing with you a simple card I made over the weekend - using just one focal stamps and lots of layers


I chose a really pretty floral backing paper for the backdrop of the card, die cut apertures and some peel off's to frame the gorgeous Wordage Stamp - 'Never Regret' - I really love this Sentiment and I use it a lot but I wanted to make this card as simple as possible to show off the stamp. I have used lots of Matt & Layers which is an old technique but works really well in lots of projects. The frame has been raised from the card front using foam tape to give dimension. I also wanted to show how peel off's can be used to tie together the busy background with the simple front panels. 

Thank You so much for visiting the Bee Crafty Blog today, please come back soon to see more gorgeous projects by the amazing Design Team

Krafty Hugs xx

Saturday, September 12, 2015

Clare DT Tree silhouette

Hi, it's Clare here again and I'm back with my little bit of Bee Crafty.  It's been my first full week of work so there hasn't been much crafting this week but fortunately, during the holidays, I made a batch of projects and I have something to show you this week.


Items used for this project are:
Beautanicals Tree Silhouette
Da Vinci  inspired script
Wordage live with no excuses 
Distress inks
Embossing powder - Clear

You can visit http://www.beecrafty.net to find all of these stamps and many more.


To start I stamped the script stamp all over the card in brown I know.   With my clear embossing stamp pad I stamped the tree and heat embossed with clear embossing powder.  

I then started to blend in my distress inks starting with squeezed lemonade in the centre of the card and gradually working in spiced marmalade and dried marigold with some walnut stain around the edge of the card.


That's my post for this week,  if you have enjoyed visiting why not follow the blog.  If you would like to leave a comment you can do this below.  

Happy crafting,
Big hugs, 
Clare x x x 

Friday, September 11, 2015

Emily DT - Smile

Hi everyone. I love using colour in my cards and crafting but this week I wanted to set myself a little challenge and do a card just using one colour. 

Here is the card I have made 

I started by choosing my stamps. I love making the most of my stamps so I am always looking at them in detail and finding bits I can use maybe in a different way from the norm. 
For this card I chose the Winged Things Pompadour stamp 


I used just the tail section and stamped all the way round my card blank and my topper using Tea Dye distress ink. 


I stamped my Wordage Smile sentiment into a scrap of card and mounted it and the topper onto Kraft card 


I finished the card with some coordinating ribbon. 

I was pleased with how it turned out. I hope you like it! 

Emily x

Wednesday, September 09, 2015

Marleen DT - Happy birthday

Morning everyone..

Once again wednesday and time for my slot for 

For today I've had a little play to try a new tecnique. I saw it somewhere, god knows where (sorry) but it stuck in my mind and I just HAD to try.
Basically its mirri card that is embossed and then painted before sanding..
Let me add the pics and talk it through as we go..

 Finished card..

 Here we go. Its a bit easier to explain with a photo.
I started by cutting a piece of red cardstock to fit my card blank. Then cut a sheet of red mirri card to fit leaving a border of the red cardstock to be shown.
I then took the mirri card and ran through my big shot with a butterfly embossing folder.
Once embossed I took a paint dabber with silver paint and dabbed it over the mirri card till it was fully covered and left it to fully dry.
Once paint was fully dry i took a sanding block and rubbed it over the paint till the red mirri card started to show through.

And then to my sentiment. I wanted to really make an impact with it, but its only a little stamp.
I used the "Happy Birthday / With Love" WORDage stamp from the Bee Crafty Store.
So I cut a panel of the red card and stamped, stamped and stamped lol..
Once all dry, I layered it all up and finished with gems and a felt butterfly.

I really love how this card came out. I love pulling out "old and used" goodies and giving them new life. And to combine them with something new, as I did with a new tecnique, only just makes it better.

And that is all from me for today.
Many thanks for popping by and for any comments left behind.


Monday, September 07, 2015

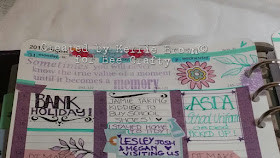
DT Kerrie - Planning with my Bee Crafty Stamps

Happy Monday and welcome to my Post for Bee Crafty

Wowser its been such a busy week with my 4 kiddies starting back at school today, all the uniform sorting and finishing up projects - nice to be back to routine but I miss them all - its so quiet today - but that does mean more time to craft so its all good 

I have been using some of my Fave Bee Crafty Stamps in my Purple Planner this week, hense why my post is a bit late as I was finishing up filling in Sunday xx


I stamped them using Chalk Inks, going over some details using my coloured fine liner pens - some across the tops and bottoms of the pages and some as accents on the plan days - I love to add colour and doodles to my planner pages but stamps are by far my favourite planning tool and im always on the look out for more designs and sets to use 


I couldnt resist filling these pages up using my 3 fave colours, Teal, Pink & Purple 


I hope I have given you a few ideas for using your stamps in other crafts - decorating planners is all the rage across instagram, facebook and blogs Im addicted but I have always loved to plan&list daily 

Thank You so much for visiting today to see my post - I hope you will come back soon to see more Gorgeous Makes by the Brilliant Design Team 

Krafty Hugs xx

Thursday, September 03, 2015

Emily DT - dandelion

Hi all this week I have had my ink duster brushes out. I love how they apply colour lightly and build it up. I have also used my favourite BEAUtanical stamp, the dandelion. 
Here is the card 


I started by making a mask from ripped paper and sticking everything down with low tack tape. 

I started applying colour using my ink dusters and distress inks. The colours used were mermaid lagoon, picked raspberry and dusty concord. 

I applied then one at a time and slowly built up the colour until I was happy with the result. 


Once it was dry I stamped the dandelion in archival black ink 


I chose a small sentiment to add to finish it off 


I have to say I totally love this card! I hope you do too 

See you next week 
Emily x

Wednesday, September 02, 2015

Marleen DT - Birthday Tag

Hey guys.

My appologies, Im a little late with my post today but better late then never..
Today Im sharing a little tag I've made for my daughter.
Its her birthday in a few days and as she hasnt really asked for anything we agreed she would just get money to put aside for a rainy day or when she want to buy new clothes for herself.

So I made a little tag to go with the money using the "Happy Birthday/Best wishes" stamp from the
  STORE.


The papers Ive used are a freebie from a magazine.

And that is all from me for today.
Many thanks for popping by and for any comments left behind.