Monday, October 31, 2016

Kerrie DT - All Hallow's Tag - Spookylicious

HAPPY HALLOWEEN!!! 
 and Welcome to my Monday Post for Bee Crafty

I love Halloween so much and will be spending the evening with my two youngest children and my Hubby making Jack-o-Lantern's and watching Hocus Pocus!! 

I hope you all enjoy your Halloween - Stay Safe! 

Today I am sharing with you a Halloween Tag I have made using some of the Gorgeous 'All Hallows' stamps and the 'Spellbound Abi' stamp which I love


I stamped the 'All Hallows -Spiderweb' stamp over the large tag using light grey ink and then inked the edges using 'Spiced Marmalade' distress ink and then 'Black Soot' distress ink just at the edge.

I cut a piece of black pearlescent cardstock to a few mm smaller than the tag, rounded the corners with a puch and glued to the front of the tag. I found an offcut of Halloween craft paper in my box and trimmed this to fit the side of the black card.

I stamped the 'All Hallows - Spooky Scene' onto white card using black ink, I fussy cut the tombstones and bats then inked over using 'Peeled Paint' distress ink. I attached the scene across the bottom of the tag using a hotglue gun and saved the bats for later.

I stamped 'Spellbound Abi' onto white card and coloured her using my pencils in colours to match the tag so far. I then stamped the edges using the 'All Hallows - Spiderweb' using black ink, I then lightly inked the edges using spiced marmalade, peeled paint and black soot distress inks. I matted the image onto black cardstock and fixed to the tag using foam tape. I then attached the bats from earlier using my hotglue gun.

To finish I added the sentiment using the 'Spookylicious' word from the 'Spellbound Abbie' stamp set

I hope you like my post today, I really enjoyed making the Tag it was a lot of fun

Please visit again soon to see the Gorgeous Projects by the Bee Crafty Design Team 

Krafty Hugs xx

Check out Kerrie's Blog to see more of her work

Saturday, October 29, 2016

Barbara DT - It's almost 'Poppy Time'.....

Morning everyone, Barbara here again with my regular Saturday post for Bee Crafty....
Today I want to show you a tag I made using the 'LIMITED EDITION POPPY' stamp...(find it HERE)
This stamp is brand new for 2016, and £2 from every sale is going to this years Poppy Appeal.
This was a very easy make......I started by cutting a tag shape out of black cardstock. Then I stamped the poppy TWICE onto red card, and the leaves & stem onto green card (all from Papermilldirect)
I decoupaged the poppy head to give it some interest and overlapped the seed pod, so it fit the tag a little better
All it needed then was the sentiment and a scrap of ribbon......I think 'Less is More' on this occasion.
Hope you like it, please leave a comment if you've been inspired.
Back soon,
Barbara x
 

Friday, October 28, 2016

Emily DT - Brusho background

Hi everyone

It's half term this week so I haven't had much time for crafting. I have managed to squeeze in making a quick and simple card which I think would suit a lot of occasions.

Here is the card I have made this week...


I started by creating my Brusho background. I used three of my favourite colours, turquoise, purple and violet. I adore using Brushos and love the different effects you can achieve. I get the effect below by sprinkling extra Brusho on after spraying on the water.


Once it was dry I trimmed it to a square then heat embossed the style wire circle and sentiment on in white.


I used distress inks in coordinating colours to stamp the dotty texture stamp around the outside of the circle.


I mounted it onto white and purple card then onto my card blank.
These are some of my favourite colours and I use them a lot when card making. I love how this card turned out and it was so quick to do.

I hope you like it too!

Emily x

Wednesday, October 26, 2016

Marleen DT

Hello dear bloggers 
and welcome..

Once again my turn to share a bit of inspiration for

I have another sample made with the fabuuuless stamps featured on Hochanda last week.
I used the "Art stamp sets, Ledger, nips and Ink"
Find it in the STORE with all the other amazing goodies..

This one is made on linnen card stock.
The background is smothered in different blues distressinks. I left it to FULLY dry before stamping the ledger with versamark and heat embossed with white embossing powder.
I took a dotted stencil and left on the background and sprayed a bit of water through. I removede the stencil and blotted the water up with a piece of kitchen towel. It removes a bit of the ink and leave like a ghost impressing.
I then cut my panel, stamped my feather with versamark and heat embossed also with white embossing powder. Once cooled I smothered the piece in the lighted blue distress ink I had before adding the same stencil as on the background and added a bit of a darker blue distress ink through.

I mounted both pieces of card on to black cardstock and layered onto my card blank.
I finished the card by stamping the nips on to a piece of black scrap card. I stamped with versamark and heat embossed with white embossing powder. I cut them out and added them to the card.

Should you wish to see my other samples from the last Hochanda show, also made with these stamps, just press HERE...

And that is it from me for today. I hope you like my creation.
Many thanks for popping by and for any comments left behind.
And dont forget to come visit me on FaceBook, Twitter, Instagram, Pinterest, Youtube or my FB page.
 Happy Crafting

Tuesday, October 25, 2016

Nothing Flies

Hi, The card I am sharing today is using the Feather Stamp Set that Bev featured on Hochanda last week. I absolutely adore them, they are simply beautiful and so well drawn, the detail is superb and they stamp like a dream. The stamp I have used coupled with one of the Bee Crafty Sentiments, shows just how little you have to add to make a lovely card or project.

At this point I wasn't 100% sure what size my finished card was going to be, so I took a sheet of Navy cardstock, dusted it with an anti static bag and embossed the feather using white fine detail embossing powder.

Then I took the sentiment, stamped using Versamark and embossed using the same detail powder. I then cut the card to 6 1/2 x 7''.

Next came the fun part, I wanted to add some splats to the design. I masked the edges first, mixed some white acrylic paint with a little water and started adding the distressed detail.

I wanted to keep this very simple as the feather speaks for itself, I cut a piece of white Centura Pearl to give me  a 1/4'' border around the card. Then wrapped some matching navy ribbon around it, securing it at the back with tape.

I secured my topper to the background using foam tape and Collall 3D Glue Gel before layering onto a coordinating navy card base.

Hopefully you like what I have shared with you today along with the step by step. It would be lovely to see you again soon so dont stay away too long. Take care and Happy Crafting.xx

Monday, October 24, 2016

DT Kerrie - 'Baby It's Cold Outside' - Beryl FASHIONette's

Hiya and Welcome to my Monday Post for Bee Crafty Stamps

This week I am sharing with you an 8x8inch Card that could be used as a Christmas or Winter Birthday card, I was inspired to use pale shades of ink for the background and bolder for the main image.


I love to use uncommon colours for my winter makes just to be a little different... blues with browns is one of my favourite combinations


For the background I used the 'Background Text' stamp from the 'Snow Words' stamp set which I stamped using 'Wheat' Versamagic Ink, I then stamped some 'Snowflakes' from the 'Snow Flake Flurry' stamp set using 'Aspen Mist' Versamagic Ink. I love the subtle look these pale inks give.


I stamped the gorgeous 'Beryl' from the 'FASHIONettes' collection using 'London Fog' Memento Ink and then coloured her using a mixture of my coloured pencils, I chose similar but bolder colours from the background to make her stand out. I drew over her eyes and eyelashes using an archival liner pen to make them pop


For the senitment I stamped 'Baby It's Cold Outside' from the 'Snow Words' stamp set, first using Aspen Mist and then I stamped again using 'Rich Cocoa' Memento Ink offset from the first to create a shadow effect.


I created the Flourishes using some diecuts and some snowflakes that i stamped onto pearlescent card using the Aspen Mist and Wheat inks from before. I cut the snowflakes out and layered them over the diecuts, adding gems for some bling.

I really love how this card has turned out, I may just have to make a few more for the festive season

Thank You so much for visiting my post today, please visit again soon for more gorgeous makes from the Awesome Design Team

Krafty Hugs xx
please visit Kerrie's Blog to see more her creations

Saturday, October 22, 2016

Barbara DT - Limited Edition Poppy......

Morning all, Barbara here again with a new stamp from BEE CRAFTY
Bev has released this gorgeous poppy stamp as a tribute to Remembrance Day.....it's a limited edition, and £2 from every sale goes to the Poppy Appeal.
I've made a few cards already with it, and will show them over the next week or so......
This card was done on 'Hopsack' cardstock, and as you can see, the image stamped beautifully.
I stamped with Versamark and heat-embossed the image, then did a bit of water-colouring with my distress inks.
I love the colour differences on the poppy.
In the background, I've part-stamped using the Da Vinci script (find it HERE) ...I love this stamp for backgrounds, and you'll find it quite a bit on my DT work for Bee Crafty.
The poppy stamp and sentiment can be found HERE  
But, don't forget it's a LIMITED EDITION.
Hope you like my creation.....I'll be back soon with more.
Have a good weekend,
Barbara x


Friday, October 21, 2016

Emily DT - Poppy

Hello everyone
Hands up who has seen the gorgeous new Poppy stamp from Bee Crafty! It is limited edition so get yours while you can.

My card this week is using this new stamp and I hope I have done it justice. Here is the card I have made...


I started by heat embossing just the head of the poppy in white on some white card. I then did the same with the Remember sentiment.


I went over the whole thing with Fired Brick distress ink and a blending tool. My new Bee Crafty blending mat makes blending so much easier! I went over the whole card once then went round the edges a second time to get the edges slightly darker.


I splattered some water drops over it and blotted it with kitchen roll, then I went all round the edge with black distress ink.


I mounted it onto white and black card and then onto my card blank. It is an 8x8 card so you can see that the stamp is really quite large and can definitely hold its own as a feature on a large card.

I hope you like it as much as I do. This was one of those cards where I didn't start with a plan, it just evolved.

See you next week

Emily x

Wednesday, October 19, 2016

Marleen DT - Hochanda samples

Hello bloggers..

Well today I will really just re-cap the samples I had on the BeeCrafty show on Hochanda this past monday. It was 3 amazing shows.
Not only did our Bev recreate 1 of my projects, no she did 3.. Such a buzz.. Thank you Bev x

For this show we all used the feather collection stamps, the art boards and the BRAND NEW paper packs. I got the background ones and had not seen the xxx till the show.. got they are both yummy.
My favorite one is the background one and im guessing the girls sent that one to me, as they know I LOVE scrapbooking and these background are just perfect for that as well as cards, mixed media, canvases ect ect.. So yep.. I jumped right in and made a LO (LayOut).

I got the 8x8 pack. Such a great size even for scrapbooking. I have some ideas using these papers for a second LO but it will be built on a 12x12 plain background ;-)
On this LO I added more interest on the background but stamping different elements from the stamps. The loops you see around the edges, is from the "hope & faith" loop stamp. I just only added ink to a little bit of the stamp. I also used just the words from the same stamp above the pic, just inking the word. The clock and cogs are cut from a second paper and layers on and my feather, inkwell, nips and the wings are stamped on to a piece of the paper pack, heat embossed, cut out and layered on the the LO. I finished by stamping my greeting in black strait under the pic.
This one is made with the paper pack as well. Simply just 1 sheet cut to size fitting the card with a blck mat. I stamped the ledger stamp with peeled paint distress ink as well as distressing the egdes with the same ink. I then stamped my feathers with black Archival ink.
I took my "Time flies" stamp and cut it apart to get "time flies" bit on its own. Dont worry, you can assemble your stamp on the stamp block again and no one will ever know the stamp was cut ;-)
I aslo stamped my greetings in Archival.
 ah I love the colour on this one. This one came about as I wanted some more dimention on my cards. But there are strict rules on what goodies we are allowed to use on the samples for the TV show. You see, if we start using goodies that Hochanda dont sell, Hochanda could get in trouble. And also our job is to promote BeeCrafty. So rules are that we may use the goodies from BeeCrafty that Bev has had on recent shows. After getting the ok from the girls, I pulled out my BeeCrafty Inkables. FOr this one I used the small star "inny" to emboss into my card. I smothered the who card in "Picked Raspberry" distress ink before I outlined the stars with a white pen.
My wings, I stamped onto white cardstock and heat embossed with white glitter embosing powder, cut them out and finished them with a wee gem.
 \I really love this one. But yellow is my favorite colour so no surprise lol. I used the circle inkables to make my backgrouns and the rest is just stamping.
The nips are strait onto my card itself and the feather is raised on a black mat using foampads.
 Another yellow creation.Bev recreated this one. A bit more vintage looking this one I think.
Watercolour card stock. Water wash distress ink background. My wings are white embossing powder and I used the heart "inny" inkable to gently make the heart on the background.
I just gently swiped the colour out from the middle of the heart "inny"out to the egdes.
I finished with water splashes and black splashes using my splatter brush.
  A shaker card.. Something I've only just started making...
Background is distress ink puddles where I just dragged my card through and left to dry. I then stamped on my feather and slowly cut it out. I stuck accetate on the back of the feather hole.
I then added my black mat to my card blank so it was ready. I turned my feather piece over and added double sided foam tape all around the feather and the edges. Make sure there is NO gaps around the feather or your sequins will fall out. I put my sequins down on the black card and added the feather piece over. I finished with my greeting and hand drawn stitches.
 Bev recreated this one as well. Its a simple distress ink background where I just stamped the large wings with versamark and heat embossed with clear embossing powder.
I stamped the wing again and my greeting on a panel of vellum and heat embossed with gold embossing powder. Voila.. Very quick and easy.
 And last but not least... My art board.. I am still new to these and It came as a surprise to me that it has been my most successful project from this show. It has gotten so many compliments since posted and Bev recreated this as well.
I simply stuck some paper on is from the Background pack, added a few extra bits I cut from a second sheets. Smothered it in matching distress ink (These papers matche the distress ink palet SO well. think this one is victorian velvet but not 100% sure)  and stamped the nips and the ledger in the same colour. I stamped the feather and ink well and heat embossed with gold, cut them out and layered ontop. I finished with a bit of gold embossing powder around the edges and stamping my greeting in black Archival.

And that is it from me for today. I hope you like my creations.
Many thanks for popping by and for any comments left behind.
And dont forget to come visit me on FaceBook, Twitter, Instagram, Pinterest, Youtube or my FB page.
 Happy Crafting


Tuesday, October 18, 2016

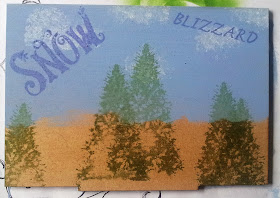
Blizzard

Bev from Bee Crafty launched the MDF on Hochanda during the 'Live from Ally Pally' shows, it was so popular that it sold out twice during the show. Luckily when she launched the New Christmas Stamps on 26th September was able to bring it back. It's wonderful quality and I have loved using it. I am sharing this project which I made with it along with the stamps from the last 2 launches, they all work so well together.

There was no need to prime the MDF first, I painted the sky with Grandma's Teacup Acrylic paint from Indigo Blu, I dragged the brush a little to get some texture. To add the clouds I stippled some System 3 white paint from Daler Rowney, it's incredibly thick and gives great texture.

When this was dry I stamped the words 'Snow' from one sentiment and 'Blizzard' from another using Cobalt Archival Ink and left to dry.

Using Bamboo Leaves Memento ink, I stamped the trees at varying heights to give some perspective and add distance to the project once I had added the landscape.

To add the landscape I used Texture Paste, I coloured it here to show up better on the photos, but thinking about it now I didn't need to for this. I added the paste with a palette knife making the mountain range as real looking as possible.

Next I added the snowflakes to the sky using Blueprint Sketch Distress ink.

I then used Titanium white Acrylic paint to colour the mountains, then adding a small amount of black I added some texture here and there. Next I added some blue to the mountains and also some Grandma's teacup to add the contrast. When this was dry, I added some Cosmic Shimmer glue to areas over the mountains and added Ice Diamonds for the sparkle.

Thank you for joining me again today, I really hope you have enjoyed this project and the step by step. Take care and Happy Crafting.xx

Monday, October 17, 2016

Bee Crafty on Hochanda!

Hiya and welcome to my Monday post for Bee Crafty

Today our Bev is live on Hochanda at 10am, 1pm & 5pm with the gorgeous Feathers stamps sets and the New Steampunk papers which are all gorgeous

I made some lovely new samples for today's shows but due to wanting to get them sent on time I forgot to take any pictures Doh!!!!

So instead I am re-sharing some of my feather makes from last time

We all hope you will join Bev and enjoy some of her yummy inspiration

Thank you so much for visiting  today

Krafty Hugs xx
KERRIE

Saturday, October 15, 2016

Barbara DT - Sneaky Peeks.......

Morning everyone, I'm back today with a sneaky look at the stamps Bev is bringing to Hochanda on Monday 17th Oct. 
Sometimes when I receive my DT stamps, I look to see how many ways I can use them, and often I chop them up to make other images.
I've done just this with the set called 'Feather Dreamer' (find it HERE )
 I cut the feather in two, and used the larger part for this card, masking and stamping with Adirondack inks on hammered card.
What do you think??
It would be great if you could leave a comment....good OR bad, it's the only way we know if we're 'hitting the spot' with inspiration.
Catch you soon, don't forget to checkout the times for the Hochanda shows......a little birdie tells me there's some fab new products, but you'll have to tune in to see what they are!
Barbara xx

Friday, October 14, 2016

Emily DT - Autumn Leaves

Hi everyone, this week the weather has turned colder and much more Autumnal which has inspired this week's card.
Here is the card I have made...


I started by colouring two pieces of card using Brusho paints. I sprinkled the Brushos on and then spritz them with water. I used gamboge, lemon, brown, sandstone and brilliant red.


Once they were dry I stamped the smaller oak leaf on and cut them out. Although I used the smaller leaf, this is an 8x8 card so they are still a fair size!


I cut a square of white card and stamped the Serendipity sentiment in the bottom corner. I then stuck on the leaves in a random pattern using foam pads, I used two foam pads on top of each other to add dimension,


I love the colours of the leaves and the effects that the Brushos create. I think the leaf stamps are perfect for this time of year and the sentiment can be altered to match the occasion.

I love how it turned out. I hope you like it too!

Emily x