Saturday, December 31, 2016

Last Post of 2016....

Morning everyone, and welcome to my very last post of 2016.....
Again, because I haven't been crafting this week, I've picked out a few more of my favourite DT samples which I've made for Bee Crafty over the past year.
All Stamps, stencils, distress inks, etc. can be found on the Bee Crafty website (HERE)


 As you can see, I have more than one favourite ....... ;-)


Well, hope you like this little selection, and also hope it has given you some inspiration to join the Bee Crafty challenges in the coming year.
All that's left to do now is wish you all a very happy, healthy & peaceful 2017.
 Thanks for all the wonderful comments left for my creations on the Bee Crafty Facebook page (and lots of others).
See you all next year!
Barbara xx

Friday, December 30, 2016

Emily DT - purple tag

Hi everyone, my post is a bit late today as I have been working overtime this week (boo!!) but here it is better late than never...


I used a scrap of card and added distress inks in shades of purple using my round ink applicator. I then stamped the clover border along the bottom edge in black Memento ink.


I then stamped the sentiment and mounted on black card and it was done! Very quick and easy project this week due to having next to no time.


See you all in the New Year!

Emily x

Wednesday, December 28, 2016

Marleen DT - Backdrops XL

Hey Blogger
and first of all let me wish you and yours a MERRY CHRISTMAS.
I hope you had an amazing time full of love and way too much food lol.

Its once again wednesday and my turn to share some inspiration for
BeeCrafty..

For today I've had a play with my new stamps..
I ordered some of the backdrop XL stamps. I have had my eye on them for a long time and Im so delighted to finally get my hands on them lol.


 These stamps truly ARE XL and they are amazing. The are the same fantastic quality as all the other BeeCrafty Stamps.. Perfect impression first time and so easy to use.

I decided to just have a play with these, to make a basic background with each of them simply to "get to know" them. I lay down a light background colour of distress ink on my card stock and left to dry. Once totally dry, I stamped my XL stamps with versamark and heat set with clear embossing powder.
I then took a darker colour of distress ink and smothered over my stamped piece.

The clear embossing powder trap the lighter colour so when you add the darker ink, the embossing powder resists the ink and the light colour shows up.


 The 2 cards above are made the same way. I made my backgrounds as above and then used some word dies to cut out my sentiments. I added a darkers mat under to make the letters stamd out a bit more and finished with a few gems (on the brown one).

 
On this one I decided to only use a cut out of my background. I simply too my background and ran it through my bigshot using a start die. (If you dont have a diecutting machine, you can use one of the INKABLES and handcut it)
I matted and layered my star and finished my card with a diecut sentiment and a few sequins.

I had a ton of fun making these 3 wee cards and I look forward to explore more ideas using these XL stamps.

 And that is it from me for today. Thanks for popping by and for any comments left behind.
Dont forget to come visit me on FaceBook, Twitter, Instagram, Pinterest, Youtube or my FB page.
 Happy Crafting

Saturday, December 24, 2016

Barbara DT - A Few Of My Favourites from 2016

Hi Folks, no time to craft this week, but just thought I'd show a few of my fave DT cards using stamps from
These were from earlier in the year....I'll have a few more to show next week, before having lots of new creations to blog in 2017
All stamps, stencils and inks can be found on the Bee Crafty website HERE
All cards are made with cardstock from  


 Hope you like this batch of DT work.....
Have an amazing Christmas & New Year, with lots of good wishes for 2017.
Thanks for popping over to the Bee Crafty blog during the past 12 months.
Barbara.
xx

Friday, December 23, 2016

Emily DT - Baby it's cold outside!

Hi everyone,

Happy Christmas! I have a beautiful wintry card to show you today, using colours that are not typically used around Christmas.

Here is the card I have made...


I started by using the large square inkable to create a square coloured with Brushos. I used lime green, lemon and emerald green.

I heat embossed the sentiment in white in the middle.


I stamped the large and small snowflakes round the edge in pale blue and green inks.


I cut a layer to fit underneath and coloured it using various green distress inks to coordinate with the brushos.

I hope you like it!

Emily

Wednesday, December 21, 2016

Marleen DT - Hochanda Samples

Hi bloggers
Wednesday again and my turn to share my weekly post for BeeCrafty.

Did you catch Bev on Hochanda the other day? Great shows as always.
Here are all my samples from the show:


All these projects are very simple but this is why I love playing with stamps. You can do SO much and still get so many different looks. 

All Ive used for these projects are Card or MDF, embossing powder and inks. And then a big selection of stamps as well as the inkables.

Backdrops Border Set ~ Clover & Poppies
Backdrops Border Set ~ Distressed Flower & Mushrooms
Bee Crafty Wordage Set ~ Inspirational Words 1
Blending Mats
Inkables

Find all these goodies and much more in the STORE

 And that is it from me for today. Thanks for popping by and for any comments left behind.
Dont forget to come visit me on FaceBook, Twitter, Instagram, Pinterest, Youtube or my FB page.
 Happy Crafting

Saturday, December 17, 2016

Barbara DT ~ With Love......At Christmas

Hi again, Barbara here with a very quick post......I don't know about anyone else, but my feet haven't  touched the ground this week, lots of baby-sitting and not much time to craft I'm afraid.
 I made a card last weekend for a friend using ALL Bee Crafty stamps, but forgot to take a photo before I posted it, so I re-created it for my son & d-i-l using a computer generated sentiment.
I've used white 'Hemp' cardstock from Papermilldirect as a base and extra layers, then stamped the holly and fir branches from Large Fir Fronds & Holly and Swirl border (find them HERE ).... I used various shades of green Adirondack inks. The holly leaves were stamped 5 more times onto scrap card then fussy-cut. I mounted them around the main image, just to add a bit of interest.
I then added a load of coloured jewels to brighten it up.
 Hope you like it....
Don't forget to get your entries into the Bee Crafty monthly challenge on Facebook.....there's a prize of £20. You MUST use Bee Crafty stamps though, of course.
Back soon with another post.
Barbara x


Friday, December 16, 2016

Emily DT - Season's Greetings

Hi everyone, hopefully everyone saw Bev on Hochanda yesterday. For those still making Christmas cards I have some last minute inspiration for you.

Here is the card I have made...


I stated by making a brusho background using turquoise and purple brushos. Once it was dry I stamped on the winter trees in blue and black trees.


I tore a strip of white card and stuck it at the bottom then stamped the sentiment onto it.


I finished it off with some glitter and love how it turned out! This was so quick and easy to make and could be done with other colours of sky.

I hope you like it. See you next week!

Emily

Wednesday, December 14, 2016

Marleen DT - The last few christmas cards..

Hey bloggers..

Once again wednesday and my turn for some inspiration for 

Did you see my post last week?? I made some backgrounds with some of the christmas stamps and some paints. Great fun. (Find the post HERE).
Well for today I made some more cards with these backgrounds.


Stamps I used for these projects:
You can find them in the BeeCrafty STORE.
These 2 cards are A5 and made with the backgrounds I made for last week
(link for last weeks post, above).
I matted and layered my cards blank with black and my backgrounds sheets from last week. I then stamped with versamark and heat set with black embossing powder.

The "Xmas" on the top card is a die from my stash (sorry I dont know from what company)
I diecut it from my gelli plate sheet and also from cheap white card stock 3 times and glued them all together before adding it onto of a black card stock panel.

The "seasons greetings"is indeed a BeeCrafty stamp. Stamped with versamrk and heat set with black embossing powder on a panel of my background paper.
 And that is it from me for today. Thanks for popping by and for any comments left behind.
Dont forget to come visit me on FaceBook, Twitter, Instagram, Pinterest, Youtube or my FB page.
 Happy Crafting

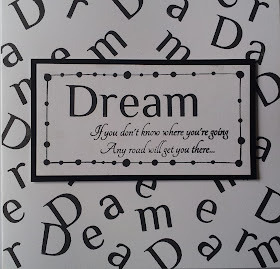
Dream

Morning. I hope you are all well. I am sure everyone is frantically getting ready for Christmas. Bev will be back on Hochanda tomorrow with some more wonderful stamps, so make sure you tune in at 11 am, 3 pm and 6 pm. Today I am sharing a card I made for the Bee Crafty show on Hochanda, using the Dream stamp. I wanted a very simple card and decided on Black and white, although any colour would look great or even multi coloured. It would be a nice idea to maybe stick with black and then pick out a specific word with a bright colour.

Stupidly, I forgot to take photos as I was making up the design. It's such a simple card so it will be easy to explain step by step.

I started off with my white 8'' square card blank and stamped separate letters from the 'Dream' stamp all across the card, using black Archival ink. Be careful to clean after each letter to avoid any unwanted marks on your card.

On another piece of white card, I stamped the main word 'Dream' and then positioned my 'Any Road' sentiment beneath. Finally using one of the 'Style Wire' border stamps, I created a box for it.

I then backed it onto black card giving a strong edge to separate it from the background. Then I attached it to my base card using foam tape.

A very strong look, but very clean and simple at the same time.

Thank you for taking a look today, I hope you like the finished card. I will be sharing some launch designs tomorrow on my blog, so I hope you will take a look and please dont miss the shows. Take care and Happy Crafting.

Sunday, December 11, 2016

Barbara DT ~ A Late Saturday Post......

Hi everyone, apologies for the late post, but my feet haven't touched the ground this week, although I'm sure you will all be the same......unless you're an organised type of person, which I'm am definitely not!
Anyway, here is my DT card for this week, made with snowflakes, HERE .....white, coloured & black embossing powders and an inky background from my 'inky store'.
The cardstock is the new 'Hemp' from Papermilldirect.
 After die-cutting four squares, I stamped each one with a selection of snowflakes in various embossing powders.
I inked the extreme edges with distress ink, and added a sentiment.
Double-mounted onto white 'Hemp' cardstock and 'voila', finished.
Hope you like it ;-)
Catch you soon, Barbara x

Wednesday, December 07, 2016

Marleen DT - Paint and stamps on gelli plate

Hello Bloggers 
and thank you if you have made it to my blog..

Well busy busy day today.. I have been busy making samples for the December show on Hochanda for BeeCrafty..

oh I so wish I could spill the beans but nope.. My lips are sealed hehehehehe...

Instead I have a christmas project to share.. I teased a bit about this project the other day in the BeeCrafty Facebook Group (come join us if you arent already a memeber)

Basically I have this wonderful Gelli plate my husband gifted me (after much hinting and frustation that I couldnt get the ingredients to make my own)
Ive used it a couple of times and LOVE it BUT I end up with all these amazing and fun backgrounds that i never get round to using. Well I decided to play with it, but with the goal of making a couple of BeeCrafty projects.
So out the Gelli came, then the paints and card stock.. and then the fun part.. My BeeCrafty stamps.


 Now Im new to the Gelli plate so dont have too much knowledge yet but I basically just spread blue and silver acrylic paint (I use cheap paint from the £shop and supermarked) on to the Gelli. I spread it with a brayer. I then pressed the stamps into the paint till I got the pattern I wanted. I then took a sheet of card stock (I used 160g cheap white card) and pressed over the gelli plate. Pulled the card of the plate and voila, one sheet of backing paper made..

I added a bit of paint here and there, tried different stamps. Some sheets came out great, some didnt. I really think it has a lot to do with the size if the stamp design and on how much paint is on the plate. I didnt waste any of the sheets though. The one lying in the very back on the pic above is the one that didnt come out too well but its used on a different project Ill share another day.

Its a really fun tool and Im delighted to have it in my craft room and I think I will be using it much more with all my other BeeCrafty Stamps.


For these 2 projects I ended up only using 1 of the sheets I made. I just love how the holy stamp is in the background as well as up front.
Stamps I used:

You can find them in the BeeCrafty STORE.


 And that is it from me for today.Thanks for popping by and for any comments left behind.
Dont forget to come visit me on FaceBook, Twitter, Instagram, Pinterest, Youtube or my FB page.
 Happy Crafting