Sunday, December 25, 2022
Alison CT - Tags
Saturday, December 24, 2022
Sally CT - A Vintage journal page
Hi there! I am here with a vintage journal page step by step for you today.
I began by arranging some torn scraps of book page, music and patterned paper on a journal page and stuck it down with matte medium.next I stencilled some walnut stain distress ink around the edges where the papers hadn't quite met.
I found a torn piece of corrugated kraft card and sponged walnut stain ink around that too
I added some stamping using the doodle art mandala stamps again in walnut stain.
next I attached the panel to the background, adding some braid too, with gel medium.
with the tag inkables I added a bit of texture paste...
then used distress crayons in hickory smoke and salty ocean to add a few lines around the page. I also added a little gilding wax on the corrugated card and the texture paste,
finishing off with a splatter of white gloss spray (not a spray - just unscrew the top, hold the pipe over the project and tap).
I stamped the three butterflies in versafine clair ink and coloured with ecolines before die cutting.
Finally I used gel medium to add these to the corrugated panel.
Wednesday, December 21, 2022
Countdown to Christmas by CT Ann
Countdown to Christmas
By CT Ann
I’ve gone all out with a sparkly tag today & want to wish you all a very Merry Christmas
🎄🥂💖
I used:
Distress Oxide Inks: Tumbled Glass/ Spun Sugar/ Speckled Egg/ Kitsch Flamingo / Salvaged Patina
Brilliance Moonlight White Ink
Inkable: Alternate Circles
D’Inkable: Regular Dots
Stickles Glitter Gel: Moon Dust
Stamp: Wreath
Embossing Ink
Ribbon
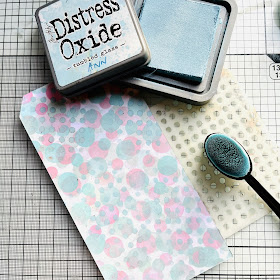
Start with the palest Distress Oxide Inks & the Alternate Circles Inkable building up a bokeh style background on to your tag. I used Tumbled Glass to start, going very lightly at first…
Next was Spun Sugar… keep rotating / moving the Inkable each time you change inks…
Then Speckled Egg …
Then using the Regular Dots D’Inkable add Tumbled Glass & Kitsch Flamingo with a little more pressure..
Finally I used Brilliance Moonlight White over the top this gave the whole tag a softness / blurred look as in bokeh effects…
Next spread some Stickles Glitter Gel through the Alternate Circles Inkable & leave to dry…
On a separate piece of paper stamp the Merry Christmas sentiment in embossing ink, sprinkle with gold powder, shake excess off & heat until molten. Cut out the sentiment..
When the gel is dry glue the sentiment onto it using foam pads & add a few sequins & a ribbon…
Thank you for stopping by…
Merry Christmas
Ann xxx
Sunday, December 18, 2022
Alison CT - Transparency ATCs
Then I chose three of the faces transparencies and stapled them to the backgrounds. I used staples to add a further texture to the ATCs.
Finally, on a seperate piece of card, I stamped my chosen sentiment using versafine clair nocturne ink. I then cut it into three seperate pieces and glued them to my ATCs.
Products used:
Saturday, December 17, 2022
Sally CT - icy tag
Hi There
Thought I would show you how I made this shimmery icy tag.
once it was dry I stuck it onto the white mount and added a winter wordy sticker, some sequins and a ribbon.
Here is the finished tag once more.
I used :
Thanks for looking!
Sunday, December 11, 2022
Alison CT - Noel
Saturday, December 10, 2022
Sally CT - Snowy Robin card
Hi There! Here is a step by step card as I rattle off as many Christmas cards as I can, lol.
I began by stamping the robin and colouring him in using markersNext I stencilled the snowflakes in broken China around the robin using the snowflake dinkableOn the base card I used the splatter dinkable to add some stickles gel through
next I stamped, coloured and cut out three lots of the foliage and added them to the robin's branch.
I used one of the Winter stickers , layered on a scrap of card....
and here is the finished card once more.


