Friday, March 31, 2017

Emily DT - Teasels

Hi everyone, it's been a busy week this week preparing samples for the Live from Ally Pally show, but I have managed to find some time to make this card. I don't often start a card knowing exactly what I want it to look like, but on this occasion I had a very definite idea from the outset.

Here is the card I have made...


I started by cutting a square of card and masking off a strip which I then coloured using distress inks and ink duster brushes. I like using these sometimes as they give a much softer colour than a blending tool.

I then stamped the small teasel stamp in the same colours multiple times in a random design.


I then got rid of my paper mask and stamped the large teasel over the top three times in black memento ink, bending the stalk to get the effect I was after.


A quick sentiment later and it was finished. I chose one of my favourite sentiments, which works so well with any of the beautanicals stamps.


I mounted it on black and then onto a card blank. I love how it turned out and it is exactly how I pictured it. I hope you like it!

See you next week
Emily x

Saturday, March 25, 2017

Spring is here.......

Hi folks, Barbara back again with my regular weekend post using Bee Crafty stamps & products.
Because it's Spring, (or supposed to be) I've done butterflies....again! (I saw some in my garden last week) And, not only one card for you this weekend but TWO......how good am I? LOL
Anyway, both cards were made using the same design and stamp, but because I've used different colours, they look totally different!
Black embossing powder and 'watercoloured' with Adirondack inks. I've covered each butterfly with Glossy Accents to make them shine, and added a few sequins.
The cardstock is white 'hemp' which I love because of the texture.
This card has the butterflies embossed in gold, then mounted onto gold mirri-card. Again, it has been 'watercoloured with inks.
So, two totally different colour schemes, which do you like best??
Back soon with more cards using brand new Bee Crafty stamps...yeah!
Barbara x


Friday, March 24, 2017

Emily DT - Life Is Good

Hi everyone, I've had a bit of time this week to play with some new stamps, one of which is the beautiful 'life is good' sentiment. As soon as I got it I wanted to use it so I made this card...


I started by cutting a square of white card and masking off a strip to colour. I coloured it using inking brushes and Distress Inks. I then stamped over using the Beautanicals leaf set in the same colours.


I stamped the sentiment in the bottom corner in black memento ink and also added some leaves in black.


I then mounted it on black and onto my card blank.

I'm really pleased with how it turned out because green isn't a colour I use very often.

I hope you like it too!

Emily x

Wednesday, March 22, 2017

Marleen DT - Youtube, Sentiment stamp background.

Hey Bloggers
For todays DT project for BeeCrafty, I have made a little youtube..
Hope you enjoy.
All the stamps can be gotten in the BeeCrafty STORE.

 Thanks for popping by and for any comments left behind.
Dont forget to come visit me on FaceBook, Twitter, Instagram, Pinterest, Youtube or my FB page.
 Happy Crafting

Monday, March 20, 2017

Kerrie DT - Steampunk Stories - Hochanda Samples

Hiya and Welcome to my Monday Post for Bee Crafty Stamps

We all hope you enjoyed watching the Bee Crafty Shows on Hochanda with Our Bev & Our Sam weren't they just amazing and so inspiring, I always love to see their Demo's... Unfortunately I missed the last post so my Samples didnt make it to the shop on time so they were not shown on the show so I am sharing them with you here instead... I shared one last week but in case you missed it... they are all here today...


This is the one I shared here on the Blog last week... If you havent seen the post click on the link below to see how I made it


For this make I have inked the Background cardstock using Peeled Paint and Tumbled Glass distress inks, Then stamped one of the Style Wire Borders around the edge. For the main Image I stamped the beautiful 'Steampunk Stories - Rosie' onto white linen cardsstock using archival ink. I then inked around the edges with the 2 distress inks again. I then tapped the Peeled Paint distress inkpad onto my glass craft mat, spritzed with water, picked up the colour using a paint brush and painted over her eyes and her dress. I then stamped 'Wordage 'Love Love' onto an offcut of the linen cardstock using archival ink and inked the edges using Tumbled Glass distress ink. I matted all the pieces using black cardstock and layered them up on a 7x7 inch Cardblank.


For this one I used a piece of grey board which I prepped using white gesso on a dry brush to create a distressed look background. I then stamped the Bolt from 'Steampunk Stories - Cog Set' just onto the edges of 3 sides and fully onto the 4th side. I inked over using Tea Dye distress ink. I then trimmed a piece of the Steampunk Background Papers, inked the eges and glued to the background. On leftover greyboard that I had prepped using white gesso, I stamped 'Steampunk Stories - Rosie', I then coloured over her hair using some brown coloured pencils, trimmed her out using sharp scissors, inked the edges and fixed to the background but overlapping the background paper. On another leftover piece of greyboard which I left unprepped I stamped 'Wordage - Making Memories' I then roughly painted gesso around the edges and lightl inked using Frayed Burlap distress ink. To finish I added some paper flowers that I inked using Frayed Burlap distress ink and fixed to the project using a hot glue gun.


For this one I trimmed a piece of linen cardstock to a half cm smaller than a 5x7 cardblank. I inked this piece of cardstock using Squeezed Lemonade & Tattered Rose distress inks. I stamped the postcard script from 'Steampunk Stories - Post Card Set' in the corner along the long side on the right of the cardstock piece. I stuck down some 'Jointing Tape' (pinched from hubby's toolshed) under where I would attach the main image. For the main image I stamped 'Steampunk Stories - Violinist' onto watercolour card which I had pre-trimmed to a nice size for the card front. I then watercoloured her using Victorian Velvet, Tattered Rose & Frayed Burlap distress inks that I dabbed onto my glass craft mat, I painted them on using a water spritzer first and lifting the colours from the mat using a paint brush. I had stamped the image using a pale inkpad so when I painted over her she looked more like a painted sketch. To finish my card I inked a few paper flowers using a makeup sponge and Frayed Burlap distress ink.

I hope these have shown you a few other ways to use your 'Steampunk Stories' stamps, I'm a big fan of soft vintage colours so these were perfect to use with the stamps

Please visit again soon to see more gorgeous makes from the Bee Crafty Design Team

Krafty Hugs xx

Saturday, March 18, 2017

Barbara DT - Rainbow Feathers

Morning everyone, I'm back with my usual Saturday post for Bee Crafty......did you miss me last week? I was still on holiday, but it's the very first weekend I've missed blogging in over a year of being on the DT ;-)
Anyway, I'm here today with a card using the feather stamps from 
I stamped in Versamark and heat-embossed with white ep, then simply inked around the image with various colours of Adirondacks.
A sentiment and a few jewels and I was done.  ( less is more, as they say ) 
Lots of matting & layering onto the same colours of cardstock, enabled me to turn this into an 8" x 8" card, for more impact.
 Hope you like it.

Back soon xx

Wednesday, March 15, 2017

Marleen DT - Youtube tutorial

Hey Bloggers

For todays DT project for BeeCrafty, I have made a little youtube..
Hope you enjoy.


All the stamps can be gotten in the BeeCrafty STORE.

 Thanks for popping by and for any comments left behind.
Dont forget to come visit me on FaceBook, Twitter, Instagram, Pinterest, Youtube or my FB page.
 Happy Crafting


Monday, March 13, 2017

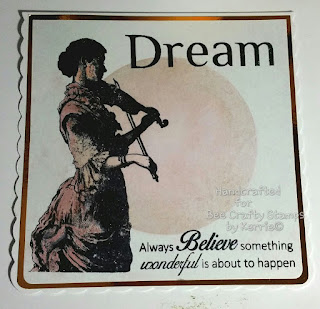
Kerrie DT - Steampunk - Violinist

Hiya and Welcome to my Monday Post for Bee Crafty

Today I am sharing with you one of my Project's using the New Steampunk Collection that Our Bev & Sam are bringing to Hochanda on Wednesday... don't forget to tune in and watch our girlies and their amazing demonstrations

Bee Crafty products used...

Steampunk - Violinist - polymer stamp
Wordage - Dream - polymer stamp
Wordage - Always Believe - polymer stamp
Inkables Template - 6" Circle - easy frame


I trimmed a piece of white pearlescent cardstock to 5.5" which I then rounded 2 corners using a corner punch. I used low rack masking rape to hold down the circle template then inked through it using Victorian Velvet & Frayed Burlap distress inks. I then carefully removed the template and used my heat tool to dry the distress inks.

I then stamped the Violinist using black archival ink and tipped clear embossing powder over her and tapped off the excess I then heated the embossing powder using my heat tool which created a raised glossy effect overy the stamped image. I Then used Victorain Velvethe,  Tattered Rose and Frayed Burlap distress markers to watercolour the image by first scribbling them into my inking mat, spritz in with a water spray and lifting the colour with a paint brush and pained over parts of the stamped image.

I stamped the Dream and Always Believe Wordage stamps onto the card front at the tip and the bottom using black archival ink.

I used Brown Mirror Board for a Mattime behind the card front and fixed to the front of a scalloped 6x6" cardblank

Thank You for visiting today... do come back again soon to see what the clever Design Team have been creating with more of the Steampunk Collection

Kraft Hugs xx
KERRIE

Wednesday, March 08, 2017

Marleen DT - Distress Crayons and Butterflies

Hey Bloggers.
Thank you for popping by..

Todays projects is for BeeCrafty.
I had a right good play making this card. Its one of those that came together quite fast. It just kind a flowed..

For this card I used the following goodies:

Find everything and many more goodies in the STORE

 This card is made by laying down lots of different colours of Distress Crayons. I just smudged the colours with my fingers to get the blended look. I then took my inkable circle and and lay in the middle. I took a babywipe and ran it around inside the circle to remove some of the crayon. 
I left the card to dry and once dry I stamped my sentiment and my branches. I used black Archival ink. I also stamped my butterflies on some scrap card, coloured them with crayons and cut them out.
 To finish it was a simple black mat and gluing on my butterflies.
A very simple yet dramatic card.

  And that's all from me for today.
 Thanks for popping by and for any comments left behind.
Dont forget to come visit me on FaceBook, Twitter, Instagram, Pinterest, Youtube or my FB page.
 Happy Crafting

Monday, March 06, 2017

DT Kerrie - Fashionette's on Fabric - Bee Crafty

Hiya and Welcome to the Bee Crafty Blog

Today I am sharing with you one of my recent makes for the Bee Crafty Show's on HOCHANDA

Bee Crafty Products used...

Fashionette's 'Vera' - polymer stamp
Fabulous Flowers 'Star Flowers' - polymer stamp

This make is something a little different to show that the Bee Crafty Polymer Stamps are not only for paper crafting


I used my sewing machine to create a fully lined Tote Bag, I used some pretty floral fabric and and white fabric. 

I stitched a piece of pink dotty fabric onto the centre of the bag.

I stamped 'Vera' onto printable canvas fabric (which I had pre-trimmed to fit) using black Archical Ink. I used fabric paints to colour 'Vera', mixing and repainting to create layers and highlights. Once dry I ironed over the painted image using a travel iron and a piece of scrap fabric to fix the paint.

I stamped the 'Beautiful Things' sentiment stamp at one corner using archival ink and painted 'Julie-Ann' by hand with a fine paint brush and black paint. I stitched this panel to the front of the bag into the centre of the dotted fabric... I used a loose running stitch on my sewing machine but free stitching and over lapping for texture.

Next I picked out some fabric flowers in colours to match nicely with the painted image and also with the floral fabric. I stitched them onto the bag front at the corners of the image using free motion stitching just in the centre's, I layered a few up, I added some flowers that I had stamped onto fabric scraps using archival ink which I had fussy cut out.

To finish I added some flat back gems into the flower centres and opposite corners of the the painted panel using Ranger Glossy Accents glue

Thank You so much for visiting my Post today, Please come back again soon to see more gorgeous makes from the Amazing Bee Crafty Design Team

Krafty Hugs xx
Please visit Kerrie's personal Blog HERE to see more of her work x

Saturday, March 04, 2017

Barbara DT - BEAUtanical Beauties....again!

Hi everyone, Barbara here again with my regular weekend post....this one has been scheduled, as I'm on holiday at the moment.
It's a very simple technique of masking & stamping, the whole card only took 10 minutes.
Mask off the bottom half of a piece of white cardstock.... I've used 'Hemp' as I love the texture.
Stamp the BEAUtanical images (find them HERE ) in various coloured inks, then do the same for the bottom half.
Stamp & heat emboss a sentiment onto a strip of black card and adhere to the centre.
Smother with Ranger 'Stickles
Mat onto black then white card and voila! finished .......
 
Thank you for all the wonderful comments and likes for last weeks butterfly card, they were amazing!
Catch you soon,
Barbara xx


Friday, March 03, 2017

Emily DT - Weeds are flowers too...


Hi everyone, it's a bit late this week as I have had a very busy week, however it's better late than never!

This week I have made a card using green which is a colour I don't use very often. Here is the card I have made...


 I stamped the elder and teasel stamps across the bottom of a white square of card using three different green Distress inks. I then stamped the birds across the top in the darkest green I used. 


I then coloured a strip of card with the green ink and stamped the sentiment onto a strip of white, with an elder bug for good measure!


I mounted it onto black card and then onto my card blank. I'm happy with how it turned out and I hope you like it too.

See you next week!

Emily

Wednesday, March 01, 2017

Marleen DT - Scrappage

Hello Bloggers..

Today I have a scrappage to show you. Its for my weekly spot for 

I actually started this page when the girls first brought out these stamps on Hochanda. But Im sure though, that Im not the only crafter that gets stuck on a project from time to time lol.
Needles to say, the page was started but never finished. I just didnt know how to finish it.. Until the day I took out my pile of unfinished projects and this one jumped out at me.. In no time I knew what I wanted and it was done..
Its funny how these projects seem to have a life of their own at times lol..

 
 Picture is of my "baby" Abbie. She was about 3 on this photo.

 I started by stamping my Marple leafs in both sizes on to a piece of A4 cardstock. I then took the matching Inkable and lay round my stamp and coloured the leafs with my distress ink and blanding tool. I guess I could have coloured them with my markers or pencils as well.
I added some strips of washi tape so it would be peaking out from my photo. I struck the photo down with double sided foam tape to give the LO (LayOut) more dimension. I then lay out all the flowers, making sure i was happy with the arrangement before glueing them down. I finished off this LO with some foam letters.

I love how something like these stamps can be a centre piece, and yes these stamps canwell hold their own, but also that they can be used as a background like this. These stamps was handdrawn by Sam and I LOVE that about them. 

Anyway, that's all from me for today.
 Thanks for popping by and for any comments left behind.
Dont forget to come visit me on FaceBook, Twitter, Instagram, Pinterest, Youtube or my FB page.
 Happy Crafting
Related Posts Plugin for WordPress, Blogger...