Friday, November 30, 2018

Emily DT - MDF Journal

Hi everyone,

Due to personal circumstances I have not been able to blog for a little while, but I am back this week with an MDF project I made a few weeks ago. 

I used one of the small MDF journals to create this...


I started by priming each piece of MDF with white gesso then painted each one a pastel colour. I used cheap acrylic paint which is why I primed them first. If I was using Dylusions or similar then I wouldn't bother.


I decorated each page using white paint and some of the Mandala Inkables. I wanted to get a distressed, rustic look so wasn't too concerned about the finish.


Once the paint was dry I stamped each page using the Dandelion, Teasel and Ground Elder Beautancial sets.


On the back of each page I used Bee Crafty Steampunk papers and then used a couple of dinkables to add a bit of interest.


I do not usually do much MDF so this was a bit of a stretch for me, however I am pleased with how it turned out.

I really like these little journals as they can be added to over time.

I will see you next week with another project!

Emily x

Thursday, November 29, 2018

Karen DT - TIME

Hi everyone xx

I'm back on the Buzzy Goings On At Bee Crafty Blog with another make using one of the Skyline Inkables, the iconic Tower Bridge

Also used:
TIME sentiment
Flock of Birds 
Distress Oxides 
Versafine


I masked of a panel across front of my card blank
I blended Distress Oxides around the "inny " skyline first, ensuring the Oxides were blended through out the masked panel
Once removed I inked through the "outy " Inkable
I went back in with the "inny" Inkable,  to get the little lines more prominent 
The masking tape was removed then the Flock of Birds, and sentiment, were stamped in Versafine 

I hope you liked today's post and I'll be back again soon 

Crafty hugs xx 

Saturday, November 24, 2018

Jane DT - Let it Snow!

Hello!

This week on the Buzzy Goings on at Bee Crafty Blog I am sharing a card that was inspired by this week's weather!  As it was so cold and I know that some places had a flurry of the white stuff, I decided to get out my snowflake stamps to create a much more clean and simple card than I would normally make...

 
I started by cutting a piece of white stamping card to the size I wanted then tore it across on a diagonal to create a ragged edge. 
Using the larger of the spikey snowflake stamps I stamped using versamark ink then heat embossed with white powder.
To create a frosty colour tone I used broken china and faded jeans distress inks, then made sure I wiped the ink from the snowflakes...


Next I took the smaller spikey snowflake and stamped using the broken china distress ink.  This piece was then layered up using foam tape onto another piece of card. 
Taking a sentiment from the everyday Christmas 1 set I stamped onto the lower piece using a dark blue archival ink, then added a small snowflake using the distress ink.

Finally I layered it up onto a card blank.

To create this card I used:

* Yuletide - Spikey Snowflakes
* Yuletide - Everyday Christmas 1
* Distress Inkpads

I hope you have been keeping warm in this colder weather and thank you for looking.

Happy crafting,

Jane xx

Thursday, November 22, 2018

Karen DT - Dreams come true

Hello crafters xx

I'm back on the Bee Crafty blog today with the beautiful Rose hand drawn stamp. I've combined it with the equally beautiful
Feather Wings 

Also used :
Inspirational Words 1
Dinkables
Distress Oxide
Sparkle pens
Versafine
Foil


I stamped the Rose in Smokey Grey versafine
Once dry I coloured it in with my Sparkle pens 
I masked off the Rose then stamped the Feather Wings so they sat behind it 
Once the mask was removed I randomly inked through the Honeycomb Dinkable with Distress Oxide
The sentiment was stamped in Versafine 
To complete I added hints of transfer foil on, and around, the Rose head

Thankyou for stopping by and I'll be back again soon 
Crafty hugs xx 

Monday, November 19, 2018

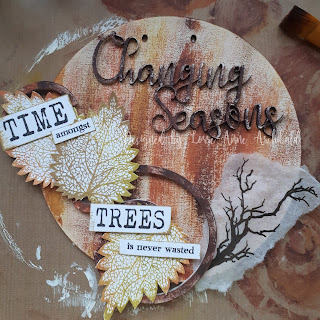
Lorre-Anne DT - MDF Mixed Media tutorial

Hi everyone, for my Bee Crafty DT post this week I wanted to share a tutorial on how I made this MDF plaque using the new MDF set released by Bee Crafty last Monday on Hochanda.  I've only recently got in to mixed media so I'm very much at the learning stage myself.


My finished piece


The MDF as it comes


The Distress Oxides I have chosen to use, I wanted autumnal colours so opted for Brushed Corduroy, Crushed Olive, Rusty Hinge, Fired Brick.


The materials used in creating my piece - White gesso Structure paste, Pentart Rust Effect paints, Copper & Gold Wax paste


I applied a few coats of white gesso to the front and back of all the pieces of MDF I wanted to use, drying with a heat tool between each coat.


I stamped 3 leaves using the BEAUtanicals Nettle Leaf Set using a selection of Oxide colours, and also stamped the tree branch from the Large Branch & Tree Set on to some rice paper using Onyx Black Versafine ink. I roughly placed everything on the MDF base to get an idea where I wanted it before gluing it down. 


I used the Pentart Rust Effect paints to add some colour to the base , and the other MDF pieces.  I used a dry paintbrush to add the various colours in the kit.


I again roughly placed the various elements on to the base before gluing to see if I liked the look.  I stamped the sentiment using Versafine ink, and chopped it into 4 separate bits.


I used some matt Mod Podge to adhere the rice paper to the MDF base, and used a water brush to blend the Oxides over the stamped leaves.


I applied some Gold Wax to the letters to give a metallic feel.


The Rust Effect paints and Gold Wax on the MDF.


My finished piece of art.. I glued everything down using 3D glue and added some twine.

I really enjoyed making this and I hope my tutorial will help someone just starting out in mixed media, and encourage them to have a go!

Hugs, Lorre-Anne x

Saturday, November 17, 2018

Jane DT - Autumnal MDF Wreath

Hello!

This week on the Buzzy Goings on at Bee Crafty Blog I am sharing one of my samples from this weeks HOCHANDA shows...


This project was created using the medium sized wreath from the MDF pack as well as some of the MDF flourishes and one of the words. 

To get the flourishes to fit exactly where I wanted I trimmed some of the parts using a strong pair of scissors then sanded the cut edges. 

The background of the wreath was created using crackle paste and then spray inks along with gilding wax to highlight some of the texture. 

The flourishes were painted and then had liquid pearls added to create extra details.

I also wanted to be able to use the centre part of the wreath so cut a piece of heavyweight acetate to the size needed then coloured it using alcohol inks. 

Once it had been stuck to the back of the wreath I could then use it for my wording...


The leaves were created by stamping from both the oak and maple leaf sets. 

I started by colouring some card using distress oxide inks then stamped over the top with an archival sepia pad. 

Once I had cut them all out they were coated with glossy accents to create a sheen and also to make them more sturdy.

When I had added the wording to the centre I felt I needed to add more texture to the wreath so used microbeads, beads and more liquid pearls around different parts, adhering them with glue gel for a strong stick...


The products used were:

* Beautanicals - Maple Leaf Set
* Beautanicals - Oak Leaf Set
* MDF - Wreath Set
* Distress Oxide Inkpads
* Archival Inkpads

If you would like to see Bev and Sam's demos from the shows they will be available for a couple of weeks on rewind, please visit the HOCHANDA website to find the link.

Thank you for looking and happy crafting,

Jane xx

Thursday, November 15, 2018

Karen DT - Samples for Hochanda show

Hello everyone

Today I'm sharing my samples on the Buzzy Goings On At Bee Crafty Blog, for the Hochanda show earlier this week with the lovely Bev and Sam. Double trouble 😂
I hope you got your orders in for the fabulous products, including the beautiful handrawn leaves set, flowers and stunning mdf

For my samples I used the following :
Maple stamp set
Oak stamp set
Large Branch and Tree set
Tall Teasel
Dandelion
Ground Elder 
Everyday Sentiments 1 XL 
Mdf circle wreath
Distress Oxides 
Versafine
Gilding Wax
Embossing powders
Versmark
Paints


Mdf wreath, floral mdf, large Oak, small Maple, paints, distress oxides, paints, gilding wax, hessian, natural embellishments


Inner mdf from wreath, floral mdf, large Oak, small Maple, Dinkables,  distress oxides, gilding wax, natural embellishments


Teasel, Dandelion,  Ground Elder, sparkle pens,  Everyday Sentiments XL 


Mdf tag, Teasel, Dinkables,  distress oxides 


Oak leaf stamp set and Easy Frame Inkable, Distress Oxides, black pen


Maple, Gold embossing powder, paints


Tree, paints, white embossing powder 


Maple, Versafine,  paints


Ground Elder,  paints, Lollipop sticks


Dandelion, white embossing powder 

How versatile and gorgeous are these handrawn leaves and the mdf is just the perfect combination 

Thankyou for popping by...please leave a comment to let me know your thoughts on my samples xx

Til next time..
Crafty hugs xx 

Monday, November 12, 2018

Lorre-Anne DT - Hochanda samples

Hi bloggers, for my Bee Crafty blog post this week I'm sharing the DT samples I made for Bev and Sam's shows on Hochanda today...tune in at 10am and 2pm to see the fabulous stamp sets on offer and some great demos by the girls!


BEAUtanicals Nettle Leaf Set, Distress Oxides (Bundled Sage, Vintage Photo, Wild Honey)


BEAUtanicals Nettle Leaf Set, Hearts Dinkable, Distress Oxides (Vintage Photo, Carved Pumpkin, Wild Honey), white gel pen


MDF (Wreath, embellishments & words), White gesso, Cracking primer & paste, DecoArt Raw Umber Antiquing Cream, Pentart Wax Paste (Copper, Gold), Distress Oxides (Vintage Photo, Spiced Marmalade, Peeled Paint), BEAUtanicals Nettle Leaf Set

That's it for this week bloggers, I'll be back next week to share another project with you all, until then happy crafting!

Hugs, Lorre-Anne x

Saturday, November 10, 2018

Jane DT - Autumnal Art Journaling

Hello!

Today on the Buzzy Goings on at Bee Crafty Blog I am sharing a little bit of art journaling...

 
Often when I start art journaling I am not sure about where the page is going to go, so this time I began by choosing 3 distress oxide ink colours that I liked to create the base (fossilized amber, wild honey and spiced marmalade).  I added the colour a layer at a time by squashing the inkpad onto my mat then spritzing with water before pressing the paper onto it.
 
At this point I thought that the background looked like an autumnal morning so decided to go with that theme using beautanical elements and the same colours...
 
 
Next I picked three of the d'inkables and I have to admit that I went for my usual favourites!  Once the inks had been applied through the stencils I chose Wildflowers 1 and 2 stamps to create some floral interest with the distress oxide inks, then used the large teasel with Versafine ink and clear embossing powder.  I also added a sentiment onto the other side of the page...
 
 
It still felt like something was missing so I used one of the circle texture stamps to fill in some of the gaps.
 
Finally I added some details using a gold and a white uniball pen.
 
The products used were:
 
 
Thank you for looking and happy crafting!
 
Jane xx


Thursday, November 08, 2018

Karen DT - Skull with birds and feathers

Morning crafters

I'm back on the Buzzy Goings On At Bee Crafty Blog with a card I made using the gorgeous
Skull with Birds and Feathers. I absolutely love this image and it's so versatile xx

Also used
Life is good sentiment stamp
Versafine
Kuretake clean colour pens


I stamped the gorgeous image in Smokey Grey versafine and coloured it in with my kuretake clean colour pens and a water brush
I stamped the sentiment in the same Versafine
This was matted onto rainbow mirri and set to one side
I stamped the image several times, onto white card, cut out some of the flowers, and coloured them in.
On a seperate piece of card,  slightly smaller than my card blank, I carefully inked up the flower on the stamp with Distress Oxide, and multi stamped it randomly,  to create a background.
This was matted onto rainbow mirri
My card was then assembled with the flowers being shaped and adhered with 3d foam pads

I hope you'll agree that this image can make a really pretty card and therefore has so much versatility

I'll be back again soon with another Bee Crafty make
Crafty hugs xx

Monday, November 05, 2018

Lorre-Anne DT - I Perform

Hi bloggers, I'm back to share my weekly Bee Crafty blog post with you all... and this week I've stepped away from my beloved Oxides and got the Dylusions sprays out!


Materials
What to do
  • Cut black card slightly smaller than the card blank, and white card slightly smaller again.
  • Spritz some Dylusions sprays on to the white card and then spritz some water too.  Dry with a heat tool.
  • Stamp the music using Wilted Violet Oxide, and then blend some Broken China through the dots Dinkable.  Mat this to the black card, and glue to the card blank.
  • Stamp the bird and sentiment on to spare card using Versafine.  Carefully cut the bird out and add some colour using pens.
  • Mat the sentiment on to black card and glue to the card blank.  Attach the bird using foam pads.
That's it for this week, I'll be back next week.
Hugs, Lorre-Anne x

Saturday, November 03, 2018

Jane DT - Be Yourself

Hello!

For my post today on the Buzzy Goings on at Bee Crafty Blog I thought I would create something a little different from my usual projects.  Even though I really love creating lots of layers in mixed media and art journaling, at times I also enjoy a bit of colouring and card making.

This week I have made a DL card using one of the Fashionette characters...


* I started by cutting my white stamping card to size then stamped the sentiment and Vera straight onto it using archival ink.

* Next I used pencils with a blending stump to colour the image, then added a bit of white and gold pen.

* Some pencil was also added at the bottom of the image to make sure she was not 'floating' on the card.

* Finally the card was matted onto black and adhered to the card blank.

The products used were:

* Fashionettes - Vera
* Wordage - Be Yourself

Thank you for looking and happy crafting!

Jane xx
Related Posts Plugin for WordPress, Blogger...