Sunday, February 26, 2023

Alison CT - Grafix Media Journal Page

Good morning. Today I'm sharing a step by step guide to creating this art journal page using the 9x6 Grafix Mixed Media Journal. I have used one of the matte dura-lar pages.

To begin I placed three small blobs of my chosen colours of paint down the side of my gelli plate. I then used a brayer to spread this evenly over the surface. Clean the brayer on a spare piece of card.

Next I placed the stencil over the paint. Then I placed the front of the dura-lar page over the stencil and rubbed gently over it. I then pulled this off and left it to dry naturally.

So as not to waste the paint on the stencil and gelli plate, I spritzed the stencil with water and pressed it down onto another piece of card. I then placed a piece of card over the paint on the gelli plate and created another pull. Some paint remained, so I applied a thin layer of white gesso to the gelli plate, then placed a piece of card over this and created a much lighter pull. These I put away to use on other projects.
Next I put some drops of teal alcohol ink onto my gelli plate. I placed the back of my dura-lar page onto this and rubbed gently. This mived the ink around and coated large areas of the back. I did this on the back of the page for a more subtle effect, so as not to hide the stenciling.

Then I stamped areas of the script stamp with stazon teal ink free hand (not on an acrylic block) on the front of the page. Some I did with second generation.
Next I stamped the grid, from the journal art elements 3 stamp set, with stazon cactus green ink, and the numbers, from the same set, using stazon jet black ink. Both were stamped on the front of the page.
On a piece of white card, I stampedthe three flying dragonflies, from the Dragonfly stamp set, using versafine clair nocturne ink. I coloured them with Ecoline pens then cut them out and glued them to the page with gel medium.

Finally, I stamped the word dragonfly using stazon jet black ink.

Products used:
Gelli plate
Inkables big ones - fern flourish 
Dylusions paints - mushy peas, lemon zest and calypso teal
Alcohol ink - teal
Art stamps - dragonfly, script background and journal art elements 3
Stazon ink - jet black, teal blue and cactus green
Ecoline pens - bronze green, bluish green

Thank you for stopping by and having a look at my project.
Alison

Saturday, February 25, 2023

Sally CT - Dreamy Dragonflies

Hi There! I am here with a journal page I created for a class recently. Here is how I made it. 

 
i began by giving the page a coat of white gesso, then added some Dylusions paint with a wet brush, spraying with a little water to get a more pastel effect.

Next I stamped some of the Doodle Art Mandala stamps onto stamping tissue using Versafine Clair ink
I cut them out and added them to the page using matte medium.
Using the circles Big one inkable and peacock Feathers distress ink I added a bit of stencilling to the background.
I stamped the Script background stamp onto stamping tissue using versafine clair ink and tore it into pieces, adding them around the page with more matte medium. 
I did the same with the dotty circle stamp.
I had some doodle art dragonflies that I had coloured in with pastel ecolines  and cut out. I added them to the page along with the ticker tape sentiment stamped on to white card with black ink. A splatter of white paint and some faux stitching with a posca pen finished it off.
Here is the finished page again. 
I used:
Dylusions paint in Peony Blush, Lemon Zest and Blue Lagoon
Versafine Clair ink in Black, Summer Breeze, Purple Delight and Golden Meadow

Thanks for looking! 

Wednesday, February 22, 2023

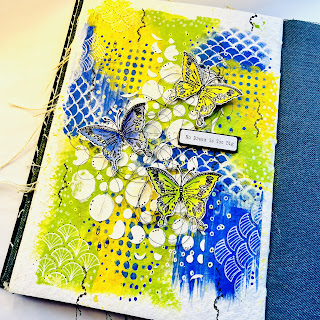
Journal Butterflies

Journal Butterflies 
By Ann 


We all get butterflies from time to time, starting a journal page can do just that to me! I hope these blogs help you to start creating, even if you end up doing something different ! 


Paint: Dylusions Fresh Lime, Periwinkle Blue & Lemon Zest.

Texture Paste

Stamps: Doodle Art Butterfly

Inkables: 6x6 Scales

Big Ones: Circles 1

DInkables: Set 7 & Set 2

Scribble Sticks 

Gelly Roll Moonlight Pens (white pen in pack)

Wordy Stickers set 1

Inks : Hero Arts & Versafine Clair Nocturne 


https://www.beecrafty.net/


Spread some Dylusions, Fresh Lime paint with a little water over your journal page, leaving some white space…


Add some Periwinkle Blue, with a little water… 


Use the small scales DInkable to soften the Periwinkle Blue into the lime …. 


I felt my page needed another colour & added some Lemon Zest…


Continue to soften & integrate the colours using the dots DInkables  & the blue… 


Dry the page, then spread some texture paste through the Circles 1 Big One … 


Leave the paste to dry. 
 Stamp 3 Doodle Art Butterflies onto a separate piece of paper with Versafine Clair Nocturne… 

I used a combination of watercolours & Scribble Sticks to colour the butterflies, sadly I forgot to take a photo! 

Once the texture paste has dried, use white & yellow Gelly Roll pens through the large Scales & the Dots, Inkables… 


To add a little black into the background I added the doodle line ( from stamp set) with some Hero Arts Ink… 


To finish decide where to place the butterflies. Scrunch up some black thread & glue the butterflies with a bit of thread under each one… 


Find a sentiment from the Wordy Stickers, glue to a slightly larger piece of black paper to frame it, add to your page… 


Add some dots & dashes with black & white Posca pens… 


Thank you for stopping by… Ann xxx


Sunday, February 19, 2023

Alison CT - Denim Journal Page

Hi everyone, today I'm sharing how I created this denim journal page in my Dina Wakley Media blue journal. 

To begin,  I placed a blending mat behind my chosen denim page, to protect the page below. I then painted circles using the three colours of Dylusions paint.

Next I ripped four pieces from the background Bee Crafty media papers. I used a wet paint brush to outline where I wanted to tear to make it easier. I also chose a sentiment from the word sheet. I glued these to the page using distress collage medium.

Next I used a white posca pen to add marks to the circles and the denim page.

Then I carefully ripped three flowers from the Elements collage papers from Dina Wakley and glued them to the page using distress collage medium. 

Finally I splatted white gesso onto the page using a paintbrush. 

Products used:
Dylusions Shimmer Paint  - bubblegum pink
Dylusions Paint  - blue hawaiian, calypso teal

Thank you for taking the time to have a look at my project.
Alison

Saturday, February 18, 2023

Sally CT - Wit Woo Journal page

Hi There! I've been having a play with my dylusions paints that I got recently and made this journal page in my mini Dylusions Journal. Here's what I did:

I began by painting the page with Bubblegum Pink and Laidback Lilac Dylusions paint. 
Once this was dry, I used a white scribble stick through the 4" easy frame heart to add two hearts. 
Next I drew several hearts using the posca pen and the Hearts 6x6 inkable around the edges of the page.
I used black soot distress oxide and the texture disc to add some darker areas to the page.
Next, I stamped some of the texture borders around the page and added some lines in black pen around the larger hearts. 
Whilst the ink dried, I cut out two of the faces from the faces #4 transparencies and added white posca pen to the eyes. I used matte medium to attach these and a sentiment from the wordy stickers to my background, and finished with a splatter of white Dina Wakely gloss spray.
Here is the finished page again. 
I used:
Dylusions paint in Laidback Lilac and Bubble gum Pink

Thanks for looking! 

Wednesday, February 15, 2023

Hearts Tag

 Hearts Tag 

By Ann 


Romantic or not hearts are always a good idea where mixed media is concerned! 


Dina Wakley Tag (6.25”/ 16cm approx)


Versafine Clair Nocturne 

Gelli Plate, old book pages, ribbon, stapler


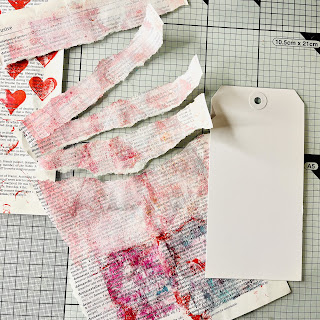
Dot some paint across the Gelli Plate, I used Bubblegum Pink & Postbox Red… 


Spread paint across the plate with a brayer starting at one side, blending as much as you want. 
Remember to roll off any excess paint on a spare piece of paper, your journal, tissue paper or a book page… 


Place the Hearts Inkable over the plate… 
 Lay a piece of book paper over the stencil & rub gently to get an impression on your paper… 
Peel back carefully to reveal the image..


Continue to create more prints if you wish & leave them to dry… 


Tear strips of paper using one of your prints or you could use
Catalyst Papers. I used a book page I’d used to clean my brayer when printing… 


Tear some hearts from the Media Papers…


Glue the strips & hearts onto a tag, using Collage Medium … 


Dry the tag, add the grid stamp with Versafine Clair Nocturne ink, to your tag… 


Using Abandoned Coral Distress Oxide, blend some regular dots through the Dinkable… 


Tear a couple of hearts from your first print, stamp the grid stamp across each one , dry the ink & glue to your tag… 


Add a few splatters with your Scrbbles Sticks or watered down paint.. I used fuschia & black Scribble Sticks… 


Glue a spare piece of the book page print onto a small oblong of card with Collage Medium, dry then stamp a sentiment on to it… 


Staple the sentiment to the tag, add some doodles if you like & finishing with a piece of ribbon… 


Thank you for stopping by… Ann xxx


Related Posts Plugin for WordPress, Blogger...