Monday, May 29, 2017

Lorre-Anne DT - Butterflies

Hi bloggers, I'm back with my regular Monday DT post for Bee Crafty and decided to go for quite a monochrome look this week.  This is a nice simple card to make, and doesn't take very long to make either.


What you will need -

What you need to do -
  • Take the white card square and, using Versafine ink, randomly stamp butterflies over the entire card.  Mat this onto a square of black card slightly larger, and adhere to the card blank using glue.
  • Stamp the sentiment onto the strip of white card, and mat this on to a piece of black card slightly larger.  Use foam pads to secure this to the top section of card blank.
  • On a spare piece of white card stamp 2 butterflies, and colour them in with the Distress Inks and a water brush.  When dry, cut them out, and glue these to the left hand side of the sentiment.
That's my project completed for this week, and I hope you liked it.  As always please do leave me a comment as I love to hear from you all.

Crafty hugs until next week
Lorre-Anne x


Wednesday, May 24, 2017

Marleen DT, Youtube, Lustre Luxe

Hey Bloggers
 
For todays DT project for BeeCrafty, I have made another little youtube..
I had planned to share my journal from last weeks show on Hochanda but then the new Lustre Luxe landed through m door.. I just had to play..
Hope you enjoy.


Lustre Luxe can be found in the BeeCrafty STORE.

 Thanks for popping by and for any comments left behind.
Dont forget to come visit me on FaceBook, Twitter, Instagram, Pinterest, Youtube or my FB page.
 Happy Crafting

Monday, May 22, 2017

Lorre-Anne DT - Can't Buy Love

Hi everyone, it's time for me to post this weeks DT project for Bee Crafty.  I'm now going to have a regular Monday spot and this week I have decided to make the following card.  I wanted to make a project using just 1 colour of Distress Ink, and opted for the gorgeous Mermaid Lagoon.

I've decided to do this blog post as a tutorial with photos showing each stage of the process, I apologise in advance for the lighting in some of the photos as it was a strange day up here in Scotland with bright sunshine one minute and black clouds the next!

The finished card is as shown below.


What you will need -


What you need to  do -


Using Mermaid Lagoon DI, stamp the diamonds along the centre of the card.


Taking a piece of white card, cut slightly smaller than the card blank, use a blending tool to blend Mermaid Lagoon DI around all the edges.


Stamp the large heart using Mermaid Lagoon DI, and using a water brush, flick some ink over the heart to create this splattered effect.


Stamp the sentiment using Mermaid Lagoon DI and cut out.  Cut a piece of white card slightly larger and blend ink around the edges.  Mat the sentiment on to the larger card with glue.


Mat the distressed diamonds onto the blended ink card.


Add Glossy Accents to every diamond.


This is the effect you will end up with - looks really good on the distressed diamonds!


When you have adhered everything to the card this is what you will end up with.

I hope you enjoyed todays tutorial and that you'll think of giving this card a go.  If you have any comments then please do get in touch.

Until next time
Hugs, Lorre-Anne x

Friday, May 19, 2017

Emily DT - Poppy Border

Hi everyone,

I hope you're all having a nice week. This week I have made a beautifully simple card, which takes no time at all to make.
Here it is...


I started by cutting a square of card the size I wanted. I inked my poppy border stamp using Distress Inks. I used my mini inks which meant I could use it like a pen to colour the parts I wanted each colour. You could also do this using Distress pens or something similar. I spritzed it with water to make sure the ink was wet and stamped it down one side of my card.


I stamped a sentiment in the top left corner and finished it by mounting it onto black card.


This card took literally a few minutes to make and I think it is so effective. I love how it turned out and I hope you do too! 

See you next week

Emily x

Thursday, May 18, 2017

Lorre-Anne DT - Art Journal pages

Hi bloggers, this will be my final Thursday DT post for Bee Crafty as I'm moving to a Monday slot from next week!  Sam is on Hochanda today at 11 am and 3 pm showing some fab new products and doing some amazing demos - and I got to try journalling for the very first time to provide some samples for the show!!!  I decided to fit my blog around this today, and want to share some of the pages I made.

This is my front cover - products used Dylusions paints (Bubblegum PinkTangerine DreamLemon Zest), Onyx Black Versafine Ink, White gel pen, MDF Clock Ghetto Rat XL stamp


Products used - Dylusions paint (Calypso Teal), Onyx Black Versafine ink, Retro Dash & Dots stampGhetto Blaster stampclear embossing powder


Products used - Dylusions paints (Lemon Zest & Calypso Teal), Onyx Black Versafine Ink, White gel pen, Journey stampInkables Dinkables regular dots


Products used - Distress Oxides (Broken China & Faded Jeans), Black Marble Dylusions paint, Onyx Black Versafine Ink, gold gilding wax, Ghetto Rat XL stampA6 Inkables template - photo opportunity


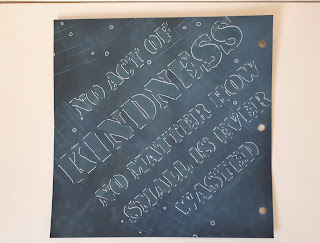
Products used on black journal page - Broken China Distress Oxide, White gel pen, A5 Inkables template - Act of kindnessRetro Dash & Dots stamp


Products used on black journal page - Dylusions paints (Tangerine DreamBlack Marble & Lemon Zest), Onyx Black Versafine Ink, White gel pen, Retro Dash & Dots stampInkables Dinkables circle latticeGhetto Blaster stamp, cogs, gold gilding wax, clear embossing powder


Products used - Dylusions paints (Bubblegum PinkLemon ZestCalypso TealBlack Marble), Onyx Black Versafine Ink, White gel pen, Retro Dash & Dots stampA5 Inkables template - Act of kindness


Back Cover products used - Crushed Grape Dylusions paint, Texture paste, Gold gilding wax, MDF clock face, cogs, Journey stampInkables Dinkables circle lattice

So that was my first venture in to art journalling, and it was fun... think I still need a wee bit of practice but it was really enjoyable and good to try something different.  I hope you liked seeing my sample pages, and remember to tune in to Hochanda at 11 am and 3 pm to see the fabulous Sam showing all the Bee Crafty goodies and doing some amazing demos.

I'll be back on Monday with another Bee Crafty project to share with you all.  Until then, Happy Crafting!

Hugs, Lorre-Anne x

Wednesday, May 17, 2017

Marleen DT - Time flies

Time flies...
In more ways then one..

Hey Bloggers and welcome..
Im late with todays post.. I got the chance to meet up with a friend today, havent seen her in a long time so I grabbed the chance and forgot all about my blog post for BeeCrafty...

I had a youtube planned but being forgetful today, means it will have to wait lol.. So Thank god, I have a spare project lying.. And very fitting for today lol..

 I made this one when I was working on the samples for Sam's upcoming show on Hochanda. I made a sample on black card with the same sparkly embossing powder. I loved the combo and wanted to do it again. So that is how this card came about.

I used several stamps here, ill make a list below, but all ive done is stamping with versamark and heat embossed with black glitter embossing powder. I then took a white sharpie and coloured in. The lines on the card as well as my greeting is stamped with a white inkpad.. I finished with faux stitching, also made with my white sharpie and a black mat before mounting onto my card.

Very simple card, but its far more sparkly in real life then it shows on the picture.

Stamps Ive used:
The flower corners are an older set also from BeeCrafty.

 Thanks for popping by and for any comments left behind.
Dont forget to come visit me on FaceBook, Twitter, Instagram, Pinterest, Youtube or my FB page.
 Happy Crafting


Monday, May 15, 2017

Art Journalling with Bee Crafty Stamps

Hiya and Welcome to my Monday Post for Bee Crafty

Last week was an Inky/Painty Adventure making samples using Bee Crafty Art Journal with lots of Bee Crafty products that will be on an upcoming Hochanda Shows with the lovely Bee Crafty Sam

Friday, May 12, 2017

Emily DT - Glitter Stars

Hi everyone, this week has gotten away from me and I'm a bit late posting this week so apologies for that! The card I have made this week could be used for lots of occasions, and would work as a birthday card for a child if you changed the sentiment.

Here is the card I have made...


I started by colouring some linen card with Distress Inks. I used Twisted Citron and Squeezed Lemonade. I then used the inner part of the large star Inkable to make a star in the middle. I went round this star with Cosmic Shimmer glue.


I then used the small star d'inkable to randomly add some stars in Distress Ink and glitter paint.


I stamped the Decision To Try sentiment onto some spare white card and cut the words out. I stuck them on using foam pads and mounted the whole thing onto silver glitter card.

I hope you like how it turned out, it is a bit different from my usual offerings!

See you next week :)

Emily x

Thursday, May 11, 2017

Lorre-Anne DT - Dare To Dream

Hi everyone, for this weeks Bee Crafty DT project I decided to make the card below.  Now this card is a first for me as I used texture paste, and I've got to say I really enjoyed playing with this and think it may be a regular feature on my cards.


To make this card you will need -
How to make -

  • Cut a piece of black cardstock slightly smaller than the card blank, and a piece of white card slightly smaller than this.
  • Take the cut piece of white card and apply some texture paste randomly through sections of the oval lace template.  Leave this to dry.
  • Once dry, blend some Picked Raspberry around the outer 4 corners and then Wilted Violet across the remaining white areas.
  • Cut another smaller square of white card, and blend Wilted Violet over the entire piece, then using Versafine ink stamp the sentiment.  Leave it to dry for a few minutes, then using a water brush add some Picked Raspberry to the letters.  Mat this onto a slightly larger piece of black card.
  • Colour the white flowers using the Distress Inks.
  • Add the sentiment to the card using foam pads, and arrange the flowers around this, also using foam pads to adhere them.
  • Finish off by gluing some black gems to the centre of the flowers.
That's this weeks project finished...hope you liked it!  I'll be back next Thursday with a new DT project for you.

Hugs, Lorre-Anne x


Wednesday, May 10, 2017

Marleen DT - One layer stamped card - YOUTUBE


Hey Bloggers
 
For todays DT project for BeeCrafty, I have made another little youtube..
This one is making a one layer stamped card, using very minimal surplies.
Hope you enjoy.


All the stamps can be gotten in the BeeCrafty STORE.

 Thanks for popping by and for any comments left behind.
Dont forget to come visit me on FaceBook, Twitter, Instagram, Pinterest, Youtube or my FB page.
 Happy Crafting

Monday, May 08, 2017

Kerrie DT - Wordage - 'Never Regret' - and some Beautanicals too

Hiya and Welcome to my Monday Design Team post for Bee Crafty

Oh my Word!!! It has been a crazy week here at KraftyKezzlaHQ - we have no broadband at home for 3 weeks so I am having to use my mobile as a Wifi Hotspot which I do not have too much data left so I am having to use my internet sparingly - not good for a social media geek lol

So while I can not be online as much as I would like I have been moving all the bedrooms around in my house!! which is nuts as its 4 rooms that are now all topsy turvy while I sort through and delclutter... but it also means some good news... Hubby and I are moving our bedroom to the back of the house which will then leave me free to use the front room we are now in as my Work/Office/Kraftroom like we always intended to eventually... it is going to be amazing to be able to leave all my stuff out where I like and be able to shut the door at night without having to shift ot all away each night YAY!! It is going to be mega!!

Now back to my post after all that chatting lol

This week I am sharing with you an older make from me where I have used the fabulous 'Never Regret' - WORDage Stamp as the main focal point of the card and then created a flower from the leaves of the 'Maple - solid' stamp and the larger branch from 'Branches' stamp set both from the BEAUtanical Collection


For the flower I repeat stamped the maple leaf onto pearlescent card, fussy cut them, embossed them from the reverse and layered them up overlapping to create the bloom, the leaves I stamped using the branche stamp which I also fussy and fixed under the flower.

I teamed these lush stamps with some pink, brown, kraft and cream cardstock, some circular dies, flatback pearl and some polka dot ribbon, on a 7x7" cardblank

Thanks You so much for visiting my post today - please come back to the Bee Crafty Team Blog again soon for more yummy inspiration from the Amazing Design Team

Krafty Hugs xx
Visit Kerrie's Blog - HERE - to see more of her Projects

Saturday, May 06, 2017

Barbara DT - It's Bee Crafty time again

Hi again, Barbara here with another weekend inspiration for BEE CRAFTY .
I have 3 new cards to show, which were featured on the Hochanda show last week.....those BEAUtanical flowers are certainly popular.
All of the new floral stamps are now on the website, along with lots of new products 😀


I've used heat-embossing on all cards. The poppy heads on the bottom card have been watercoloured and covered with 'Glossy Accents'
Well, that's all for now, have a great weekend,
Batbara x

Friday, May 05, 2017

Emily DT - Diamonds

Hi everyone, I have been busy making samples for upcoming Hochanda shows this week, but I hve managed to find time to make a card for this week's inspiration blog.

A lot of the time when I make cards I have a clear idea of what I imagine the finished item to look like, however in this case I didn't. I started by choosing random stamps and colours of ink. Sometimes when I do this it ends up in the bin, but I was happy with what I finished up with this time.

Here is the card I have made...


I started with the distress diamond background stamp, and created a background using Spun Sugar and Crushed Olive distress inks.


I punched a white circle of card and chose a sentiment which fit it. I ended up with the small 'Glad I Did It' sentiment.

I then stamped some butterflies onto white card and partially coloured them with a distress ink pen.

I stuck the circle on using foam pads and then added the butterflies. Whenever I use these butterflies I always stamp the butterfly onto the background first, then cut out the wings of the coloured one and stick it over the top. This way you do not have to worry about cutting out the butterfly's body and antennae. I then bend the wings up to add dimension to the card.

I mounted it onto black card and then onto a card blank. 

I am pleased with how this card turned out and used a colour combination I do not often use.

I hope you like it too!

Emily x

Thursday, May 04, 2017

Lorre-Anne DT - Never Regret

Hi everyone...I'm back with my regular Thursday DT post for Bee Crafty.  Hope you're all good!

This weeks project involeves a bit of masking, some blending and of course stamping :-)

This is the card I have made, and this is how you can make it too!


What you will need -

What to do -
  • Take the piece of white card, and mask off a section, using a blending tool blend Squeezed Lemonade from the bottom up to just below centre, then blend Twisted Citron from the top down.  Blend well where both colours meet.
  • Keep masking tape on and stamp the small leaf using both DIs over this blended section.
  • Remove masking tape.
  • Using Versafine, stamp the sentiment in the top right corner of card.  Mat this onto a piece of black card slightly larger, and adhere to card blank with glue.
  • On a spare piece of white card, stamp 2 green and 1 yellow leaves.  Draw around the outline with a black pen, then cut out.
  • Apply glossy accents to all the cut out leaves and leave to dry.
  • Use glue to adhere the leaves to the bottom of the card.
That's me finished for another week, if you have any questions or comments please do get in touch.

Hugs,
Lorre-Anne x

Monday, May 01, 2017

Dt Kerrie - beautanicals Large Flower's - Bee Crafty

Hiya and welcome to my Monday Post for Bee Crafty Stamps

For all of last week I was colouring up and playing with the New Large Flower stamps from the Beautanicals rage that Bev showed for the first time at Alexandra Palace recently they are amazing stamps so detailed and massive and I love them

So I stamped them out with light grey ink and the coloured them up using my Copic Markers below are a.couple of photos of some of the versions I coloured


When making some in to samples I kept my card making very simple and only used some wordage stamps for sentiments as I think the flowers are so detailed they stand out well by themselves


Thank you for visiting the Bee Crafty blog today please come back soon to see more creations from the Brilliant Design Team

Kraft Hugs xx
KERRIE
Related Posts Plugin for WordPress, Blogger...