Saturday, May 30, 2020

Jane DT - Lightbulb Collage Canvas

Hello!

This week on the Bee Crafty blog I am sharing a canvas that I have created...


I started by using a piece of tissue paper that I had previously coloured with gloss sprays.  This I then stamped using black archival ink with the Script, Numbers and letters and numbers from Typewriter Alpha.  Then I adhered it to the canvas using distress collage medium making sure it went round the sides as well...


Next I used the metal work alpha inkable with crackle paste for extra texture...


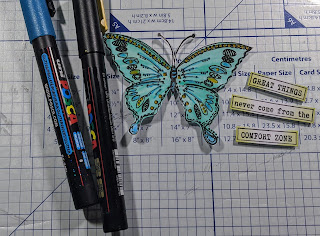
To create my focal point I stamped out a butterfly (cutting away the wings), the lightbulb, one of the stitch borders and a sentiment.  These were then coloured and I also added glossy accents to the bulb to give it a more glassy look...


Finally these were added to the canvas using glue gel...


Here are the products that I used:


Thank you for looking and happy crafting!

Jane xx

Thursday, May 28, 2020

Karen DT - To the moon and back

Morning everyone xx

So it's my turn on the Bee Crafty blog today and I have an MDF door hanger to share with you using one of the gorgeous Journaling Girls, Cheer. xx

Also used:
Journaling Blocks
Art Journal Borders
Dinkables
Distress Oxides 
Acrylic Paint
Sparkle Pens
Alcohol Markers
White/black Gel Pen


To begin I painted the MDF with Acrylic Paints then stamped one of the Journal Borders top and bottom 


I coloured in the circles with sparkle pens.
I stamped some of the embellishment stamps in Distress Oxides and blended the same colour through the Hearts Dinkable.

I then used Versafine to stamp the hearts and decorative lines, from the stamp set.


To add depth I used a black and white pen to add highlights, and accents on the circles and flowers. 


I stamped the girl, in Memento, on a piece of super smooth card, coloured her with Alcohol Markers and cut her out. 

I also stamped out one of the Journaling Blocks, wrote my own message on it, and cut it out. 

I adhered both to the MDF to complete my make.

I hope you liked todays post and I'll be back again soon 

Crafty hugs xx


Tuesday, May 26, 2020

Caz DT - Heraldic show samples

Hochanda show samples I made for the Heraldic stamp collection.....

Products used:

Heraldic collection:

https://www.beecrafty.net/?searchStr=Heraldic&x=0&y=0

Prancing lions
Assorted small crowns
Large Jubilee crown
Feathered knight
Heraldic banner
Heraldic alpha

MDF pocket watch
https://www.beecrafty.net/bee-crafty-mdf-pocketwatches-set-of-3.ir

Ink'ables distressed diamonds
https://www.beecrafty.net/inkables-template-distressed-diamonds.ir

Ink'ables Mondrian 1
https://www.beecrafty.net/inkables-template-mondrian-1.ir

Ink'ables Damask
https://www.beecrafty.net/inkables-template-damask.ir

MDF landscape album
Embossing powders
Ink sprays
Gesso
Distress oxides
Versafine onyx black ink
Gilding wax
Acrylic paint

MDF pocket watch - coated in mixed media embossing powders and crackle glaze over the top with a dusting of mica pigment. 

Card - inked oxide background, stamped Heraldic elements and Heraldic alpha sentiment.

Art board - MDF clock elements, prancing lion heat embossed, painted and embossed background with MDF word sentiments and gilding wax.

Card - spray ink background over the Mandrian ink'able, stamped banner, lion and alpha. Added stencilled distress diamonds. 

MDF landscape album - mix of techniques on each page.

Card - swiped oxide pad background, randomly stamped all heraldic stamps in black and white heat embossed heraldic alpha sentiment.

Pyramid card - patriotic colours, very grungy look. Gold heat embossed Jubilee crowns accompanied by Heraldic alpha sentiments. 

Any questions feel free to ask! 
Hope you like
❤️ 
Thanks for looking

Saturday, May 23, 2020

Jane DT - Heraldic Samples for HOCHANDA

Hello!

Today I am sharing the samples that I made using the Heraldic collection and some of the new MDF and embellishments...


The Heraldic collection can be found on the Bee Crafty website here:

https://www.beecrafty.net/stamps-heraldic.irc

Thank you for looking and happy crafting!

Jane xx

Thursday, May 21, 2020

Karen DT - Time Flies

Morning everyone xx

It's my turn on the Bee Crafty blog today so thought I'd have another go at making some ATC'S.
For my focal image I got out the beautiful
Feathered Wings. These are awesome and so versatile xx

Also used:
Retro dots and dash
Time Flies
Distress Oxides 
White paint pen


To begin I blended Wilted Violet, Shaded Lilac and Fossilized Amber Distress Oxides randomly on my ATC cards.
I stamped the Retro dot and dash stamp in the Wilted Violet.
Using a posca white paint pen I have, I drew some random circles and squares


The beautiful Feathered Wings were stamped randomly on both ATC'S in Versafine 


To complete I stamped the sentiment on a piece of card twice, then cut out the Time Flies   and adhered them with medium gel. 

I hope you like my makes and I'll be back again very soon 
Crafty hugs xx

Wednesday, May 20, 2020

Caz DT - Doodle butterfly mount board panel


This mount board panel is 6x4 and could be used as a note book cover, album cover and such like. 

PRODUCTS USED: 

Bee Crafty Doodle art butterfly stamps
https://www.beecrafty.net/bee-crafty-doodle-art-butterfly-1-xl.ir

Big ones daisy chain stencil 
https://www.beecrafty.net/bee-crafty-inkables-big-ones-daisy-chain.ir

Ticker tape sentiment stamps
https://www.beecrafty.net/?searchStr=Ticker+tape&x=16&y=8

Distress oxide inks/sprays
Glitter paste
Versafine onyx black
Izink ice
Posca paint pens

HOW TO MAKE:

Swipe the oxide ink pads (peacock feathers/twisted citron) across the panel of mount board to create the background...

Lay the daisy chain stencil over the top and spritz with oxide ink spray (wilted violet)....

Then apply the glitter paste through part of the stencil so you have a section of texture...

Stamp some of the element stamps from the Doodle art butterfly set to add more interest to the background...

Stamp out and colour the main butterfly with izink ice...

Add posca paint pen detailing and fussy cut. Stamp and cut the sentiment...

Add more paint pen details, colour elements etc then stick on the butterfly and sentiment to complete the piece. 

Hope you like
❤️
Thanks for looking. 

Saturday, May 16, 2020

Jane DT - Alcohol Ink Doodle Art Card

Hello!

This week on the Bee Crafty blog I am sharing a card with a step by step...


I started by creating an alcohol ink background on YUPO paper with inks and gold mixative...


Next I used alcohol lift ink through the Fernando big inkable and cut the piece down to the correct size I wanted for my card...


After this I stenciled some white gesso through the leafy branch d'inkable and then used a black posca pen to add details and doodles.  This was then matted onto black card...


I stamped out the Doodle Art Sunflower, Doodle Art Butterfly and leaves from the Just Bloom stamp sets.  These were coloured using markers and then I sprayed them with a clear glitter spray for some extra bling...


Finally I added them to the card, mounting the flowers together for a full sunflower.  To add some finishing touches I added a few glittery gems and a sentiment from Everyday Sentiments 2...


Here are the products that I used:

* YUPO Paper, Alcohol Inks, Gold Mixative and Lift Ink
* Big Inkables - Fernando
* D'inkables - Leafy Branch
* Doodle Art Stamps - Sunflower
* Doodle Art Stamps - Butterfly
* Art Stamps by Jane Royston - Just Bloom
* Wordage - Everyday Sentiments 2

Thank you for looking and happy crafting!

Jane xx

Thursday, May 14, 2020

Karen DT - Bee Monarchy

Morning everyone xx

I'm on the Bee Crafty blog today with a spread from my Art Journal using the fabulous
Bee Monarchy collection 😁

Products used:

Ticker Tape Stamps
Crackle stamp
Distress Oxides
Dinkables


To begin I smooshed Distress Oxides across  my Art Journal pages.
I blended one of the Oxides randomly through the Honeycomb Dinkable 


Using the other Oxide colour I randomly blended through the Brick Wall Dinkable


I stamped the Honeycomb embellishment stamp and the Crackle stamp, around the spread in Black Soot Oxide.

The Bees were stamped on to a piece of card, coloured in with sparkle pens, cut out and adhered to the pages 

The Ticker Tape Sentiments were then stamped, cut out and glued in place and to finish I drew a wiggly frame around the double spread. 


I hope you enjoyed this weeks post.
Crafty hugs xx 


Wednesday, May 13, 2020

Caz DT - Holographic Bee tag


PRODUCTS USED:

Bee crafty bee monarchy stamp
https://www.beecrafty.net/bee-crafty-art-stamps-bee-monarchy.ir

Bee crafty scripted bee stamp
https://www.beecrafty.net/bee-crafty-art-stamps-bee-scripted-bee.ir

Bee crafty small words sentiment stamps
https://www.beecrafty.net/wordage-sets-small-words.ir

Bee crafty perspective circles ink'able

https://www.beecrafty.net/inkables-template-perspective-circles.ir

Grey archival ink
Versafine black ink
Distress ink/oxide candied apple,carved pumpkin and fired brick
Yellow pencil
Holographic gel medium

HOW TO MAKE:

First smoosh the distress inks onto your tag by laying some colour onto your mat and spritzing and swipe through...


Then use the oxide fired brick to add some dot details from the ink'able...

Partly ink up the scripted bee stamp in grey archival and stamp at random to add subtle details to the background...

Then stamp the largest bee from bee monarchy set in versafine onyx black ink as a focal point...

Stamp out the smallest bed from the same set, fussy cut and colour with yellow pencil...

Stamp out your small words sentiment, mount and then glue onto your tag with the fussy cut bees...

Using a spatula, spread holographic gel medium over the top to add an eye catching finish. 

You're done! 
Hope you like
❤️ 
Thanks for looking.
Related Posts Plugin for WordPress, Blogger...