Tuesday, May 31, 2022

Ali C - Jubilee Card, Remember Every Moment


It's Jubilee Week, so I've used a couple of the Bee Crafty Heraldic Art Stamps on this card. These stamps are currently in the End of Line sections on the Bee Crafty website.

I remember going a street party for the Queen's Silver Jubilee in 1977, lots of bunting, sandwiches, party games for all of us local children - fond memories of a fab sunny day. 
First I cut a piece of 300gsm white card 5 1/2" x 5 1/2", spritzed a little water on the back to keep it flat and laid it over a piece of kitchen paper. 
Then I tapped a little Cosmic Shimmer Red Lava Pixie Powder over one corner and Midnight Blue over the opposite corner. I spritzed again to activate the paint powders, being careful to leave the middle section of the card white. 
I blotted any excess water with kitchen paper and dried the card with a heat gun. 
Heating the back of the card speeds up the drying time and helps flattened it.
I swiped an anti static pad over the dry card, stamped the two lions from the Heraldic Prancing Lions  with versamark ink , then heat embossed with gold embossing powder. 
The two lions arrive on the same stamp but it is easy to split them using scissors. You can then use them separately or together.
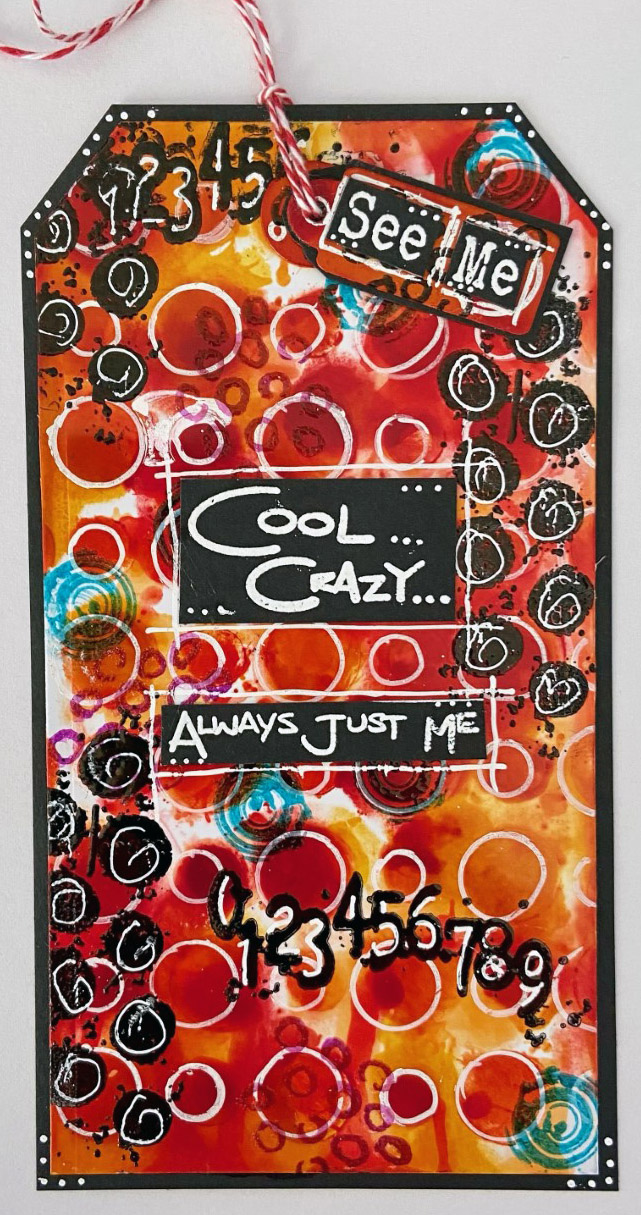
Next I stamped the Coffee Stains across the white portion of the card in black versafine clair and clear heat embossed. I used the smaller coffee stains on the coloured sections.
I used Sam's favourite stamp next, the tiny numbers. Stamped using versamark ink then heat embossed with white embossing powder.
Edged around the card with black ink to add a vignette.
I used pva glue to fix the coloured panel to white card (1/16" border), onto black card (3/16" border) and then on to a white 7" x 7" card blank.
Then stamped the sentiment from the WORDage - Small Words onto black card and heat embossed with white embossing powder.
I stamped the Heraldic Large Jubilee Crown onto white card with black versafine clair ink.
I coloured parts of the stamped image with Sakura stardust gelly roll pens.
Used scissors to fussy cut, leaving a small white border.
I pressed the versamark ink pad over the cut out then clear heat embossed. I repeated this to give the crown a very glossy finish - the stardust ink twinkles through the varnish.
I attached the crown and sentiment using 3d foam pads.
Finally I added a couple of black gems to finish the card.

 I hope you have enjoyed this post and thank you for stopping by xxx

Products used

Sunday, May 29, 2022

Alison CT - Simple Journal Page

Hi everyone, I'm concious that not every crafter has all the stamps, inkables, paints, sprays etc that I do, so I wanted to create a simpler project this week, that could easily be adapted to use what you have in your stash.

To begin paint lots of small squares on your page. I used watercolour paints, buy you could use pencil crayons, acrylic paint, ink pads or any media of your choice. Leave to dry.
Using Versafine Clair morning mist ink stamp your chosen worker stamps from the journaling girls collection. If you dont have this collection, any small image stamps will work. With the larger foliage stamps, I only inked the top part. 
Stamp your chosen sentiment using morning mist ink and cut out.

 Ink the edges with the grey ink and glue to your project.

Products used:
Watercolour paints
Versafine Clair - Morning Mist
Art Stamps - Journaling Girls - Elegant, Bev, Cool, Cosy, Warm, Cheer and Sam
Wordage - Small Words 1

Saturday, May 28, 2022

Sally CT - Dreamy tag

 Hi There! Thought I would show you how I made this mixed media tag today. 

I began by Gessoing an MDF tag.

Next I added some Distress matte texture paste through a texture disc. Alongside I smoothed on a thin layer of the crackle texture paste too.
Once this was dry I sprinkled liberally with Atlas and Elf explosion powder and spritzed with water, before setting it aside to dry.
On a piece of mixed media card I stamped and gold embossed the mandala 3 times, cutting out layers on each one. 
I used ecolines and a waterbrush to colour the layers
Once these were dry I layered them with ultra thick gel medium onto the tag.
I brushed a little Gilt paint around the edge of the tag and added a ribbon, a gem in the centre of the mandala and a sentiment. 

And here is a close up of that texture! 
I used:
Thanks for looking! 

Friday, May 27, 2022

Sharon CT - Cool Crazy Tag

 Sharon CT - Cool Crazy Tag

Hi for my CT post this week I felt like making some bright and I think my tag fits that!


First up I die cut a large tag, mini tag and a hole protector in smooth, white cardstock.


I'm using the Inkable Alternate Circles template and alcohol inks for my background. I've used Red pepper, Watermelon, Peach bellini and Butterscotch.


I laid the stencil on top of my tags and adhered the sides with a low tack tape. I then applied the inks by just squirting them on and dabbing with a paint brush. Don't forge to clean up your stencil afterwards by pressing onto a piece of card. This will be great for another background in a different project.


When you've taken the stencil off it will look a bit messy but don't worry it will all come together. 


When it was dry I added some texture with a white posca pen by laying on the stencil and drawing around the circles.


Next I used some of the journalling stamps from the Journal elements 3 and Faces See Me sets. I stamped the full circles in black and the swirls in an archival blue ink. I like to clear emboss over these to make them stand out and to make sure the ink doesn't smudge. I also added some circular squiggles over the full circles with the white pen.


I felt that the tag needed a bit more so I added the numbers from the same journal elements stamp set and highlighted the numbers with the white pen.


I added a bit more colour by using some small circles from the elements 3 set with a pink archival ink and clear embossing. I also used the small circles to the smaller tag and ring.


For the sentiment which comes from the Handwritten words set 2 I white embossed onto black cardstock then cut them up.


I adhered the sentiments onto the tags and highlighted with white pen. I layered up the tags onto a black cardstock. Then I just added the twine. 

I hope I've brightened up your Friday with my colourful tag. Have a lovely weekend.

Sharon x

Products Used:


Thursday, May 26, 2022

Sue CT Scripted Bee


Hi, this week I am using my 8x8 Dylusions journal and just 2 stamps and three oxide sprays to show that you don't always need a million things to make a page.


Products I Have Used 

Distress Oxide Sprays
Bee Crafty Stamps
White Card
Matte Gel Medium


I started this week by spraying each of the three oxide inks onto the page in my journal. I kept more towards the left hand side of the page as I wanted some colour to appear behind the stamped image. 


Next I stamped the main Scripted bee image twice using Versafine Clair, once on the white card and once on the stamping tissue. 


Once I had heat set the image on card I used oxide ink to colour various parts of the image which I then cut out ready to add to the tissue stamped image. I feathered the edges of the tissue stamped image with water and carefully took away the excess before sticking it into my journal using gel medium. As it is a large image I found it easier to add gel medium to just half of the image at a time and gently place it down before sticking the second half down. 


I used a 3D adhesive to attach the coloured details that I had cut out onto the page. This allowed them to stand proud of the the page and add definition to the page. 


Finally I stamped the sentiment onto a scrap of card. As the words are very closely spaced I added some tape to each line of the stamp before inking it to allow me to stamp each line individually. Before stamping I removed the tape so only the line I wanted to stamp was inked up. 


I then backed them with black card and placed them on my layout.

Thank you for looking at the blog this week. I hope you all have a wonderful rest of your week and manage to get some crafting time into your day. 

Wednesday, May 25, 2022

FLY by DT Ann

 FLY 

by DT Ann 


I’ve had this card in my head for some time & have thought these two colours would go together well .. they did not disappoint. These are my favourite favourite stamp sets too… 


I used: 

Stamps: Birds & Butterflies XL ( & dies) Elements 3 Typewriter Alpha  Art Backgrounds 2

D’Inkables set 1&3

Distress Oxide Inks: Rustic Wilderness & Salvaged Patina 

Versafine Clair Nocturne 

Blending Mat

White Pen 

https://www.beecrafty.net/


Start by cutting a rectangle 4.5” x 6.5” & die cut a 3” circle out of the same card, I used a light sand coloured card. 

Then rub Rustic Wilderness ink onto a blending mat, spritz with a little water & smoosh your card & die cut circle through the ink, dry & repeat… 


Repeat this method with Salvaged Patina… 


 Place the circle onto your rectangle of card & draw a faint pencil line around it. I doubled over some low tack tape underneath to secure it. Stamp the bird just off centre, of the circle, giving the ink time to sink in, the tail will be off the circle so you’ll be to press firmly to get an image… 


Remove the circle carefully, line up the bird & stamp if you like ( I did because I like to see where to put other images, but it’s not necessary) 


Using the squiggles from Art Backgrounds 2 & Rustic Wilderness, ink around the pencilled circle… 


Add some alpha circles & ‘barbed’ circles from Elements 3 around the central circle & across the card… 


Stamp the large numbers onto the main circle & add a few to the background.. 


Stamp the word FLY onto a spare piece of card cut out & add some edge doodles.. 


On another piece of paper stamp the bird , die cut & colour with the Distress Oxide inks… 


Ink around the edges of the circle & glue the bird onto the background..


 Add some white pen circles using a Gelly Roll pen & Dinkables… 


Glue the word onto your card, mat & layer with black card … all done ! 


Thank you for stopping by… Ann xxx


Related Posts Plugin for WordPress, Blogger...