Wednesday, August 31, 2022

Be More by CT Ann


 Be More 

By CT Ann 


When sorting out my craft space I came across samples I'd made for the Doodle Bloom release.  One of my favourite makes, pic at the end,  inspired me to create this weeks blog post. 


Stamps: Journal Elements 3 / Birds & Butterflies XL / Ticker Tape 4 / Stitched Boarders

Birds & Butterflies Dies XL

Ecoline Pens 

Versafine Clair:  Twilight 

Archival Ink : Garden Patina

Distress Oxide Ink:  Peacock Feathers 

Acetate / water bottle / paint brush /watercolour paper / white pen 


https://www.beecrafty.net/


Cut a piece of watercolour paper  to 4.5” x  6.5” (to fit a 5”x7”card). 

Choose 3 complimentary Ecoline Brush Pen colours, I chose Deep Green 602, Fir Green 654 & Prussian Blue 508.

Scribble a few lines across the acetate using the mid-colour (654) lightly spritz with water & place across (landscape) your piece of paper …


Repeat using the lighter colour (602), letting the colours merge a little… 


Add the darkest colour (508) but only scribble a few short lines before spritzing… 

Whilst your background is drying stamp some butterflies in Twilight (dark blue) Versafine Clair ink, onto a separate piece of paper. Emboss in clear embossing powder & cool. Colour each one with the same colour Ecoline pens used for your background…


Die cut the butterflies… 


Stamp the ‘splatter’ boarder from the Stitch Boarder stamp set across the centre of your background… 


Using Twilight again, stamp the grid from the Journal Art Elements 3 above & below the central line just stamped. I removed ink from parts of the stamp, lined up with the previous grid to give an elongated effect… 


Decide where you want to place your butterflies & stamp some ‘wire circles’ from the Journal Elements set in those places. I used Archival Ink in Garden Patina for this… 


With the Peacock Feathers ink I added some circles from the same stamp set, giving me my finished background.. 


I chose a sentiment from Ticker Tape 4 set, stamped in Twilight, cut out & layered onto a piece of coloured card… 


Glue sentiment & butterflies on to the background, mat & layer onto coloured card & add a few details with a white pen … 

Here’s the card I used for inspiration … 


Thank you for stopping by… Ann xxx


Tuesday, August 30, 2022

Ali CT - Be Strong Journal Page

This week I'm sharing a colourful patchwork page on my little white journal. Started off in a rather solemn mood but after getting my paints out and listening to a bit of Rammstein, I'm feeling much jollier.
Bev and Sam have been showing us how we can use the printed acetates from the stamp packaging recently. The stamps can be stored on the laminated sheet so the printed acetate is spare!.
I chose a blank page in my Dina Wakley 6" white journal and picked some Dylusions paints - Lemon Zest, Calypso Teal, Bubblegum Pink and Fresh Lime.
Starting with the Lemon Zest I painted in some sections with a flat 3/4" brush.
Then painted with the Calypso Teal using a 1/2" flat brush.
Added some sections with Bubblegum Pink.
And filled in with Zesty Lime.
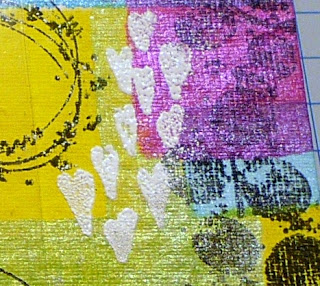
Dried the page with a heat tool and holding the stamp with my fingers, stamped some of my favourites from the Bee Crafty Art Journal Elements 3 in black versafine ink. I left the centre left area alone.
Dried the page again and applied an anti static pad. Stamped the hearts with white pigment ink and heat embossed with white embossing powder.
Painted in the eyes on the back of the printed acetate from the Bee Crafty Art Stamps Faces - Seen using white bleed proof ink and a bit of the Calypso Teal Dylusions.
Stamped words from the Incredible Words onto white card and mounted them onto black card.
Used the Matt Distress Collage gel medium to fix the acetate, a small blob on each corner.  Then red liner tape to fix the sentiments in place - over the edge of the acetate. Weighted down the acetate as it dried. Lastly added a couple of gems to the top right.

I hope you have enjoyed this week's project and thank you for visiting xxx

Products Used

  • Black & White card

  • White bleed proof ink, red liner tape, paint brushes, scissors, anti-static pad

Sunday, August 28, 2022

Alison CT - Blue Blooming Blooms

Good morning, as it approaches the end of the month I thought I would share one more art journal page inspiration for the challenge in the Facebook group. 
Spritz uncharted mariner distress spray stain on to the page. Sprirz with water. Spritz ocean gloss spray over the page, then splat white gloss spray onto the page and spritz with a little water. Leave to dry naturally. When dry, splat more gloss white spray on the page and leave to dry.
Add two strips of the squiggly circles, from the background media papers, diagonally across the page. When the glue is dry colour the circles with salty ocean distress crayon, by picking the colour up directly from the crayon with a damp paintbrush. 
Using uncharted mariner distress oxide ink with the text inkable, add text across the diagonal strips of media paper.
Using prize ribbon distress oxide and the distress diamonds inkable, add diamonds along the outer edges of the media paper.
Add more detail to the background by using the small curcle and dotty border stamps from the blooming blooms stamp set with Versafine Clair twilight ink.
On a seperate piece of card, stamp five of the largest blooming blooms fliwer using the twilight ink. Loosely colour the flowers with ecoline pens and apply a generous amount of
water using a paintbrush and leave to dry. Cut out.
Stamp the sentiments using the twilight ink and cut into banners.

Glue the flowers diagonally down the page, overlapping as necessary. Add the sentiments. 

Products used:

Inkables - text and distress diamonds
Doodle Art Stamps - blooming blooms
Wordage - incredible words
Dina Wakely gloss spray - ocean and white
Distress spray stain - uncharted mariner
Distress oxides - uncharted mariner and prize ribbon
Versafine Clair - twilight
Distress Crayon - salty ocean
Ecoline pens - 522, 508, 580, 578
White card

Saturday, August 27, 2022

Sally CT - Do it journal page

 Hi there! Thought I would share a journal page I finished yesterday. Here's how I did it.

I began by spraying the tag inkable with frayed burlap distress oxide spray  and pressing it onto the page. I spritzed it with a little water to get another impression at the top of the page, and tried to go for a third, but there wasn't enough ink left.
I cut a piece of Dina Wakeley collage paper big enough to fit the central area and stuck it down with Distress Matte Collage medium. 
Next I stamped the coffee stains and numbers randomly around the page using peacock feathers distress oxide ink.
I used distress crayons to add a little colour into the coffee stains. 

I stamped and die cut the large butterfly and coloured it using ecoline pens
I die cut a circle from black card and the words from the acetate sheet.
Using the collage medium I added the circle, words and butterfly to the page. 
Here is the finished page....
and here is the page opposite it's partner in my journal. If you want to see how the other page was created you can find the live here.
I used:

Thanks for looking! 

Tuesday, August 23, 2022

Ali CT - Botanical Blue

 Sharing this card today, I was inspired by my teamie Alison Jane's gorgeous monochromatic card earlier this week and thought I'd add a blue butterfly or two to support the Blue Bee Crafty August challenge 💙💙💙

Cut a piece of white 300gsm card 4 1/2" x 4 1/2". Fix this to a craft mat using rolled up tape on the back. Use low tack masking tape to tape the Bee Crafty Botanical Garden Big One over the card.
Use the back of a spatula to scrape a thin layer of black texture paste over the stencil.
Carefully remove the tape, lift off the inkable and place it into water. 
Allow this to dry, can use a heat gun to speed up the process but avoid overheating and bubbling the texture paste.
Stamp one large and two medium butterflies from the XL Birds & Butterfly Art Stamps in black versafine ink and heat emboss with clear embossing powder.
Colour the butterflies using light blue and dark blue watercolour pens and a damp paintbrush to blend.
Stamp the small Life & Rain sentiment onto white card and heat emboss with clear embossing powder.
Trim down the sentiment, fix to a large back matt with a 1/16" border than on to a white matt with 1/16" border.
Fussy cut around the butterflies with scissors leaving a small white edge, or is you have the matching dies, die cut them 😎
When the texture paste is completely dry, attach it to blue card matt with a border of 1/8" (or you could colour the edge of white card if you haven't got any blue).
Then attach to a black card matt leaving a 3/16" border and then on to a 6" square white card blank.
Fix the sentiment with foam pads and the butterflies with 3d glue gel.

I hope you have enjoyed this week's project and thank you for checking in xxx

Products Used

Bee Crafty Art Stamps - Birds & Butterflies XL

Bee Crafty Inkables Big Ones - Botanical Garden

Bee Crafty Wordage - Life & Rain

Black texture paste - or colour Distress texture paste with black paint/gesso

Black & White card

Blue card 

6" square white card blank

Watercolour Pens - Zig Clean Color pens or Ecolines

Black versafine ink 

Clear Embossing powder

Also - spatula, masking tape, scissors, pva glue, foam pads, antistatic pad, 3d glue gel,  paint brush.

Related Posts Plugin for WordPress, Blogger...