Wednesday, July 31, 2019

Caz Harwood - Don't look backwards card


PRODUCTS USED:

Distress oxides 
Doodle girl art stamp
Stonework Ink'able
Wordage ticker tape 2 stamps
Versafine onyx black
Derwent Intense blocks

HOW TO MAKE: 

ink up the card base with the stonework Ink'able in two colours of distress oxides (I used twisted citron and broken china)

Stamp, colour and cut the doodle girl stamp, glue her onto the left side of the card base.

Use the border stamp to add some interesting to the background

Stamp and fussy cut the sentiments from ticker tape 2, Glue in place. Then add the splatter stamp randomly to fill in the gaps. 

You're done! 
Hope you like 
♥️
Thanks for looking! 


Monday, July 29, 2019

Lorre-Anne DT - Together we so rock!

Hi everyone for my Bee Crafty blog post this week I'm sharing a card I've made using the fabulous guitar stamp - this makes a great card for sending to a man for an Anniversary!


Materials
What to do
  • Cut a piece of black card slightly smaller than the card blank, and a piece of white slightly smaller again.
  • Take the Inkable and put some Salty Ocean and Candied Apple Distress Oxides on it, spritz with water and place ink side down on to the white card.  Gently press all over it, and then carefully remove.  Dry with a heat tool.
  • Stamp the soundwave dots using Versafine ink, and then blend some Black Soot around the edges before matting to the black card and fixing to the card blank.
  • Stamp the guitar and sentiment on to white card and carefully cut out.
  • Blend some of each Oxide around the edges of the guitar and use foam pads to attach to the card.
  • Mat the sentiment to black card and affix using foam pads.
That's my project complete for this week, I hope you like it.

I'll be back next week.
Hugs, Lorre-Anne x


Saturday, July 27, 2019

Jane DT - 'A Flurry of Snow' MDF Tag

Hello!

Today on the Buzzy Goings on at Bee Crafty blog I am sharing a mixed media MDF tag that I have made using a set of the new doodle art Yuletide stamps...


I started with one of the Victorian Medium MDF tags, which I painted using antique white acrylic then added stencilling through the snowflakes d'inkable using blue chalky acrylic paint...


Next I used one of the snowflake doodle art stamps to add text along one side of the tag with light blue archival ink.  This was very easy to line up and I added it at different distances to create an uneven edge...


Then I used two of the smaller snowflake stamps with some darker blues in archival ink.  I wasn't worried if the stamping wasn't always accurate as this was still forming a part of the background layers...


After this I wanted to add one of the larger snowflakes to become more of a foreground element.  I stamped it directly onto the tag in an even darker blue archival ink, then used my pitt pens (which are a permanent india ink so can colour over the acrylic paint) along with little touches of posca paint pens...


I had left a space on the right side of the tag as I knew that this was where I wanted my main focal image to be.  Using the snowflake 2 inkable I added clear modelling paste, then whilst this was still wet covered it with a glitter embossing powder in teal.  This was then heated to melt the powder and although there was also some bubbling of the paste I liked how this helped to increase the dimension...


To finish my main element I stamped a different one of the larger snowflakes onto card and cut it out.  This was then also coloured using pitt pens before I stamped out my sentiment.  I cut this out by hand and added some ink to the edges and also some pen to match the colours of the tag...


Finally I added some white thread under the snowflake before sticking it to the tag and adhered the sentiment all with glue gel to help create dimension.  I felt a little more sparkle was required so added a gem to the centre of the snowflake and some smaller gems to the tag...


Here are the products that I used:

* MDF - Victorian Medium Tag
* Yuletide Stamps - Doodle Art Snowflake Regular
* D'inkable - Snowflakes
* Inkable - Snowflake 2
* Archival Inkpads

There is currently a giveaway running over on the Bee Crafty Instagram page where you could win the collection of regular Yuletide Doodle Art stamps including the snowflake set I have used for this project.  To link to the giveaway click on the link below..

.https://www.instagram.com/p/B0YWw0hAlYa/

The giveaway closes on Monday 29th July so make sure you get there soon!

Good luck if you enter and happy crafting!

Jane xx


Thursday, July 25, 2019

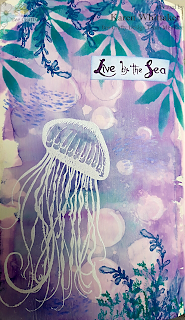
Karen DT - Live by the sea

Hi everyone xx

Hope everyone is well and been crafting away.
I'm up on the Bee Crafty blog today, and I've been playing in my Art Journal again using the gorgeous Jellyfish from the Bee Crafty Under the sea collection.

Also used:
Dinkables
Distress Oxide
White embossing powder


Having first painted my page with white gesso and dried it off with my heat gun, I then blended distress oxides randomly all over. I dried each layer off before applying more until I was happy with the effect. 
I dropped some water on and dabbed dry with paper towel. 
Using a damp wipe, and my circles Dinkables, I removed some of the ink to add more dimension. 
I stamped and heat embossed the gorgeous Jellyfish in white.
Green Distress Oxide was blended through the leafy Dinkable
I stamped various Seaweeds in different Oxides, first and second generation, to get more dimension.
The sentiment was stamped on paper, cut out and adhered to finish.

I hope you enjoyed today's post

Crafty hugs

Xx

Wednesday, July 24, 2019

Caz Harwood - Doodle Butterfly Kraft postcard


PRODUCTS USED: 
Doodle art butterfly stamps XL
https://www.beecrafty.net/bee-crafty-art-stamps-doodle-art-butterfly-1-xl.ir

Ledger stamp 
https://www.beecrafty.net/bee-crafty-art-stamps-ledger.ir

Creativity words
https://www.beecrafty.net/wordage-sets-creativity-words-small.ir

Versafine onyx black
https://www.beecrafty.net/versafine-onyx-black.ir

Distress oxides 
https://www.beecrafty.net/?searchStr=Oxides&x=0&y=0

Clear embossing powder
Versamark ink
Frantage embossing powder
Gel pens

HOW TO MAKE: 

Cut a rectangular postcard shape from Kraft card 6x4 is a good size. Then using the ledger stamp cover the background using versafine onyx black and then clear heat emboss. 

Then I added a crooked edge die cut, torn edge panel will work too. I found a funk gel print to cut my panel from. Then using a background honeycomb stamp from the doodle butterfly set I added some to the design. 

Next stamp the doodle butterfly onto the postcard and also onto a plain piece of card. Fussy cut it. 

Colour with distress oxides and a water brush.
I used picked raspberry and wilted violet.

Add some sparkly gel pen details and some white highlights to add a little more interest.

Using a Versamark ink pad, ink around the border of the postcard. Sprinkle the frantage embossing powder over and heat. This gives a cool distressed edging. 

Finish off by adding the circle doodles - cut out and coloured and stuck on as embellishments. 
Sentiment and butterfly adhered with silicone gel for dimension. 
That's it done! 
♥️
Hope you like! 
Thanks for looking. 


Monday, July 22, 2019

Lorre-Anne DT - Wake up

Hi everyone for my Bee Crafty blog post today I'm sharing a card I have made using the beautiful Doodle Art girl... I just love this image and love to sit and colour her in.  


Materials
What to do
  • Cut black card slightly smaller than the card blank and white card slightly smaller again.
  • Take the white card and use Versafine to stamp the girl towards the left hand side.
  • Place the Inkable over the rest of the card and carefully blend some Black Soot through this, avoiding the face.
  • Add some colour to the face using the pencils, and some highlights to the stars with the white pen.
  • Mat the white card to the black, and glue to the card blank.
  • Stamp the sentiment using Versafine on white card, cut out and mat to black card.  Affix to card with foam pads.
That's my project complete for this week everyone, I'll be back soon to share another.

Hugs, Lorre-Anne x


Saturday, July 20, 2019

Jane DT - Doodle Sunflower Notebook Cover

Hello!

Today on the Buzzy Goings on at Bee Crafty blog I am sharing a notebook cover that I have made for one of my son's teacher gifts as it is heading towards the end of the school year...


I started by cutting two pieces of mount board with a journal die that I have and coated it with white gesso.  Then I used crackle paste through the Mandala 5 inkable and the circles d'inkable and left it to dry naturally...


As this is a gift and an item that will be handled I wanted to use colouring mediums that are permanent and not water reactive, so I painted on acrylic paints but added water to make sure the crackles were still visible...


To help the pattern to stand back out I got my inktense pencils in orange and grey and added shading which I activated with my water brush.  If the colour got a bit too intense I added extra water and blotted with a paper towel...


Once I was happy with the shading I used the Script XL stamp to add extra detail and I used watering can archival ink to match the pencil colour and also because it is a permanent ink...


The Doodle Art Sunflowers were stamped out in both sizes.  Once cut out I coloured them using permanent markers and then added glossy accents over the top, this was to create a nice finish but also as another layer of protection...


When creating journals or notebooks I love to add long dangly charms to the spine, so I started by stamping the sunflowers onto white shrink plastic before cutting them out, adding a hole to each and then shrinking them with my heat tool.  After that I used alcohol markers to add some colours and coated with glossy accents...


Using my stash of beads and jewellery findings I put a selection of beads in matching colours onto head and eye pins to create my dangly charms...


The project was finished off by adding eyelets and ribbon for a closure and the elastic to put my pre bought notebooks inside and also to add my dangly charms to...


To create this project these are the products I used:

* Inkables - Mandala 5
* D'inkables - Circles
* Art Stamps - Doodle Art Sunflowers (regular and XL)
* Backdrop Stamps - Script XL
* Archival Inkpads
* White Gesso
* Glossy Accents
* Shrink Plastic

Thank you for looking and happy crafting!

Jane xx

Thursday, July 18, 2019

Karen DT - O'Christmas Tree

Morning xx

I've been getting a bit festive with my Doodle Art sets, on my weekly Bee Crafty blog post.... mad you say... but I can't put these stamp sets down lol

Products used:
Doodle Art sets: all of them!! 🤣
Distress Oxides
Versafine
Kuretake clean colour pens
Sparkle pens
Gelli Plate
Patterned papers


Whilst I have made my backgrounds on my Gelli Plate, you can achieve a similar effect by applying Distress Oxides to an acrylic block. Spritz with water and apply to card blank. Then stamp your desired images within the inked panel.

All my images were stamped in Black Onyx Versafine as I like the bold, contemporary feel to this style.

I coloured in some aspects of the images, either with kuretake clean colour pens or sparkle pens, but you can use whatever you have in your crafty stash 

To create the 3d snowflakes I stamped on to patterned paper, cut them out and layered them up.

Well there today's selection of makes. Until next time.

Crafty hugs xx


Wednesday, July 17, 2019

Caz Harwood - Doodle flower tag!

Sharing a fun, vibrant summery tag with you all today....... 


PRODUCTS USED:

Ranger manilla tags #8 

Acrylic paints (pink and neon yellow)

Doodle girl regular stamp set

Doodle bird regular stamp set 

D'Inkable Drops stencil

Wordage ticker tape 1 stamp set

Black archival ink
Pink stazon 
Grey Archival ink

HOW TO MAKE:

Firstly start by sponging the yellow paint onto your tag, covering all the surface. Then with a palette knife scrape some of the pink paint over the surface at random. 

When the paint is dry, take some of the decorative element stamps from both the doodle girl and doodle bird set, and stamp a background design. 

Then using the drops D'Inkable, sponge some white gesso through down the centre of the tag. 

Stamp the flower head from the doodle bird set, colour and cut. Stamp out a doodle border for the stem. (Looks Quirky & fun) 
Then glue the heads on top and coat in glossy accents. 
Add your ticker tape sentiment! 
You're all done. 

Hope you like 
❤️
Thanks for looking. 


Monday, July 15, 2019

Lorre-Anne DT - Memories

Hi everyone, I'm sharing my latest DT project on the Bee Crafty blog today and I'm using one of my favourite sentiments on this card.


Materials
What to do
  • Cut some black card slightly smaller than the card blank, and white slightly smaller again.
  • Put some of each Oxide on to a blending mat and spritz with water.  Drag the white card through it and dry with a heat tool.
  • Randomly stamp the Dandelion head using Chipped Sapphire around the card, and blend some Picked Raspberry through the Texture Disc.
  • Stamp the Dandelion and Texture stamp using Versafine ink, and blend some Black Soot Oxide around the edges before matting to the black card.  Glue to the card blank.
  • Stamp the sentiment using Versafine, cut out and blend some Black Soot around the edges.  Mat to black card and affix with foam pads.
  • Finish by adding some Star Dust Stickles to the Dandelion heads.
I'll be back next week with another project, until then Happy Crafting everyone!

Hugs, Lorre-Anne x

Saturday, July 13, 2019

Jane DT - Doodle Art Christmas Samples

Hello!

I am back on the Buzzy Goings on at Bee Crafty blog today to share with you the samples I made for the HOCHANDA shows last week using the Doodle Art Christmas stamps...


MDF Circular Art Board with XL and regular Poinsettia sets


Kraft card using regular Robin set


Dylusions tag using snowflakes d'inkable, snowflake 2 inkable and XL Poinsettia set


Square card using regular Robin set and holly from the Poinsettia sets


Aperture card using the XL Poinsettia set

Thank you for looking and you should still be able to watch replays of the shows over on the HOCHANDA website where Bev and Sam show some great demonstrations using the stamp sets.

Happy crafting,

Jane xx

Thursday, July 11, 2019

Karen DT - Christmas Doodle Art samples for Hochanda

Hello xx

I'm so excited to be sharing my Christmas Doodle Art samples on the Bee Crafty blog today . I hope you got your orders in as these designs are stunningly gorgeous and so versatile xx

Products used:
Doodle Art Christmas Tree
Doodle Art Snowflakes
Doodle Art Robin
Dinkables
Snowflake 1 Inkable
Distress Oxides
MDF Artboard 
Kuretake clean colour pens
Sparkle pens
Embossing powder
Pearls
Gelli Plate


Used my Gelli Plate to create a Distress Oxides background
Baubles coloured with sparkle pens.


MDF inked with Distress Oxides.
Snowflakes coloured with Sparkle pens and the Robin with Distress Oxides.
Texture paste through Snowflakes Dinkable


Cut out snowflakes on patterned paper 


Gelli Plate Distress Oxides background 
Snowflakes cut from patterned paper 


Using Distress Oxides, sparkle pens and kuretake clean colour pens 


Using Distress Oxides, sparkle embossing powder and kuretake clean colour pens 


Coloured using Kuretake clean colour pens 


Versafine and red sparkle pen 


Wallet and voucher Card.
Black embossing powder 
White gel pen

I had soo much fun with this collection and it combines perfectly with all the other Doodle Art stamp sets.
I have made more samples using ALL the Doodle Art sets which I'll share over the coming months

Crafty hugs xx

Related Posts Plugin for WordPress, Blogger...