Wednesday, May 28, 2025

Sally CT - Clean and simple stamping


Hi There! I am here with a very simple card this morning. 

I began by stamping a curvy line of the small flower across the page in 4 shades of versafine clair inks
Next I used the freehand border stamp to add some pink lines below the line of flowers. 
I stamped the sentiment in Hawthorn Rose ink in the top white section and sponged a little ink around the panel. I also added gold centres to the flowers using a gel pen
Finally I attached the panel to the front of a 6x4" white card blank. 

I used:
Versafine Clair ink - I used Bali Blue, Baby Pink, Arctic, Very Peri and Hawthorn Rose
Gold Gel Pen
6x4" white card blank and white card 5.5 x 3.5"
3d foam pads

Don't forget, if you find yourself on the Bee Crafty Website from my blog post, you can get yourself an extra 10% off by using my discount code! Just pop BEESALLY10 in at the checkout x
Thanks for looking! 

Sunday, May 25, 2025

Alison CT - Using up Bits and Bobs

Hi everyone, ever time I get new products from Bee Crafty, I stamp lits of each new stamp before making samples. I never use all that I create and these get put in a box to use later. Later rarely comes, as I forget what is in the box. 
I also save all the off cuts from the catalyst cards, catalyst papers and old book pages. So today I decided it was time to use some.
To create the background, I tore up pieces of left over catalyst card, catalyst paper and old book pages and collaged them, using matt medium, to create a colourful page. I left this to dry naturally. 
To give the pieces some cohesion, I blended uncharted mariner distress ink through the circles inkable big one. 
Now I had my background, I searched through my box of stamped images and chose the ones I wanted to use. As the background was bright, I decided to colour the images with Ecoline watercolour pens. I decided to leave the cogs white.
I used matt medium to glue the images to the page.
Finally, I cut down a sentiment from the wordy stickers, added them to the page and drew a freehand line around the edge.

Products used:
Journaling Essentials 1
Circles Big One
Ecoline pens 
Uncharted mariner distress ink 

Thank you for taking a look.
Alison

Thursday, May 22, 2025

Calee CT - Grid Journaling


Hello , for my step by step this week I thought I would show you how I created this journal page with a grid journaling feel .


First I had a look through my catalysts cards and chose these from the #3 pack with varying colours. These would be use for my blocks of colour . 

I then cut my papers into a selection of squares and rectangles , adding them to my journal page to create my grid .  

My next step was to give each block and my page a doodled boarder using a black fine liner pen .  Then I added a little stenciling randomly in some of the white spaces using Spiced Marmalade distress ink and an D’inkable from set 2 .
 
 
Using some of the smaller stamps from clocks stamp sets I stamped over my blocks of colour. 


My next step was to stamp out some of the clocks on to white card.


I then cut these out leaving them monochrome , but did add some colour with 3 butterflies from the Birds and Butterflies Art stamp set .

 
All of these stamped elements were add to my page along with the Time sentiment from the Time is Free set . 


Finally I took a green and pink Posca pen and added a few dot and heart doodles . 
This is my finished page with a grid journal feel , thank you for stopping by. 
Happy crafting 
Calee .
Here is a list of the products I used 
A black fine liner pen, green and pink Posca pens and a black ink pad . 


Wednesday, May 21, 2025

Sally CT - Pastels and Emboss Resist


Hi There! Thought I would show you some emboss resist for some more pastel inspiration for this month's challenge over on the Bee Crafty Stamps Facebook group. 
I began by stamping a 4" square of white card with the freehand borders using Versamark ink. I sprinkled with Clear embossing powder and heated. 

Next I used various patel shades of distress oxide inks to blend over the embossing. 
Once I was happy with the colours, I gave a light spritz with water and also with Distress Spritz in Fossilized Amber.

On a separate piece of card, I stamped the sketchy flower in Sand Dune ink and coloured using pastel coloured pencils. 

On another scrap of white card, I stamped the sentiment using lilac bloom ink and trimmed it to size.

Using 3d foam pads, I attached the background, the flower and the sentiment to the front of the 5x5" card.


Finally, here is a close up of the sparkly background showing the shimmer.
I used:
Versamark/ embossing ink
Distress oxide inks - I used tumbled glass, twisted citron, dried marigold, shaded lilac and spun sugar.
Distress spritz - I used fossilized Amber
coloured pencils
3d foam pads
4" square of white card
5" square base card

Don't forget, if you find yourself on the Bee Crafty Website from my blog post, you can get yourself an extra 10% off by using my discount code! Just pop BEESALLY10 in at the checkout x

Don't forget to enter the challenge too. There's a £20 stamp voucher up for grabs x

Thanks for looking! 

Sunday, May 18, 2025

Alison CT - Things Take Time ATCs

Hi everyone today I'm sharing a step by step guide to creating these ATCs.

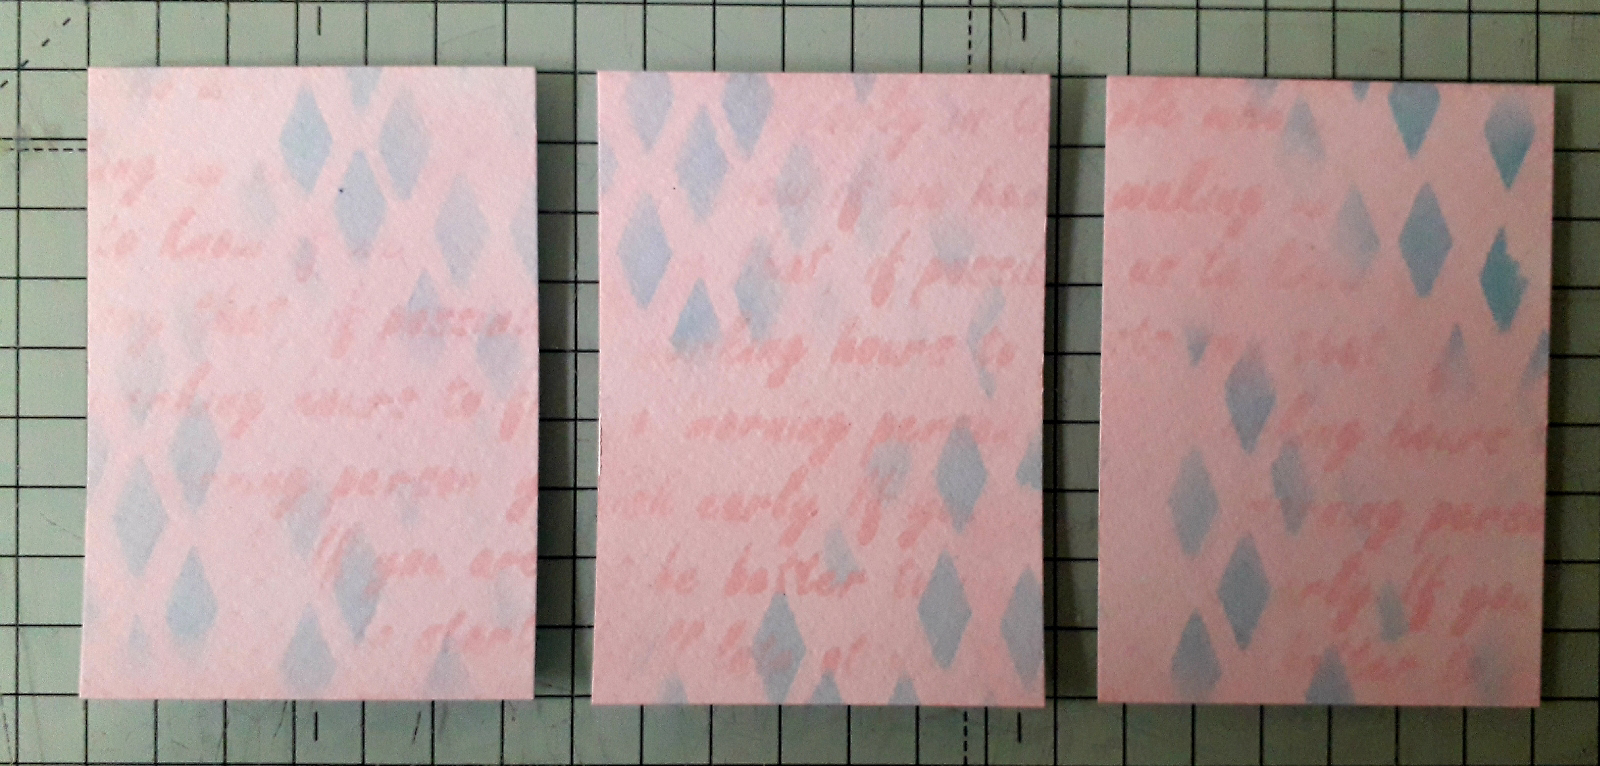
To begin cut 3 pieces of 300gsm card to 2.5 x 3.5 inches.
Next blend milled lavender distress oxide ink over all three.
Then, using the distressed diamonds 6" inkable blend tumbled glass distress oxide through parts of it.
Next, blend spun sugar distress oxide through the text part of the 6" inkable coffee stains script.
To decorate them choose 3 keys and 3 numbers from the mdf pop-outs sheets. Paint these with white gesso and leave to dry. Apply a second coat and leave to dry completely.
Next, stamp 3 clicks, 9 leaves, 9 flowers and a selection of cogs on to two of the greyscale catalyst cards from set 3. Colour them with the  same colour distress pencils as used on the background. Cut out.
Glue the mdf to the ATCs.
Add the clocks, cogs, flowers and leaves. Add a pearl to the centre of each flower.
Finally add sentiments from the Things Take Time transparency prints.

Products used:
Mdf pop-outs - Keys, Numbers etc
Transparency Prints - Things Take Time
6 inch Inkables - coffee stains script, distressed diamonds 
Art Stamps - Clocks - Wasted Time, Time is Free
Art Stamps - Journaling Essentials sets 5 and 8
Distress Oxide - spun sugar, milled lavender, tumbled glass 
Versafine Clair morning mist 

Dolly Dimples -Perfect Pearls Spring Fall

Thank you for taking a look. 
Alison 


Thursday, May 15, 2025

Calee CT -Pastel Flowers


Hello , this week for my step by step project , I have a card with a pastel colour palette , this month’s challenge theme . If you have seen any of my other crafty makes you will know I love bright colours ,so this I quite a change for me .


My first step was to put some colour down on my background . For this I used distress oxides in Dried Marigold with Kitsch Flamingo stencilled over the top , through this D’inkable from set 11. 


It’s a little difficult to see in this photo but I then added a black border using a wide maker pen .

 
The next step was to choose and stamp out the elements for my card . I chose these beautiful flower from the Art stamps set -Sketchy Flowers . I stamped 4 of each , not sure of my design yet but any I didn’t use  I would save for another project 


The flowers were coloured using more distress inks adding a little water to them and painting on with a small paint brush .Again I used distress oxides for that pale chalky feel , just adding some distress inks to add a little depth to the colours . 

  
While these were drying the next step was to choose my sentiment , which I had decided would be fairly large and I would create my design around it . I stamped it on to piece of white card and added a border with a black marker pen . 

  
Next I cut out all of my stamped images and added some highlights and dots with a white gel pen . 


 Next I played around with my sentiment and flowers and finally decided on this design , after adding a stitched border with black fine liner pen , I glued everything down. I also added a few clusters and lines of dots using a peach and pale pink paint pen

Thank you for taking a look at my pastel flowers card . 
Happy crafting 
Calee 
Here’s a list of the products I used 
D'inkables : set 11                        
A black marker pen, a white gel pen and pink and peach paint pens .
Water colour and smooth white card stock . 


Wednesday, May 14, 2025

Sally CT - A Little Hope Journal Spread


Hi There! I've moved away from pastel colours this week and I have a journal page for you. 

I began by smooshing Mustard Seed Distress Oxide onto a double page in my 5x5 notebook. 
When this was dry, I drew a rough circle in Salty Ocean Distress crayon on the right hand page. I brushed over this with a damp brush to blend it a little. 
Using Picked Raspberry Distress Oxide ink, I added some dots using a dinkable. 
I used the same colours of ink to add stamping using Journal Art Elements 3, randomly around the page. 
Next, I used the 4" circle easy frame to add a pink circle using a paint marker....
and also a white circle slightly offset.
On a small piece of vellum/ parchment paper, I stamped and heat embossed the Doodle Art Butterfly in white and cut it out. 

I splattered the page using distress Spritz in Picked Raspberry. 
Then I added the butterfly to the page using matte medium.
I felt it still needed a few white and pink pen dots here and there, so I added some in. 
Finally, I added a wordy sticker sentiment. 
Here are the finished pages once more.

I used:
Distress Oxide inks - I used Salty Ocean, Mustard seed and Picked Raspberry
Distress crayon - I used salty ocean
Posca Pens or paint markers
Embossing ink
Vellum/ parchment craft paper
Matte Medium

Don't forget, if you find yourself on the Bee Crafty Website from my blog post, you can get yourself an extra 10% off by using my discount code! Just pop BEESALLY10 in at the checkout x

I will be live this evening at 8pm over on the Bee Crafty Facebook page. Hope you can join me and thanks for looking! 
Related Posts Plugin for WordPress, Blogger...