Monday, October 05, 2020

Sally DT - A Clean and Simple Autumn Card

Good Morning! I am here with another Step by Step tutorial for a CAS card in Autumn colours. 

I used:

Wordage Ticker tape 1

Queen Bee Autumn botanicals

Versafine Clair Black ink

Distress Oxide inks in Fired Brick, Fossilized Amber, Peeled Paint, Spiced Marmalade and Vintage Photo

Liquid pearls in Buttercup and Platinum Pearl

Ivory square card 

a Sticky note


First I stamped the sentiment right of centre onto the base card and then stamped again onto the sticky note. I cut it out of the sticky note leaving a narrow margin, and placed over the one on the base card as a mask.

Next I used the Autumn botanical stamps and oxide inks to stamp around the sentiment, with each stem touching the sentiment mask.

I put a little of the vintage photo distress oxide onto my glass mat and scooped up some of the ink on a wet fan brush. I then tapped it over the card to make splatters. I repeated this with spiced marmalade distress ink too.

Finally I peeled off the mask and added some dots of liquid pearls amongst the splatters closest to the leaves and seedheads, and sponged a little fossilized amber distress oxide around the edge. 

Here is another look at the finished card.

Don't you just love that sentiment? It really is very true. I have shared some well needed laughter with a few friends recently. It certainly helps to keep the spirits up! 
Thanks for looking and for all your lovely comments.

Saturday, October 03, 2020

Jane DT - La Luna Art Journal Spread

 Hello!

Today on the Bee Crafty blog I am sharing an art journal spread made using the Moon and Stars collection of stamps...


1) I used my Dylusions small flip journal and started by applying distress inks using a blending brush...


2) Next I added some stenciling with the stars d'inkable...


3) Using the same inks already applied, I added stamping using the Stars Textures set...


4) To add more interest I stamped with archival inks with stamps from the La Luna set, then used watercolour and white pen to create more details...


5) To complete the spread I added the La Luna stamp and then stamped one of the Moons and Stars sentiments onto a die cut tag.  

6) For extra texture and sparkle I dabbed stickles glitter gel (moon dust) onto parts of the circles then added more through the stars d'inkable (although it may be tricky to see on the photos!)...


These are the products used:


Thank you for looking and happy crafting!

Jane xx


Friday, October 02, 2020

Hope House


 Hope House

by DT Ann


This week I've used the Doodle House Villa Rose to create a card.
Although it looks like quite a long list, its mostly different colouring mediums. Must admit to treating myself to a couple of Dina Wakley Gloss sprays after seeing Bev, Sam & Jane using them !!

I used:
Distress Oxide Inks: Peacock Feathers & Candid Apple
Paint: light blue, turquoise & a deeper turquoise & red
Posca Pens
Inktense Pencils


Cut a piece of paper 15cm x 15cm, I used a 300gsm mixed media paper.
Cover your paper with white gesso & add some black gesso to the corners & edges. Paint on 3 colours to create a background, use only a little paint at a time, giving a "sketchy" look. 


Whilst that dries, stamp the Villa Rose house onto a separate piece of card (Versamark Smokey Grey) & emboss. I used the Distress Glaze in Speckled Egg as I didn't want it to be too glossy, clear embossing powder would be. Colour in your house, I used Peacock Feathers & Candid Apple, adding depth with Intense Pencils. Repeat this process with 3 trees from the Rainbow View stamp set & one of the colours.


In between colouring spritz the background card with Marine Gloss spray.


 With black gesso & Circle Lattice Inkable add some circles to the edges of your card...


Using an old credit card, dip the edges into some black gesso, tap off the excess paint, then place card onto your background & scrape in a downwards motion. Repeat twice. Use the same technique with a small amount of red paint, randomly, around the edges. 


Add some doodles / details around the edges with Posca pens. Stamp a word from the Small Words set ( I used HOPE) onto the house & a few stars, from the Rainbow View set, onto the background, using Versafine, Onyx Black.


Use 3D tape to stick the house to the background & glue for the trees. Mat & layer onto black card & a 7 x 7 card.


Thank you for stopping by... Ann x


Monday, September 28, 2020

Sally DT - Autumn inspiration


 Good morning! It seems we have entered the season of mists and mellow fruitfulness, so another Autumn inspired card was a must. after all, it is my favourite season! 

To make this card I have used:

Queen Bee Journalling Autumn botanicals

Wordage - Small words

Stencil tape/ low tack masking tape

Versafine clair in Acorn, Fallen Leaves, Shady Lane and Tulip

Tea dye Distress ink 

A blending brush

Liquid pearls in Garnet, buttercup and Avacado

Here is a step by step to explain what I did. 

First place a piece of stencil tape across your card blank at a jaunty angle and use the brush to apply ink along both sides of the tape. Apply around the edge of the card too if you want to.


Next, stamp the lovely Autumnal botanicals with their stems overlapping the tape in the different shades of Versafine Clair ink. I tend to stamp the same stamps opposite each other, but it isn't necessary. Random stamping is equally effective.

Now stamp more foliage in the tea dye ink to fill out the background.

Carefully remove the tape and stamp the sentiment. I used versafine clair Acorn ink for this.

Finally add some dots of liquid pearls as berries and (shhh, don't tell anyone!) to cover any fingerprints 😉 The Splat stamp is also brilliant for this.

Here is a last look at the finished card


 You have a couple of days left to enter the Bee Crafty Stamps challenge on the facebook group with it's Autumn colours theme. Thanks for looking!

Saturday, September 26, 2020

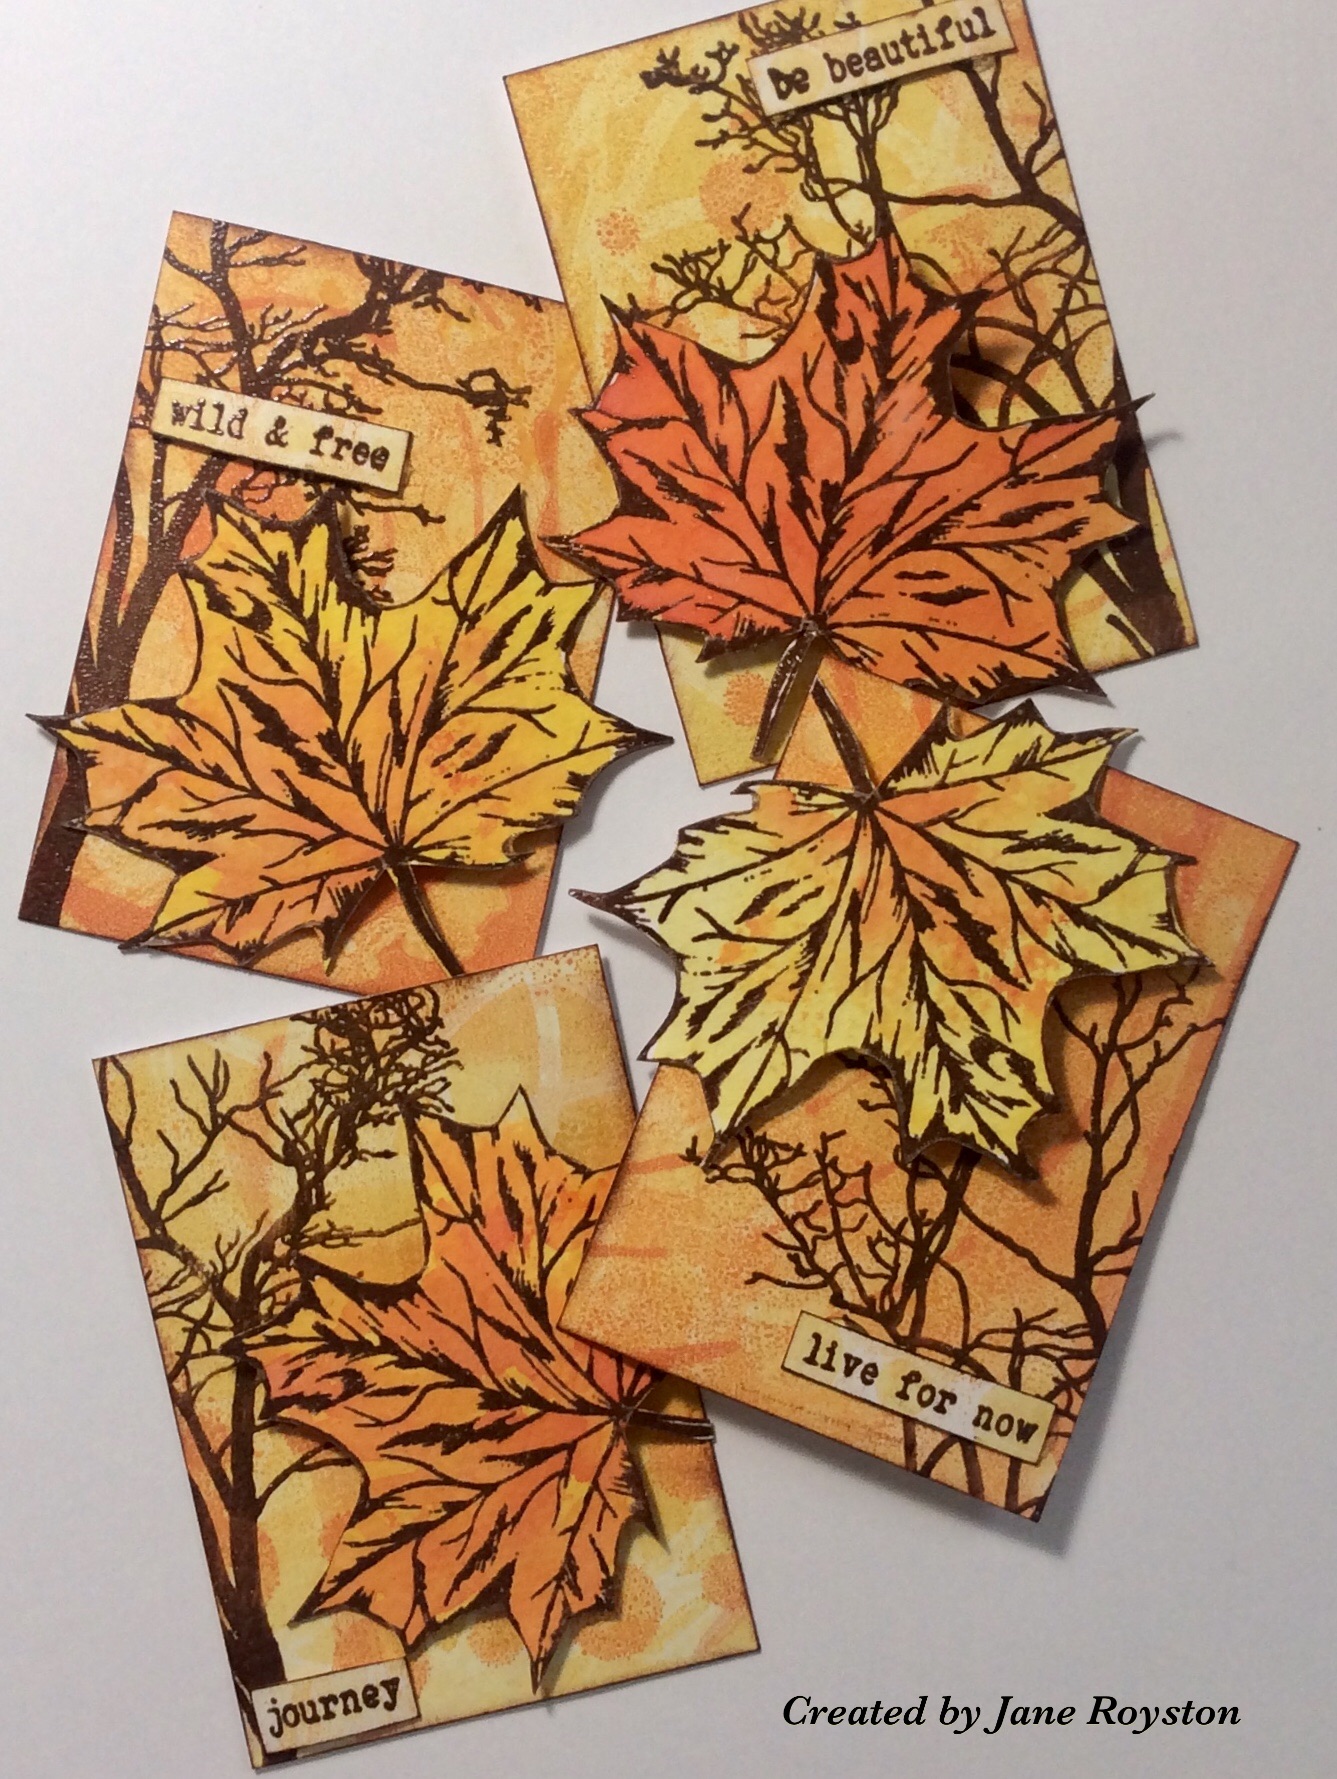
Jane DT - Autumn Leaves ATC's

 Hello!

Over on the Bee Crafty group on face book it is coming up to the last few days of this months challenge and the theme is autumnal colors.  So this week I thought I would create some artist trading cards (pieces of art work that measure 2 and a 1/2" by 3 and a 1/2") using the autumn theme...

1) I started by creating some backgrounds on my gel press with stencils (alternate circles, mandala 2 & sunset) and distress oxide inkpads (wild honey, fossilized amber, spiced marmalade & crackling fire)...

2) Next I chose which areas I liked the best and cut my 4 ATC sized cards...


3) To create some extra interest in the background I stamped part of the deciduous tree onto each card using brown versafine clair and heat embossed with clear powder...


4) Then I stamped the small maple leaf onto watercolour card in the same way as the tree and coloured them using the same distress oxide pads...


5) I chose where to put the leaves on the cards and adhered them with glue gel...


6) Finally I chose some of the sentiments from the small words set and stamped them onto the left over background card.  Again I used brown versafine clair and clear embossing powder...


Here are the products used:


Thank you for looking and happy crafting!

Jane xx


Friday, September 25, 2020

Blending Dreams


 Blending Dreams

by DT Ann


Hi, I've seen a few posts & lives this week that inspired me to go back to basics for my post today, blending oxide inks. Sometimes its good to go back and refresh the simpler things, although it didn't seem that easy when I first started!! :D

I used:
Distress Oxide Inks: Blueprint Sketch, Wilted Violet, Festive Berries & Mustard Seed.
Versa Clair Ink Black (Nocturne)
Versa Mark
White Embossing Powder
DL card (21cm x 10cm)


Cut a piece of A4 smooth card into an oblong just slightly less than a DL card, 20cm x 9cm & kept the piece you've cut off for the extra feathers.

Starting with the Blueprint sketch I put plenty of ink onto the blending tool sponge (tip, use a circular motion). Then on a blending mat, apply ink to one end of the piece of card, again in a circular motion. Cover about 1/4 of the card, keep going over it to intensify the colour.


Next use the Wilted Violet, adding plenty of ink to give it depth, move the ink into the blue but use less pressure, so you get a gentle blend. Swop back to your blue ink & as before gently blend over the violet this should give you a better blend. Continue with the Festive Berries & Mustard Seed, remembering to go back over the join between each colour with less pressure, to blend the colours.
Use a paper towel to rest your hand on whilst blending it helps prevent smudges & finger marks.


Repeat this process on your cut off card.

Once blended, splatter some water across your card, leave to soak in a minute then roll some kitchen paper across it to remove any excess. Leave to dry or use your heat gun, holding the card off the mat & dry both sides as the ink will have saturated the card.


Once dry, gently swipe over with an anti-static bag, then stamp the feather in Versafine Ink, onto the main piece of card, cover in embossing  powder. remove excess & heat until it melts.


Repeat this process twice, on the extra piece of card & cut these 2 out.


Using the coloured Oxide Inks & the stars stamp from the La Luna set add  some stars around the edges. Carefully ink the Circle around LA LUNA in Versaclair & create a semi-circle at the top of the card (as though the feather were hanging from it).


Stamp a sentiment onto an offcut of card & cut out.


Stick the feathers on to the card with a dimensional glue or foam pads (see below)
Create a bow with some bakers twine & add to card along with your sentiment.
Finally stick to your card....


Thanks for stopping by... Ann x


Related Posts Plugin for WordPress, Blogger...