Friday, September 30, 2016

Emily DT - Snowflakes

Hi everyone, my card this week is totally inspired by a gorgeous card by Marleen from the Hochanda samples.

I have used different colours and mounted the card differently.

Here is the card I have made...


I used a selection of green distress inks to make the background, then heat embossed the snowflakes top and bottom.


I adore the new large snowflake stamp. It is so versatile and I can think of so many ways to use it.

I used the Seasons Greeting stamp and a small snowflake in the middle. This is also heat embossed in black.


I mounted it on black and then onto a card blank. I am so happy with how it turned out. I will definitely be making more to send at Christmas in all different colours.

See you next week!

Emily x

Wednesday, September 28, 2016

Marleen DT - Snowflakes on Hochanda

Hey Bloggers..

Once again wednesday and my turn to share inspiration for 
BeeCrafty
Did you catch our Bev on Hochanda last monday?? What do you think of the new stamps? Arent they just fabulous?? I really REALLY loved playing with these. But then again, christmas crafting IS my favorite lol..

Here are the samples I made for the show:


All the above samples has all been made with distress inks and TONS of embossing powder lol.
All my stamping and embossing has been done with versamark and any background stamping has been done with distress ink.
This one is one of the new wooden tags. Its also made like above, distress ink and embossing powder.

I had so much fun making these samples. I love making chrismas cards as it is, but when you get a set of stamps that you KNOW will carry their own for many years to come, its just even more exciting. 
I have already made several more samples with these stamps to share with you over the next few weeks.

And that is it from me for today. I hope you like my creations.
Many thanks for popping by and for any comments left behind.
And dont forget to come visit me on FaceBook, Twitter, Instagram, Pinterest, Youtube or my FB page.
 Happy Crafting

Tuesday, September 27, 2016

Make a Wish

Morning, This is one of the projects I made for Bev's MDF launch show on Hochanda, live from Alexandra Palace. I wanted to add a frame to this large piece and to create and almost 3D look with real depth, like the layered glass images you sometimes see. I used the beautiful Dandelion set for this, it's such a wonderful set of stamps with such great detail as do all of the BEAUtanicals.

To start with, I took a piece of cardboard and cut it to the same size as the MDF. Then using a square die I cut an aperture that would give a large enough window for the design while still keeping enough of the frame for the support needed.

Next I cut some thick wadding to the same size as the frame I had cut from the cardboard.

I coloured the back section of my MDF with Black Soot Distress Ink, the MDF has such a super smooth finish and takes inks extremely well, without any need for an undercoat. I wanted to keep the smooth surface for this piece.

On this back section I used Versamark to stamp the Sentiment, Dandelion and Seed Heads, then embossed with White detail embossing powder, making sure that the design fitted within the frame. To add the other layers I used squares of acetate large enough to fit behind the frame. Taking the first sheet I overlaid it onto the MDF stamped image to allow me to position the next layer of stamping, for these I used white Stayzon Ink. I repeated this for my next layer. When these were both dry, I secured them in turn using foam tape to give the distance between layers.

I took a square of cream calico  and stamped the dandelion seed heads around the area where the frame would be. I stamped them in both Black Versafine Ink and Versamark to act as a resist. Then I dyed the fabric using a blue denim fabric dye.

Once dry, I cut the centre so I could cover the frame. I stretched and secured around the inner frame using Cosmic Shimmer glue. 

Because of the tab at the bottom I just folded this edge and secured above the tab. The other 3 sides were secured with Wonder Tape and Cosmic Shimmer glue.

I covered the base/stand with the same fabric I had used for the frame and cut out the slit.

To finish I secured the frame to my base with Cosmic Shimmer glue.

I hope you like this project and the step by step I have shared with you today, I thoroughly enjoyed making it and sad that I had to send it for the show.Take care and Happy Crafting.xx

Monday, September 26, 2016

Kerrie - Hochanda samples - New Yuletide Stamps

Hiya and welcome to my Monday post for  Bee Crafty 

Today our Bev is Live on Hochanda at 11am, 2pm and 5pm. So exciting for her!!!

The lucky Design Team have been busy making samples for the last 2 weeks which has been loads of fun.

Here are my makes that are using the new Stamps from the shows


 Thank you so much for visiting the Bee Crafty Blog today

Please visit again soon for more gorgeous Design Team makes soon

Krafty Hugs xx
 
please visit my Blog to see more of my work xx

Saturday, September 24, 2016

Barbara DT - MDF Samples from Ally Pally

Morning everyone.....this is a scheduled post as I'm in Croatia on holiday...yeah!
Last weekend, Bee Crafty was at Ally Pally, and launched a fab new range of MDF projects. All the DT got a few to play with, and these were my shapes.....
 For this one, I first covered with a coat of white Gesso, then inked over with Adirondack raspberry pink. Using Versamark, I stamped the Ground Elder - HERE, Tree Branch - HERE and sentiment -  HERE,  then heat-embossed  with silver & white embossing powder. I messed around too much with this one, and didn't like it ......
 Now this one I think is much better.....quite a large MDF piece, so I thought it needed to be classy & elegant. Black & gold is always a favourite choice for me, if I'm doing 'elegant'! I simply covered the front of the plaque with black smooth cardstock then stamped and heat-embossed the Ground Elder - HERE, Teasels - HERE, Tall Teasel - HERE and Sentiment HERE in fine gold embossing powder. (this is my favourite, and a great size to work with)
This was a small plaque, so I painted it with Dylusions acrylic paint in yellow & lime.....(so much brighter than in the pic). I stamped the Teasels, ( as above ) and Sentiment (as above) in Onyx black, Versafine, and added some yellow Stickles - HERE
Well, hope you've enjoyed seeing my MDF pieces, I'll be back next weekend with a sneaky peek of the brand new Christmas stamps.....and they are FABULOUS!!
Catch you later,
Barbara xx

Friday, September 23, 2016

Emily DT - Ally Pally samples

Hi everyone, who saw the live show from Ally Pally?

The design team were very lucky and got to play with some of the new mdf artboards beforehand. Here are a few of my samples...


Wednesday, September 21, 2016

Marleen DT - Ally Pally MDF samples

Evening bloggers..

Once again wednesday and time to share my weekeny inspiration for BeeCrafty.
The samples Im sharing today are from the last show on Hochanda, live from the Ally Pally
Bev brought back the BEAUtanical stamps as they were as BIG success, but this time she teamed them with the brand new MDF.
They literally sold out in minutes and even the extra stock that Julie secured during the show was gone before they were on the shelf lol..

This is the first time Ive really worked on MDF.
It was a bit of a challenge but once I got going, I have to say, I really enjoyed it.
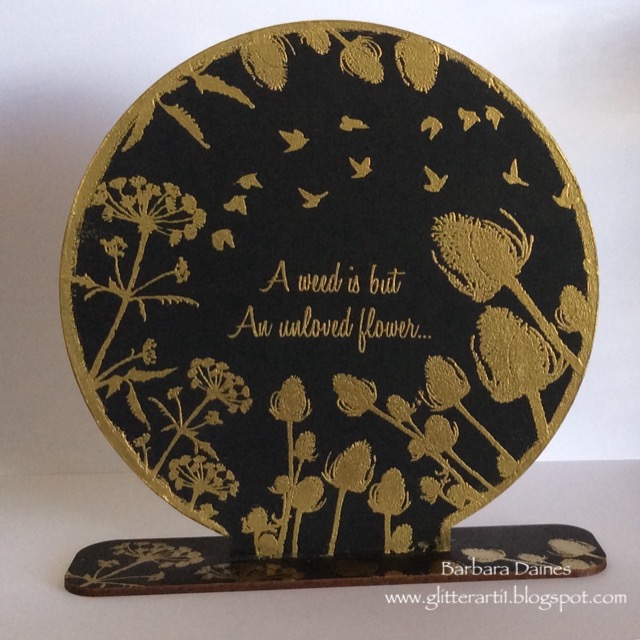
 This one was primes withwhite acrylic paint and once dry, I brushed on distress ink. The moon was simply a punched circle I held in place while brushing the ink on. Once again left it to dry before stamping with my trusty Archival jet black ink.
My picture frame is simply a piece of acetate I stuck on with red double sided tape on 3 sides. The gems hides the tape. I added a strip of washitape to the photo so it can easily be pulled out and replaced.

 This 
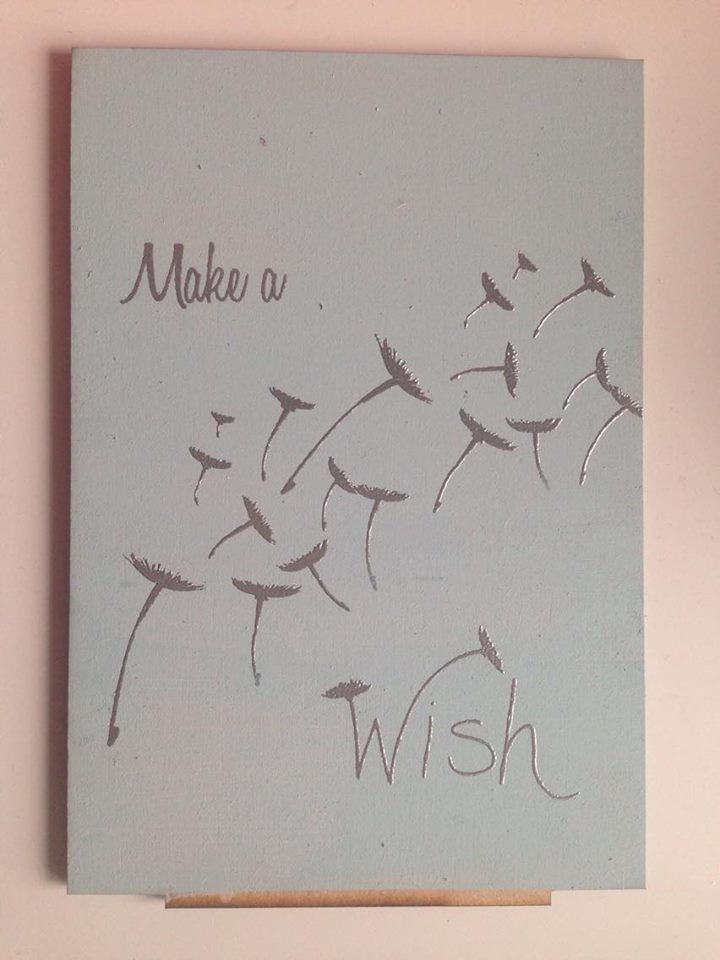
one is the smallest one and by god this one was hard.. I think I painted and re-painted it 4 times before i finally came up with this design that I was happy with. Im used to working on bigger areas and I think that was the problem for me.. 
The final design is simply brused with distress ink, stamped and heat embossed. Due to the many layers of paint you can really see the brush strokes, but I must admit, that is what I like about the final look. It looks more like real wood.
This one was the first one I made. Its 3 colours of acrylic paint. I painted strait on to the MDF and just blended the colours with a dry clean paint brush. Once dry I stamped once again with Archival and finished with a bit of home made shimmer spray..

So if you are like me.. Never really had a go at MDF, these stands are a great place to start.
The surface is smooth and so easy to work with, and you can use so many mediums strait to the MDF..Im sure you will enjoy them as much as I did.


And that is it from me for today. I hope you like my creations.
Many thanks for popping by and for any comments left behind.
And dont forget to come visit me on FaceBook, Twitter, Instagram, Pinterest, Youtube or my FB page.
 Happy Crafting

Tuesday, September 20, 2016

Vintage Wishes

Morning, I am sharing a card I made using the Christmas Collection that Bev brought to Hochanda. I wanted to make a card with a vintage style, I thought that it would really suit the sentiment that I chose to use.

I must apologise for the lack of photos for this one. I am not sure where they went but somewhere between taking them and downloading them to my laptop they disappeared. I will just have to explain today and share the pictures that survived. I started by stamping the beautiful Elegant tree using Cobalt Archival ink. I stamped it four times, lining it up and joining them in the centre, to give the lovely pattern. Next using a brayer, I randomly rolled over the whole piece with Mowed Lawn, Twisted Citron and Picket Fence Distress Ink. I didn't want this perfect as it was supposed to look like a pressed image.

Next using the fancy Merry Christmas, I stamped it in the corner, using black Versafine Ink.

Finally to finish, I back the piece onto black card to form a nice frame.

I hope you like the finished card, I am sorry that all the photos weren't available and that you can understand my explanation. Thank you so much for your visit and hope to see you very soon. Take care and Happy Crafting.xx

Monday, September 19, 2016

Kerrie DT - Yuletide - MDF Tag!!!!

Hiya and Welcome to my Monday Post for Bee Crafty

Yes!!!! more Christmas Makes! - I adore Christmas and all the sparkle and fun so I always make a start on Christmas makes during the Summer Holidays and then continute all through Autumn and right up until the Big Day!! love love love

Over the Weekend 'Our Bev' was over at Alexandra Palace for the Stamping & Scrapbooking Show with her massive stand full of Bee Crafty Goodies loads of Stamps and Yumminess including... Brand New MDF loads of it which was a Big Hit and sold out!!!!

I so wish I could have gone this year but unfortunately my Hubby was working (darn!! I cant drive so I lucked out) 

This Week I have created a Christmassy Tag using one of the Lush MDF Tags! Love!!!!

I had a lot of fun creating this tag with loads of Bee Crafty Lushness!!

The products I used that you can get from the lovely Bee Crafty online shop are...

Bee Crafty - Yuletide Snowflakes - Stamp Set
Bee Crafty - Dots - Inkables Template 
Bee Crafty - Inspired by DaVinci Script - Stamp
Colourcraft - Brusho's - sea green, ost blue, ultramarine & turquoise

I also used White Gesso, and Embossing Powders (opaque white, sparkling snow & chunky silver) from my own crafty stash

First I painted over the whole tag using white gesso, once dry I then sprayed the front using a water spritzer and then tapped the Brusho's over the whole tag removing the excess water with kitchen roll. I then dabbed white gesso through the Inkables Template using a dry stencil brush over one corner. I random stamped the Script Stamp using white ink over the opposite corner. Once dry I then stamped the 2 Snowflakes repeatedly over around the edges of the tag using a clear embossing ink, then used the 3 different embossing powders alternately and heating with my Heat Tool

(I have pierced holes in the tops of my Brusho's so i can use them like salt shakers)

I love how the Sparkling Snow embossing Powder looks on the snowflakes


I ran the clear embossing ink over the tag edges and dipped into the chunky silver embossing powder, which once heated made the edges look like metal


I really love how this tag has turned out - I also love how the colours worked - I am a bit obsessed with blue toned christmas makes this year 


Thank You so much for visiting my Bee Crafty post this week - please visit again soon to see what the other Design Team Members have been creating 

Krafty Hugs xx
 I would love for you to visit my own Blog if you would like to see more by me at... Kerrie's Blog
Related Posts Plugin for WordPress, Blogger...