Showing posts with label Kelly. Show all posts

Monday, December 08, 2014

A bottle of Seasons Greetings

Hi Guys, 

Sorry I am a little late today I have no idea where the time has gone today. 

So today I thought I would share with you a bottle tag that I created using the Yuletide Collection, and my sparkly embossing powder. 

The stamps that I used today are Holly Swirl Tree and Seasons Greetings 

So I stated off with a red card stock and cut it down to 21.cm by 11. cm. 
I scored the top section 5cm, and punched a hole in it that was big enough to get the bottle neck through. 

Next I stamped my image with a clear ink pad, and used "Gold Tinsel" embossing powder, I stamped this on 300gsm stamping card, I cut this down to 9.5 x 9 cm and matted onto a thin red border, which was then matted onto a white card stock that gave a thicker border. 

I repeated the same with the "Seasons Greetings" stamp and matted in the same manner. by top layer is 9.5 cm by 4.5 cm, and again I heat embossed this with the gold tinsel embossing powder. 

To finish the card off I added four pieces of card candi one to each corner and rounded the bottom corners with a corner rounder. 


I hope you like it and I will see you next Monday. 

Crafty Hugs 
Kelly
xxx

Monday, December 01, 2014

Christmas Again

Good Morning Everyone, 

Kelly again today and again I have for you another Christmas card, I thought that I would keep with the Christmas theme, considering we have now entered December. 

So I started with a green six by six card blank that I matted with a white layer, then a green layer and the top layer is a white layer that I decorated up, I used the "Holly Swirly Tree" stamp and the "Seasons Greetings" Stamp. 

I used the Holly Swirl Tree and just randomly inked sections up using a clear embossing pad, and embossed using a silver detail embossing powder, I repeated this around the square.

I then stamped the "Seasons Greetings" stamp and embossed using a gold tinsel embossing powder. I added some liquid pearls to the card to finish it off and left it pretty much as that as I wanted the sentiment to be the focus of the card.


I hope you like it and I will see you next week with some more inspiration.

Crafty Hugs
Kelly
xxx

Monday, November 24, 2014

Seasons Greetings

Morning Guys, 

How are we all today, well it is Monday again already so that means it is my day to share with you some ideas. 

Today I thought I would use some of the Yuletide Stamps.

For this card I used two stamps, I used Holly Swirl Tree and Seasons Greetings   

I complemented the stamps with the Inkables Chain Link Fencing mask

The card is an A4 blank, which I matted with a red layer and then a white layer, the white layer I used the inkables mask and embossed it using my embossing machine, I only did this for the top of the layer. 

I stamped my "Holly Swirl Tree" stamp using a clear ink pad and embossed it with a gold tinsel embossing powder. I matted this onto a piece of red card to give it extra layer, next I stamped in black ink the sentiment and again matted this onto the red card stock.

I added a ribbon and a bow, placed the "seasons greetings" to the bottom, three card candi and liquid pearls in gold.


This is a close up, of what the embossing powder looks like, I tried to cature the sparkle.


That is it for me for today, I will be back next week with more inspiration. 

Crafty Hugs
Kelly
xxx

Monday, November 10, 2014

Poppy Heads

Good Morning Crafty Friends, 

It is Monday morning again, where are these weeks going, be December soon and then in to the new year. 

The card I have for you today is one that I have left blank with regards to a sentiment, I thought that it could be used for a Birthday, Thinking of You, Sympathy or just a Hello card. 


I started with a plain blank card stock, and used a deep blue ink pad and inked the background I didn't really take much care with  it as I wanted it to look all wispy.

I took the "Poppy Heads"    I inked them up using a clear ink pad, and heat embossed them with a suttle white embossing powder.

Next I matted and layered this up on to various card stock to give it some definition.

To finish it off I added ribbon to the bottom, with a fake bow and three pieces of white card candi.

That is it for me for today.

Crafty Hugs
Kelly
xxx

Monday, October 27, 2014

Something That Made You Smile

Good Morning Crafty Friends, 

It is my turn again today to share with you some inspiration using some of the stamps from Bee Crafty. 

The sentiment that I have picked today has to be one of my favourites. 

The sentiment is from the Wordage Range and is called Never Regret 

I created a 6x6 card blank using a white hammered card stock, the next layer is a blue card stock, matted again with another white card stock that has been embossed using the Inkables Chain Link Fencing Mask. 
I used a matting die to create the "toppper" on the white card stock I stamped the sentiment and used a detailed silver embossing powder using my heat gun to "set" it. 

Next I added three butterflies, and liquid pearls to the center of each butterfly and in the join of the chainlinks on the background.


That is it for me for today. 

Thanks for stopping in. 

Hugs 
Kelly
xxx

Monday, October 20, 2014

Spooky Scrapbooking

Good Morning Crafty People;

Today I thought I would share with you a Halloween Scrapbook Layout. I tried to take pictures at each step so bare with me.  All of the stamps I used were from the new All Hallows Range


Step 1
I selected a plain black background and cut it down to 8 X 8 inches


 Step 2.
I used a white card stock and randomly stamped the spider using a black momento ink pad, once I was happy I cut it down to 7.75 x 7.75 inches.


Step 3 and Step 4
I picked an orange background I didn't want it so bright but this was all I had so I had to come up with an idea. I cut this down to 7.25 x 7.25 inches
So I Decided to take the Fern stamp and the black ink pad and randomly stamp the fern around the edges of the card stock I then used the Black Soot distress ink pad and some cut and dry foam to ink the edges, some of the ink got on my finger and left random dots but I didn't try and correct these as I thought it gave a bit more of a "spooky distress" look to it.

I used my explore to cut the border out, I cut it to the size of the card and left it to size. I added white pen around the "tombs" to give it some detail

Step 5. 
Next I created my photo mat layer. 
I used the black card and cut it 6.73 x 4.73 inches
I used a white card stock and stamped the "Poison" stamp I used a dark purple and then edged it with an orange ink I then cut this to 6.5 x 4.5  inches
Once my photo has been taken I will print this at 6 x4 inches


Step 6
I stamped my title and cut it down so it was nearly the correct size, I added orange ink around the edges on this

Step7
I then gathered up all my elements to check that they all worked together and that I was happy with it.
I adhered all these together


Completion
All being well this is what you should come out with, I added the title using foam tape, but only removed one piece leaving the bottom open so I can added my photo then remove the backing and fully stick it down.

To give it some final detail I added stitching around the "Spider" background and some additional detail to the "tombs"


I hope you have enjoyed this and I would love to see some of your Halloween Scrapbook Layouts.
Crafty Hugs
Kelly
xxx

Monday, October 13, 2014

Delightful Judith

Good Morning Everyone, 

Monday already so that means it is time for me to share with you another project. 

This time I have gone for a girly card to share with you and have used one of the brilliant 

FASHIONettes, stamps this time I picked JUDITH to use.


 This time I did a DL card the base is lilac and I am sure it come from a card blank pack I purchased many years ago. 

The next layer is a white layer that I created a background with, I used the Fern stamp from the BEAUtanicals range  I used a distress ink to stamp the fern with I picked Victorian Velvet for this. 

The next layer is a purple matt layer, and the layer on top started with a white card stock, I coloured it in using a distress ink pad, this time I used Worn Lipstick and then inked lightly with the Victorian Velvet. To give it some detail I used the Honeycomb Inkables mask and a fine line black pen and traced the individual honeycombs, to create a different background. 

Next I stamped Judith on to 300gsm card stock and coloured her with a combination of promarkers. I used a rose chalk inkpad for her cheeks, she was a delight to stamp and colour. 

To finish the card I added foam to some of the layers, some ribbon and a knot bow, card candi and a sentiment from the Wordage range "Hugs and Kisses"

That is it for me for today. 

Crafty Hugs
Kelly
xxx

Monday, October 06, 2014

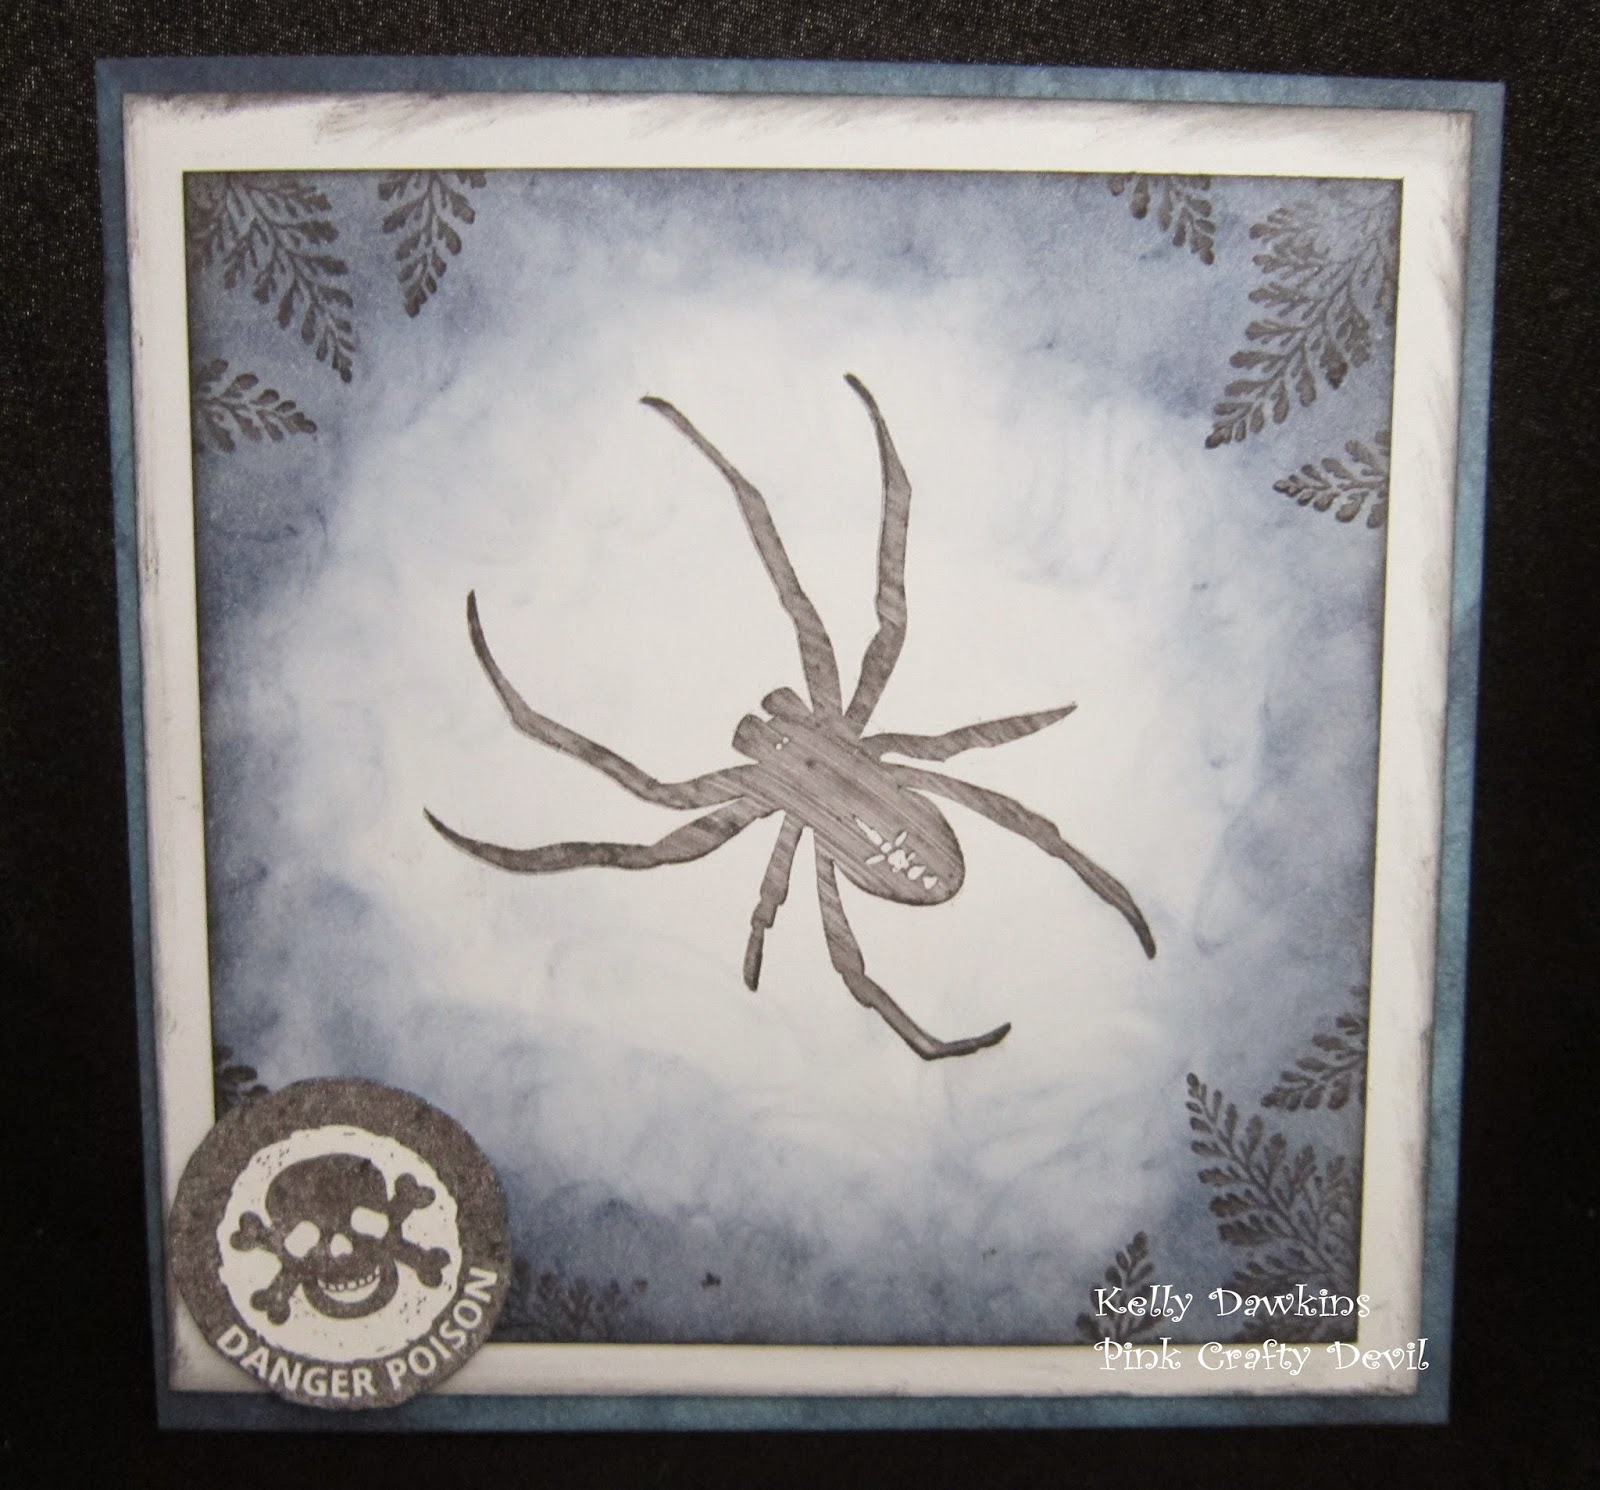
Scary Spider

Good Morning Everyone

Well today I am sharing a card for you that I really don't like simply because it has a great big SPIDER on the front and I have a huge fear of spiders - but when I stamped it out I took great pleasure in pushing it down hard onto the card stock ha ha ha
 

So I started with a light blue back ground which I inked with a dark blue distress ink 

I matted a white layer and inked it with black soot and wasn't overally careful about it as I wanted it to be all spooky

The next layer started with a white card blank, which I stamped the spider on to (shudders) I used a black ink pad for this, I then used the same dark blue distress ink and inked all around the creating darker on the edges and lighter towards the spider. 

I used a fern stamp and stamped it into the corners I stamped them three times in each corner.

To finish I added the "danger poison" stamp to the corner.


Well I hope you like him and I apologise if anyone is super scared now from the spider 

See you next week

Crafty Hugs
Kelly
xxx

Monday, September 29, 2014

To The Moon

Good Morning Guys, 

How are we all today, slowly getting back into the swing of the school runs?

Today I thought I would share with you a card I made using one of the Wordage stamps, and using the colour scheme blue - Which I don't normally do. 


Now I had some issues with this card, I had an idea in my head but no matter what I did the idea in my head just would not replicate itself with this card! This is as close as I could get my idea, not 100% what I wanted but I am happy with it. 

I started with a white card stock, folded it in half to create an A5 side folded card, I matted this with a blue backing paper - Before I glued it down I inked with an old promarker pen the edges  with a slightly darker blue - I then stamped my sentiment using a black ink pad, onto a blue background I matted this onto silver mirror card. 

I cut a piece of the blue card and created a section to go across my card, I added the same backing paper to this but put it so the lines went in a different direction to the backing paper. I finished this with a piece of ribbon and a bow. 

Next I created my "moon" this is a circle cut from a circle die cutter and I tucked it underneath the center section to make it look like a half moon. I then cut my "flags" for the bottom and again tucked them under the center. I added my matted sentiment with foam tape to give dimension. To finish I added fake stitching to the moon, flags and center strip. I finally finished it with six pieces of card candi. 

I hope you like it and you can find the sentiment I used here!

Crafty Hugs
Kelly
xxx

Monday, September 22, 2014

Spooky Goings On

Good Morning Guys,

I thought today I would share a card I made using the "All Hallows" range to try and give you some inspiration ready for Halloween, eek it won't be long now. 


So today I started with a white spring card design  I matted the front with a white piece of card stock that was inked with orange ink and then edged with black soot, the next layer is a black piece of card stock and I stamped the "Danger Poison" stamp in the orange ink and created a background. It doesn't stand out fantastically but it does look pretty cool when you see it. I stamped the sentiment "Happy Halloween" onto a white card stock and inked it again with the orange ink and edged with the black soot ink, I very very lightly went over the sentiment to take away the harsh white. 

To finish the front part I added Liquid pearls in a bronze colour in various place and a piece of black velvet ribbon which I tied into a bow. 

 The title


This is a close up of the bottom section of the card, it is a black layer matted onto the white card blank, with a white piece of card stock that I inked with an orange ink pad and very lightly edged it with black soot, I used the "Danger Poison" stamp to create the background, this was stamped in black ink. 

I added liquid pearls to this section as well.


I hope you like it and I hope it gives you some inspiration ready for your Halloween cards. 

Thanks for stopping in and don't forget a different member of the design team showcases a creation every day on the blog and we have our Facebook group that you can share your creations with us.


Crafty Hugs
Kelly
xxx

Monday, September 08, 2014

Happy Halloween - Gift Card

Good Morning Crafty People,

How are we all today?

I am here sharing with you a quick Halloween card that I have made from the new range ALL HALLOWS.

Okay so we are not in October yet and Halloween seems so far away, but it will be here soon enough. 

My card today doubles up with a gift as well. 

I started with a standard a6 card blank. I used a white piece of card stock cut it down by a 1/4 inch and then used a orange ink pad to ink the edges to create an orange layer, the orange I had seemed to bright for a Halloween card, so I used Black Soot and lightly inked over the edge with the black soot to make it a bit darker. 

The next layer is again a white piece of card stock and I inked it using a dark purple ink bad, I used the black ink to stamp the "Danger Poison" stamp to create the background, one this had been done I again inked the edges with black soot to give it a slightly darker feel. 

I used two pieces of black velvet ribbon and crossed them over - to be honest I didn't pay that much attention to this as I wanted it to be slightly odd angles. 

The next layer is again a white card stock I stamped the Sentiment "Happy Halloween"
 I inked around it with the orange ink and then again ran around the edges with the black soot. I mounted this layer onto foam tap to give some dimension to the card.


Next I decided to create a gift card pocket on the inside. I used the same ink as the front and the same sentiment stamp as the front. I glued down the two sides and the bottom leaving the top open so money/gift card/treat could be popped into the pocket to give to the recipient. - The purple tag is just in there to give you the idea that it is a pocket.


This is a side view of the card, showing the depth of the front, and a peek of the inside. 


That is it for me for today, I really hope you like it, and don't forget to pop back tomorrow to see what Sue has on over for you, we would love to see your creations so please don't forget to pop on over to our Facebook group, or leave a comment in the comment box with a link to your project :) 

Crafty Hugs
Kelly
xxxx
 

Monday, September 01, 2014

Poppy Delights

Good Morning Guys, 

Can you believe that it is September already, many of our schools have gone back today, I know I have a few nervous cousins in my family today. Mind I will be joining them with the nerves in a few weeks time when I go to Uni. 

Today I thought I would share with you a card that I made using a poppy stamp and an Inkables mask. 

To start with I stamped my Poppy stamp using a black in pad, I then stamped it on to a post it note, and cut around it to create a "mask" I put the mask over the original stamped image.

I used a Pink distress ink, and inked it through the Inkables mat, I used more colour at the top and faded it to a light shade towards the bottom, being careful to be really light around the masked image.


I removed the stamped mask and very lightly rubbed a bit of ink around the black stamped image just to take the harsh white away, I added a piece of ribbon to the middle of the stamp and tied a fake bow I matted and layered this onto white and distress inked pieces of card - You will notice I do this a lot, I use plain white card stock and then use my distress ink pads to colour to create a mat. I love how then my colours match perfectly especially if I don't have card stock to match.


 To finish the card I added a sentiment from the Wordage range, liquid pearls to the center of the "grid" and card candi to the top and bottom of the base card. 

I hope you like it and don't forget to pop on over to our Facebook page and group and share your creations with us. 

Crafty Hugs 
Kelly
xxx
Items I used
Distress Ink; Card Stock; Ribbon; Card Candi; Liquid Pearls

Monday, August 25, 2014

Here Comes Santa

Good Morning Everyone, 

How are we all today? Hope you are all enjoying your bank holiday weekend.

Today I thought I would share with you a Christmas Gift Bag, I created with two stamps from the Yuletide range. 


So I started with a plain brown gift bag, I matted it with white card stock and then red polka dot paper, on to this I matted a further white layer that was matted with a wordy Christmas paper. I added a white border and a green strip across the center of the bag, the ribbon  was added and attached to it, with a further piece of ribbon tucked in and pulled to create the Knot. I stamped my Santa onto 300gsm card stock I used a black ink pad for this and left him black and white, I added fake stitching around the Santa and added him to a red square. I repeated the same steps with the sentiment stamp. 

To finish the bag I added two pieces of green ribbon to each side of the handle, three green card candi pieces and three red card candi pieces.


 I think it come out great and would love to read your thoughts on it, don't forget to  leave a comment also for anyone on Facebook Bee Crafty have a page which is updated with all the latest news and a group for you to share your projects with us. 

Thanks for stopping in, don't forget to stop back tomorrow to see what Sue has to offer for us. 

See you next Monday

Crafty Hugs
Kelly
xxx

Products I used
Brown Gift Bag
Red Paperstock
Word Paperstock
Green Paper stock
Red card
White card 
Memento Ink Pad 
300gsm Card Stock 
Green Ribbon
Card Candi 

Monday, August 18, 2014

All about the Fern

Morning Crafty Friends,

How are we all doing? 

Today I thought I would share with you a  card that I made with a male in mind. 


I used the two different fern stamps that you get with the pack - and stamped one with pine needles distress ink, and the smaller one with black soot distress ink, I randomly stamped these in all different directions.

I stamped the "Thank You" from the Wordage range.

I added a piece of ribbon and finished with a bow and three pieces of card candi.

I hope you like this, it is a little different for me and I think it could be used for a birthday card as well.

I am back next Monday and I have a gift bag to share with you then, don't forget to pop back each day to see what the rest of the Design Team have created.

Crafty Hugs
Kelly
xxx

Items I used
Ferns
Wordage
Distress Ink
Card Candi
Ribbon

Monday, August 11, 2014

Well Hello Shirley

Good Morning 

My turn to share with you what I have created to share with you for inspiration. 

This week I am sharing "Shirley"  

I love Shirley she is so cute, with her mad hair and glasses, she is perfect for any age. 

 As it is summer I thought I would go with Bright and Funky colours, this is really not my normal colour scheme but it is so cheerful and bright I thought it would certainly stand out. 

The base is an 8 by 8 white card blank with Bright Pink and Lime Green colour card stock which have been cut down by a 1/4 of an inch to give a nice border. 

I used a designer paper from my stash which luckily complimented the image and my colour scheme perfectly.


 I stamped Shirley out onto 300gsm card stock cut her out using a spellbinder die, and coloured her with promarker pens.


Hair; Walnut, Cocoa, Cinnamon, Sandstone
Top; Wild Cranberry, Pink Lobster, Rose Pink
Skirt; Leaf Green, Grass Green, Apple
Boots; Apricot, Honeycomb, Oatmeal
Skin; Ivory, Blush, Oatmeal, Sunkissed Pink
Glasses; Apple
Eyeshadow- Soft Aqua (Flex Marker)
 Lips - Vermillion (Flex Marker)
Edging - Soft Aqua


To finish the card I added a green wavy border with a pink strip across the center of it, I then added a sheer green ribbon and knotted it at one end.  I used a photo corner die in the green added to each corner. Finally to finish the card I punched out four flowers two in each colour and added gems to the center of the flowers and to the center of the corner dies. 

I hope you like what I have shared with you and please don't forget you can share your creations with us over at the "Bee Crafty Stamps Facebook group" and our Bee Crafty Page. 

Thanks for stopping in, don't forget to pop back tomorrow to see what else the DT have in store for you. 

Crafty Hugs
Kelly
xxx

Monday, July 28, 2014

HO HO HO Merry Christmas

Good Morning to Everyone, 

Wow its back to me, these weeks are flying past. 

Today I am sharing for you a Christmas tag. The tag is probably for a really big present but you can resize it to suit your needs. 

I took a plain piece of card stock and used my red brick distress ink and inked the background.. I didn't want just a solid colour so thought this would work well. 

I took my stamp he is from the Yuletide range and is "Claus" and stamped it on to 300gsm white stamping card, and coloured his face with promarker pens, I added glossy accents to his glasses and stickles glitter glue to his beard and hair. 

I matted this onto red and gold card stock.

I added a bordered and inked this in green, and added gems to the center of each point. 

The poinsettia is a die cut and I coloured this in using two different reds and layered them up, I added gold gems to the center of the flowers. To finish it off I added red spotty ribbon.


I adore this Santa he is so cute and makes me feel like I could just have a cuddle of the "real" Santa. 


That is it for me for this week, don't forget to pop back and see what Sue has on offer for you tomorrow. 

Don't forget as well you can find "Bee Crafty" on Facebook we have a lovely little group that you can share your creations in. 

Crafty Hugs
Kelly
xxx

Monday, July 21, 2014

Butterfly Flutterfly

Hi Everyone, 

How are we all today?

Today's  card I have concentrated on just the Inkables Masks that you can get from Bev and  how they can look without having to be mega grungy with them. 


 I used 
Inkable - Honeycombe Mask


So I cut down my card stock to 5.25 x 5.25 inches.

I matted this with the next layer that I cut to just under 5 x 5 this layer was plain white cardstock and it was run through my calibre with the  Chain Link Fencing mask, once it was embossed I used my Worn Lipstick Distress Ink and inked through the stencil. This is about as inky as I get. 

Next I cut a strip the same width but about 4 inches high, I used a border punch to punch along the bottom, I then ran this through the calibre with the "Honeycombe" mask.  I very gently ran a make up sponge done the edges with some of the worn lipstick.  Before adhering it I added a piece of ribbon and tied it with a bow. 

Next I stamped out using the worn Lipstick the sentiment "Hugs and Kisses" and matted this up. 

For the Butterflies I cut different size butterflies out, and embossed these with the Honeycomb mask.  I added liquid pearls down the centre of the butterflies. 

To finish the card I added three pieces of card candi down at the bottom.

I hope you like the card, and don't forget to pop back tomorrow to see what Sue has for you - I am sure she will have something special for you as normal. 

Take care see you next Monday 
Crafty Hugs
Kelly
xxx

Monday, July 14, 2014

Rose Garden Abi, Flower Power

Good Morning All. 

How was your weekend?

Today I have for you a card that I think would go great for an female occasion, thank you, thinking of you, birthday or just hello. 


Today's card I created using a die for the shape of the card. I matted this up with white and purple card stock, using different sizes for layers.

For the final layer of the white card just behind the image I used the Inkable "Honeycomb full" mask and ran it through to give it an embossed texture. I stamped my Rose Garden Abi stamp and coloured her with promarker pens. I added fake stitching around her and used a border punch to punch down one edge of her layer. I added two pieces of ribbon, a dark purple ribbon and then a sheer purple ribbon, I tied a knot bow at one end. I added three butterflies, and card candi and then used the "Flower Power" stamp that you get with the main stamp plate.

Isn't she really cute!  I love her and I think she can be used for some many different occasions.


Don't forget Sue will be with us tomorrow for some more of her wonderful creations. 

Hugs Kelly
xxx
Related Posts Plugin for WordPress, Blogger...