Showing posts with label Christmas. Show all posts

Wednesday, December 14, 2016

Marleen DT - The last few christmas cards..

Hey bloggers..

Once again wednesday and my turn for some inspiration for 

Did you see my post last week?? I made some backgrounds with some of the christmas stamps and some paints. Great fun. (Find the post HERE).
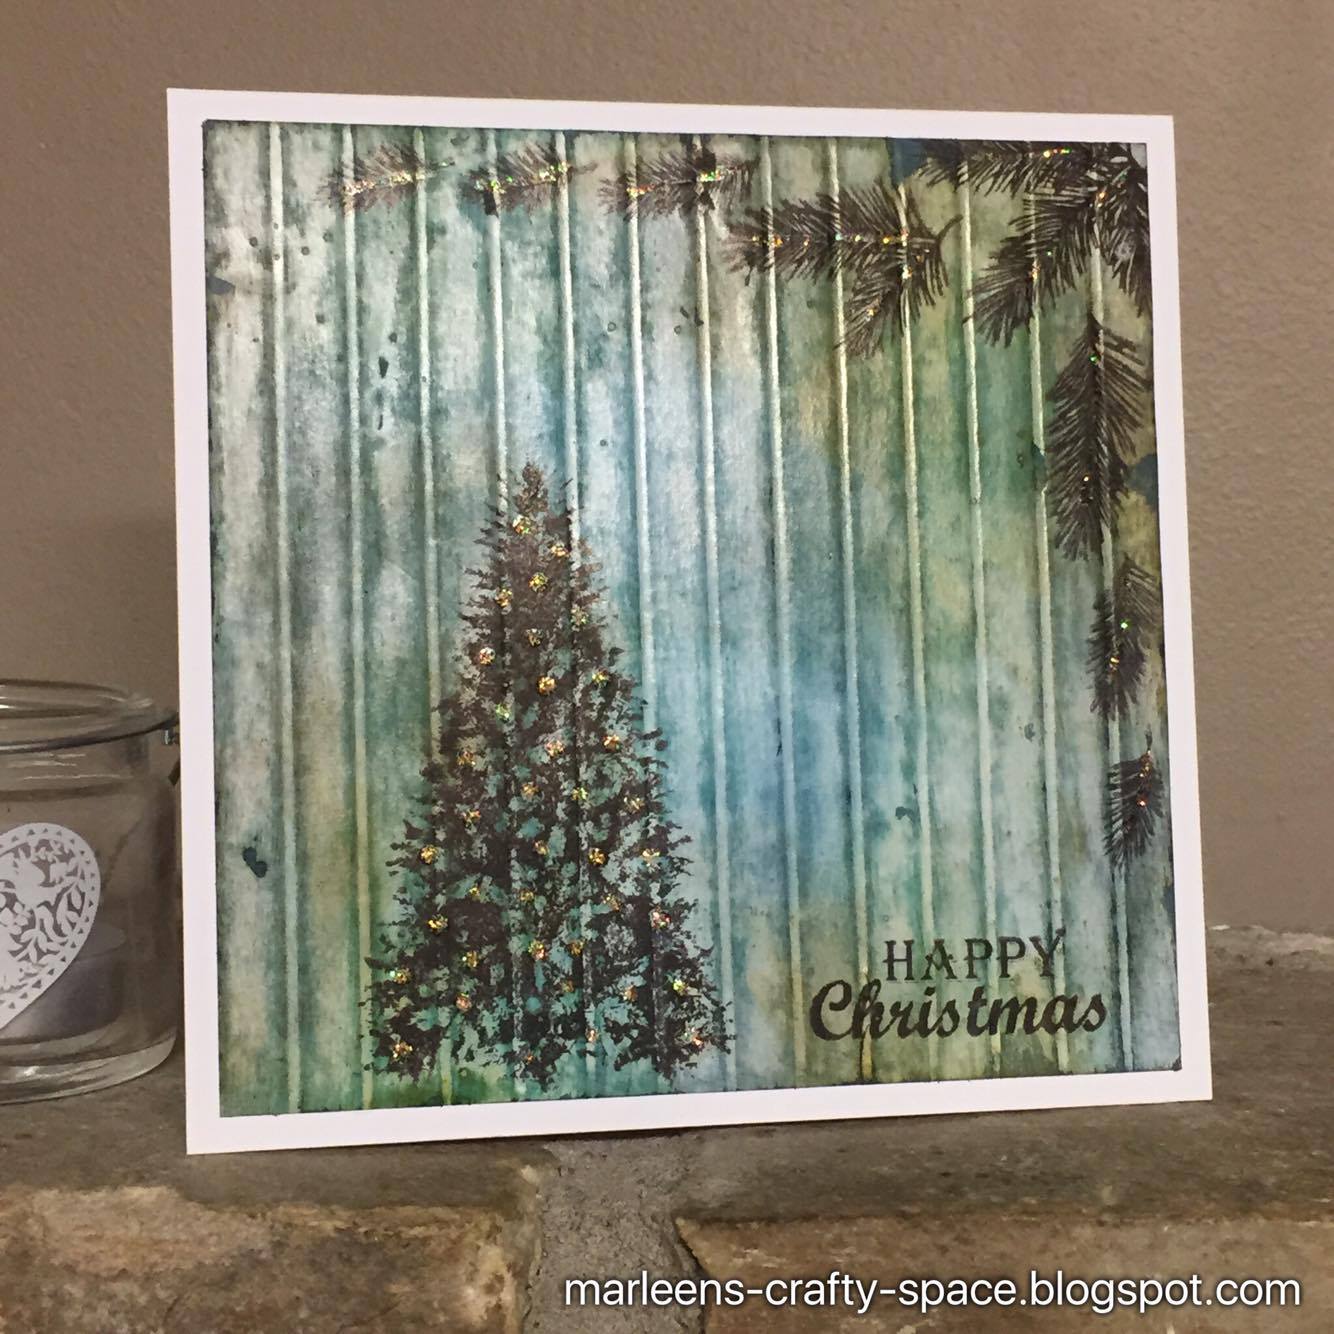
Well for today I made some more cards with these backgrounds.


Stamps I used for these projects:
You can find them in the BeeCrafty STORE.
These 2 cards are A5 and made with the backgrounds I made for last week
(link for last weeks post, above).
I matted and layered my cards blank with black and my backgrounds sheets from last week. I then stamped with versamark and heat set with black embossing powder.

The "Xmas" on the top card is a die from my stash (sorry I dont know from what company)
I diecut it from my gelli plate sheet and also from cheap white card stock 3 times and glued them all together before adding it onto of a black card stock panel.

The "seasons greetings"is indeed a BeeCrafty stamp. Stamped with versamrk and heat set with black embossing powder on a panel of my background paper.
 And that is it from me for today. Thanks for popping by and for any comments left behind.
Dont forget to come visit me on FaceBook, Twitter, Instagram, Pinterest, Youtube or my FB page.
 Happy Crafting

Wednesday, September 28, 2016

Marleen DT - Snowflakes on Hochanda

Hey Bloggers..

Once again wednesday and my turn to share inspiration for 
BeeCrafty
Did you catch our Bev on Hochanda last monday?? What do you think of the new stamps? Arent they just fabulous?? I really REALLY loved playing with these. But then again, christmas crafting IS my favorite lol..

Here are the samples I made for the show:


All the above samples has all been made with distress inks and TONS of embossing powder lol.
All my stamping and embossing has been done with versamark and any background stamping has been done with distress ink.
This one is one of the new wooden tags. Its also made like above, distress ink and embossing powder.

I had so much fun making these samples. I love making chrismas cards as it is, but when you get a set of stamps that you KNOW will carry their own for many years to come, its just even more exciting. 
I have already made several more samples with these stamps to share with you over the next few weeks.

And that is it from me for today. I hope you like my creations.
Many thanks for popping by and for any comments left behind.
And dont forget to come visit me on FaceBook, Twitter, Instagram, Pinterest, Youtube or my FB page.
 Happy Crafting

Wednesday, August 24, 2016

Marleen DT - Hochanda Smaples and MDF Window

Morning bloggers..
And thank you for stopping by..

Today I want to share all my samples I made for the last BeeCrafty show on Hochanda.
Bev had a mix of new and older christmas stamps on the show and they proved very popular. She also brought some of the Inkables Templates (which are all favorites of mine..)
Bev also showed us something totally new to BeeCrafty.. MDF windows... and boy they flew off the shelves lol..
MDF is something I've personally not done a lot off, and I must admit I found it a bit scary.
Anyway, I have to say, in the end, I really loved the process. It made me really think about what I wanted to make, and made me think about colours, texture ect ect before even starting. Normally I just go with the flow and start over if it dont work, but here I had to think about the process..

I made 15 samples altogether for the show. Only a few got shown on the screeen this time but I hope I can still give you all a bit of inspiration with these amazing stamps.

Here is my MDF Window.. The kit contains the back (where I stamped and painted), the window pane and a foot for both to stand on. Find the kit HERE.
 I made mine as a wall hang instead of using the foot

 This one is made using the Inkables Templates layered up and then stamped on top.


 THis one is stamped and covered with a double sided sticky sheet and covered with glitter.

 This one is made using the ofcuts from the MDF window. 


 This one is also made with the inkable Tempates. I stamped through the circle stencil to get the rounded shape.

 Lots of embossing poeder and distress ink


 Ive made this back ground before and still love it. HERE is a link to the original tutorial on how to make it.


 This one is stamping and mica powders.


And that is all from me for today. I hope I've managed to inspire you a bit to have a go with these amazing stamps.
Many thanks for popping by and for any comments left behind.
And dont forget to come visit me on FaceBook, Twitter, Instagram, Pinterest or my FB page.
 Happy Crafting

Monday, August 15, 2016

DT Kerrie - Christmas in August x

Hiya today I would like to share with you a little something I made using some of the new stamps that will be over on Hochanda with our Bev on Thursday

I used some of the new stamps for the background they are pieces of the pine needles from the trees
I repeat stamped them in shades of green distress inks to build up the background.

I stamped the large tree onto a piece of cardstock using the same inks tapped over the stamp to add texture

I then stamped and fussy cut 2 pieces of pine to add as an embellishment which I added 2 real mini pine cones to. 

I stamped on of the new sentiments which I fixed sideways onto the card front

I added some gems to finish

Don't forget to watch or set your planner's to record the shows on Thursday all the new stamps are so gorgeous you won't want to miss any xx

Wednesday, December 23, 2015

Marleen DT - Holly Swirl tree

Hello everyone..

A new project today, made for

A very simple card but I just love this combination and I think that even the simplest of stamps could be used for this tecnique.
White on craft card...

For today Ive used the "Holly Swirl Tree", You can find it in the STORE with all the other goodies. 

As i said, A very simple card. Its simply just stamping with versamark and white embossing powder.
The edges are made by adding a bit of distress ink and then swiping the versamark pad on the edges, genty tapping of the eccess. Embossing powder will stick to distress ink as well so thats how the specks stayed in place.

And thats it from me for today. 
Thank you for popping by and for any comments left behind.


Wednesday, December 02, 2015

Marleen DT - Holly Swirl tree

Hello everyone..

Once again wednesday, and can you believe it?? Its DECEMBER..
Merry Christmas everyone..

Today I want to share a little quick card I've made for
Bee Crafty

I've used the stamp called Holly Swirl Tree from the Yuletide collection
 
This card was made by smothering my cardstock in the blue distress ink. I then stamped my tree and embossed it with silver embossing powder. Once melted and cool, I tool a glue pen and hand drew my border around and once again embossed with the silver embossing powder.
Once my border was cooled I used a brown distress ink around the edges.

The little specks around the card is also embossing powder. I 'made' them by simply not flicking the card too hard when taking of the extra embossing powder when making the border.

And that is all from me for today. I hope you like my wee card.
Thank you for popping by and for any comments left behind.

Monday, November 16, 2015

DT Kerrie - Yuletide Elves - Quick Makes For Christmas Fair

Hiya and Welcome to my Monday Post for Bee Crafty

Over the Weekend I have been Crafting up a Storm getting ready for my little ones' Christmas Fair at School where I have my first ever stall selling my Christmas Cards and Christmas Gifts 

The very gorgeous 'Yuletide Elves' have been a Godsend for making up lots of Quick Cute Christmas Cards 'Eric & Elsie' and 'Ernie' are all so so cute and so much fun to colour up and teamed with some lovely christmas papers from my Stash and now I have stacks of cards ready and packed for the Stall


I stamped the 'Yuletide Elves' onto supersmooth card and coloured them to match the papers I chose using my fave Alcohol Markers 

Thank You so much for visiting my Post today - please do visit the Bee crafty Blog again soon to see more gorgeous makes from Our Amazing Design Team

Krafty Hugs xx

Monday, November 17, 2014

Santa Is Coming To Town

Good Morning Guys, 

Today I have for you a card using one of the Yule Tide collection. I have used Claus as the main feature of this card. 

The card is a 7x7 card blank that has been matted and layered up using various backing papers, and card stock. 

The image was stamped and then his face was coloured in using promarkers, I used stickles to glitter his beard and white pearls to "pearl" around him. 


I finished the card off with some ribbon, which I tied into a bow and three pieces of card candi.

I hope you like him and thank you for stopping in

Crafty Hugs
Kelly
xxx

Monday, November 03, 2014

Underneath My Tree

Good Morning Guys, 

Monday again so it means it is my turn to share with you some more inspiration. 

Today I have a Christmas card for you. 


I created a 6x6 card blank and started with a red card blank.
The next layer was a white blank card stock, the I repeatedly stamped the sentiment "If you're not under my tree Christmas morning i'm going back to bed" 
I next matted it again with a plain red layer and then stamped the sentiment repeatedly on the next white layer again using a christmas red ink pad.
The main topper was stamped with black inkpad and then his hair and beard was glittered using a fine glitter glue. I matted this onto a red layer. To finish the card I stamped the sentiment again and matted it up, and placed it into the corner, I added a poinsettia with some gold fibres, and three pieces of card candi, I then fake stitched around the layers to give them further detail.

Well that is it for me for today

Crafty Hugs
Kelly
xxx

Monday, August 25, 2014

Here Comes Santa

Good Morning Everyone, 

How are we all today? Hope you are all enjoying your bank holiday weekend.

Today I thought I would share with you a Christmas Gift Bag, I created with two stamps from the Yuletide range. 


So I started with a plain brown gift bag, I matted it with white card stock and then red polka dot paper, on to this I matted a further white layer that was matted with a wordy Christmas paper. I added a white border and a green strip across the center of the bag, the ribbon  was added and attached to it, with a further piece of ribbon tucked in and pulled to create the Knot. I stamped my Santa onto 300gsm card stock I used a black ink pad for this and left him black and white, I added fake stitching around the Santa and added him to a red square. I repeated the same steps with the sentiment stamp. 

To finish the bag I added two pieces of green ribbon to each side of the handle, three green card candi pieces and three red card candi pieces.


 I think it come out great and would love to read your thoughts on it, don't forget to  leave a comment also for anyone on Facebook Bee Crafty have a page which is updated with all the latest news and a group for you to share your projects with us. 

Thanks for stopping in, don't forget to stop back tomorrow to see what Sue has to offer for us. 

See you next Monday

Crafty Hugs
Kelly
xxx

Products I used
Brown Gift Bag
Red Paperstock
Word Paperstock
Green Paper stock
Red card
White card 
Memento Ink Pad 
300gsm Card Stock 
Green Ribbon
Card Candi 

Sunday, November 18, 2012

Sensational Seasons Greetings by Sue & Tracey

Happy Sunday Everyone,

Well 5 weeks tomorrow is Christmas Eve which means we should all be getting underway with our Christmas Cards, I know many who have finished many  who are halfway through and those like me who have barely or not started at all.

Luckily the Bee Crafty Design Team have come up with lots of fabby ideas to keep us inspired.

Today I have 2 fantastic NEW offerings from Tracey and Sue

From Tracey:
What Tracey used: Ivory 5x5 card, mat and layer black glitter card, ivory supersmooth & black card.
Seasons Greetings & Winter Wonderland Trees stamped using versamark and embossed with Black supersparkle embossing powder.
Wide black satin ribbon wrapped around the card and sentiment stamps fixed onto ribbon.
Finished off with black glittered card snowflake die cuts & Sparklers gems.


From Sue:
C6 Plain Card, Layer with Silver and an Embossed card using an embossing folder, Sparklers Gems to accent and the Seasons Greetings Circle cut with a number 2 Spellbinders Circle amd layered

Both of these cards are Simple and Stunning and would grace any home this festive season

Bev x

Wednesday, November 14, 2012

Seasons Greetings Bauble Card by Suze

Good Evening All,

We have a fab card for you by Suze-Jo.

She has used the NEW Seasons Greetings Circle to create another gorgeous Bauble Card

Suze has layered her Seasons Greetings Circle on die cut circles with a gorgeous ruffled lace layer to create a beautiful bauble effect.

What I love about this design is that it would look fab in any colour so if ven if you chose to do all of your Christmas cards like this you could still really mix it up by doing dofferent colour ways

The Seasons Greetings is part of the

Bev

Wednesday, October 24, 2012

Winter Wonderland by Pauline

Today we have a gorgeous card by Pauline, using the brilliant NEW Winter Wonderland Set (2 Stamps for only £3.99)

Now I have to say this card is not instantly recognisable as one of Paulines, as it is VERY non-grungy, with clean lines (and auline is usually up to her elbows in ink) and is quite delicate but as I'm sure you'll agree like all Pauline's creations it is STUNNING!


This fantastic card is easel style with some funky little extra folds

The borders are Bazzil bling, edged with a Tonic punch, and a thin piece of snowflake paper added. the Winter Wonderland stamps have been stamped in Broken China, and clear embossed, snowflakes punched out of Bazzil bling, with diamond stickles added.

Here is picture from the side as well which will help to see the construction

This is such as stunning card and the stamps are beautifully shown off

You can see the full yuletide range online


Hope you are all having a great week

Bev x

Friday, October 12, 2012

More Yuletide Lovelies

Afternoon All,

The DT have been making some more luscious lovelies using this weeks release,

How about this gorgeous card by Sue

using the fab Claus stamp and the 'twas the night before Christmas stamp

and Tracey has shown here how great the 'twas stamp is as a little tag

with a little faux stitching around the edge for effect GORGEOUS

Remember you can see all the Yuletide online or instore

TOP TIP:
For ultra smooth images we advise priming your stamp before it's first use by inking up and stamping a few times with an ink such as archival, but nearly any dye based ink will do :)

We have a NEW Christmassy paper range arriving very soon so keep your eyes peeled

Have a great weekend everyone

Bev x

Thursday, October 11, 2012

Circle Easel Sleigh Card by Tracey

Today we have a fantastic card using the sleigh and 'twas the night before Christmas stamp by Tracey

This is a stunning card and is just that little bit different to add a funky new twist to your Christmas Card Designs

You can see all the stamps in the Yuletide range in store or online here

Bev x

Wednesday, October 10, 2012

Today we have gorgeous card by Sue


Sue has stamped the sleigh in black and filled in the lines with silver pen and then layered in a rich red piece for the body of the sleigh.

The sleigh is framed by the fab Fir Tree, also available in the Yuletide range, which has stamped ansolutely beautifully and also uses the new message released this week.

Bev x
Related Posts Plugin for WordPress, Blogger...