Saturday, March 30, 2019

Jane DT - Doodle Art Stamp Samples

Hello!

Today on the Buzzy Goings on at Bee Crafty blog I am sharing the samples that I made for this weeks HOCHANDA shows...


Thank you for looking and happy crafting!

Jane xx

Thursday, March 28, 2019

Karen DT - Doodle Art samples for Hochanda

Morning crafters xx

So excited to share my samples today, on the Bee Crafty blog, using the fabulous new Doodle Art collection of stamps. Did you get yours ordered from their show earlier this week? I had so much fun playing with these sets which mix and match so well together x

Products used:
Doodle Art Girl
Doodle Art Butterfly
Doodle Art Dragonfly
Ticker Tape 2
XL every day sentiments
Distress Oxide 
MDF artboard
Dinkables
Ink
Sparkle pens
Versafine
Acrylic paints
Shaving foam


Distress Oxide 
dinkables 
White gel pen
Ticker Tape stamps 


Distress Oxide 
Dinkables
Sparkle pens 
Ticker Tape stamps 


Mdf artboard
Dinkables 
Acrylic paints 
White gel pen
XL creativity stamps


Ink
Shaving foam 
Ticker Tape stamps 


XL everyday sentiments 
Dinkables 
Distress Oxide 


XL creativity stamps
Distress Oxide 
White gel pen


Pattern paper
Ticker Tape stamps 
Versafine


XL everyday sentiments 
Archival
Ink


Distress Oxide 
Dinkables 
Versafine 
XL everyday sentiments 

I hope you enjoyed looking through my samples for these amazing stamps. Will definately be many more blog posts using these lol

Crafty hugs xx 

Monday, March 25, 2019

Lorre-Anne DT - Doodle Art Hochanda samples

Hi everyone, for my Bee Crafty blog post this week I'm sharing the DT samples I have made for Bev & Sam's Hochanda shows today at 12 noon and 4 pm.  These cards were made using the amazing new Doodle Art stamps, and I absolutely love them!!!!  I'm going to be using these stamps a lot!


7"x5" card blank, Creativity Words, Doodle Art Stamps - Girl regular, Dragonfly regular, Bird regular, Prismacolour pencils, Onyx Black Versafine ink, white gel pen


7"x5" white card blank, Creativity Words, Doodle Art stamps - Girl regular, Bird regular, Onyx Black Versafine ink, Distress Oxides (Dried Marigold, Ripe Persimmon, Tea Dye, Antique Linen, Brushed Corduroy, Ground Expresso, Mowed Lawn, Spun Sugar, Worn Lipstick)


6"x4" card blank, Creativity Words, Doodle Art stamps - Girl regular, Bird regular, Prismacolour pencils, Onyx Black Versafine ink, black gems


6"x6" kraft card blank, Everyday sentiments, Doodle Art stamps - Bird regular, Dragonfly regular Distress Oxides (Rusty Hinge, Ground Expresso, Crushed Olive), white gel pen


6"x6" white card blank, Ticker Tape sentiments, Doodle Art stamps - Dragonfly regular, Distress Oxides (Scattered Straw, Peacock Feathers, Chipped Sapphire), Onyx Black Versafine ink, Texture Discs


6"x6" white card blank, Creativity Words, Doodle Art stamps - Bird regular, Dragonfly regular, Onyx Black Versafine ink, Distress Oxides (Mustard Seed, Wilted Violet, Candied Apple, Carved Pumpkin, Mermaid Lagoon, Mowed Lawn)


6"x4" card blank, Ticker Tape sentiments, Doodle Art stamps - Bird regularDragonfly regular, Onyx Black Versafine ink, Prismacolour pencils

I had  so much fun using these stamps, and I can't wait to make more!  I'll be back next week to share another DT make with you all, until then happy crafting!

Hugs, Lorre-Anne x

Saturday, March 23, 2019

Jane DT - Grunge 'v' Glitter and Gloss (Altered Tin)

Hello!

Today I am on the Buzzy Goings on at Bee Crafty blog with an altered tin project.

I love to alter different objects and it is even better if that object can then also be useful as well as fun to create.  My children have been decorating tin cans for a while to store different things in so I decided to get in on the act and use a tin to hold my watercolour brushes.

The styles that I like to use in my crafting are very varied and I love both the grungy look as well as very colourful and pretty so I decided to combine both within this project...


I started by making sure my tin was really well cleaned and I used one that required a tin opener rather than a ring pull as it seems to leave a safer edge.  Once clean I painted it with 3 layers of white gesso, drying between each...


To add texture I used my palette knife to put on some crackle paste and allowed it to dry overnight...


I wanted some background stamping but as this was a curved and uneven surface I used archival ink with the numbers stamp and stamped onto tissue before applying it to the tin using matte medium...


Next I added colour by applying watered down acrylic paint in washes.  I used silver, light and dark blue and quinacridone gold...


To try to highlight the crackles I added black antiquing cream from Decoart which you apply, let dry then rub off the areas you don't want.  As this does not ever truly set I added a layer of matt varnish afterwards.  It didn't work as well as I had hoped so I decided to add some gilding wax as well...


To add some stencilling I used the metal alpha d'inkable with some black modelling paste.  Once this had dried I added a lighter gold gilding wax over the top to bring out the details...


At this point the tin had become much darker than I had wanted so I decided to add some more stencilling, this time using the chevrons d'inkable with white gesso.  I also then dry brushed some of the white across the tin...


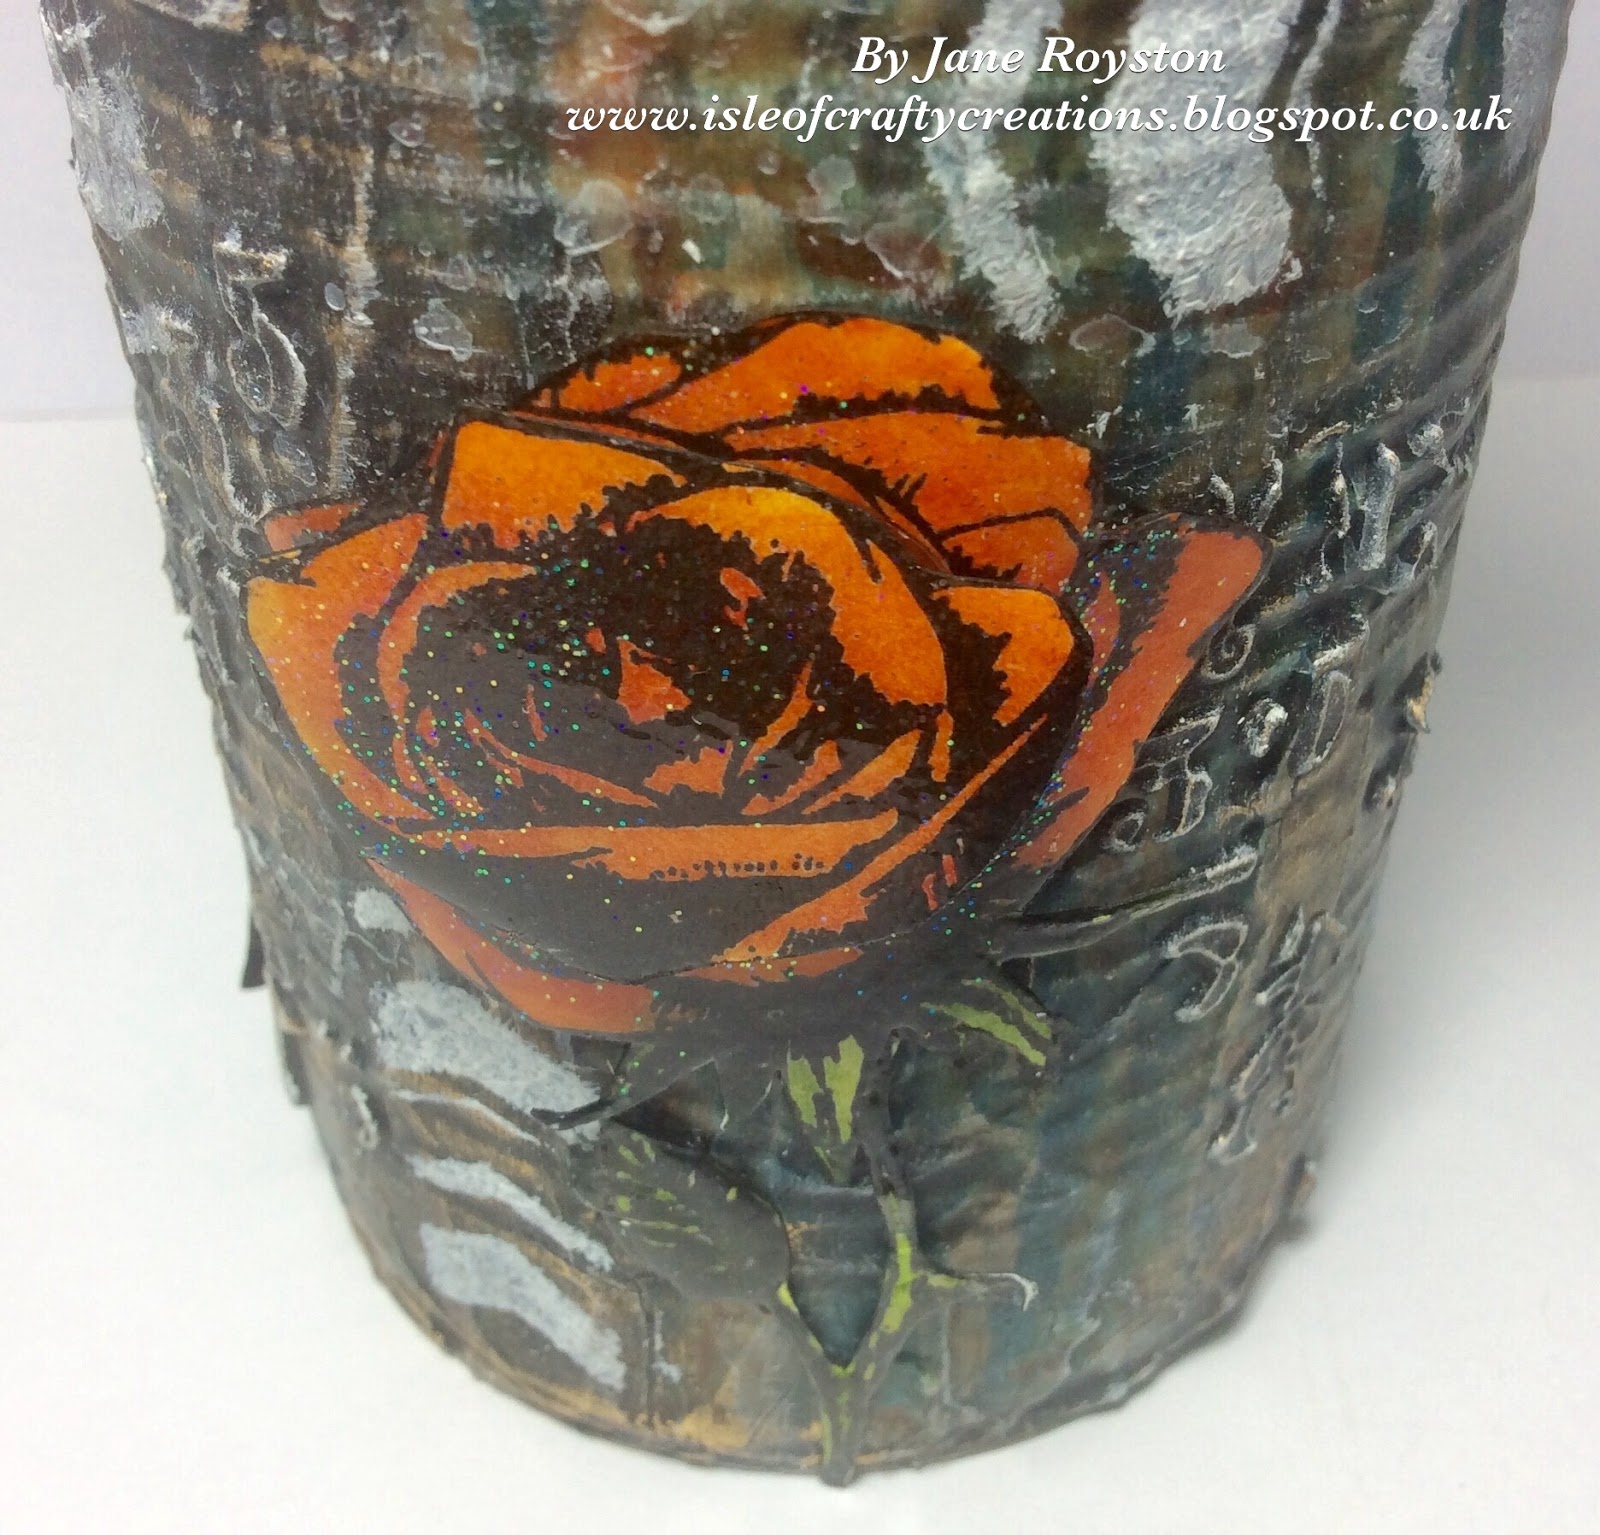
To completely contrast with the grungy tin I wanted to add some very pretty focal images.  The large rose stamp from Beautanicals was stamped 3 times in full then the head another 3 times.  Once cut out I coloured them with shades of yellow and orange and coated them with glossy accents, sprinkling in a little bit of fine glitter whilst still wet.  Once dry they were layered up and adhered to the tin using glue gel...


Here are the products that I used:

* Backdrop Stamps - Random Numbers
* Beautanicals Large - Rose
* D'Inkables - Metal Alpha; Chevrons

Which do you prefer grungy or pretty?  Or maybe you are like me and love both!

Thank you for looking and happy crafting,

Jane xx

Thursday, March 21, 2019

Karen DT- Time Flies

Hello

I'm back on the Bee Crafty blog today with the fabulous Feather Wings. So beautiful and very versatile and can be used with so many other stamps. I've made two cards with a completely different look

Products used:
Pocket Watch 
Roman Numerals 
Time Flies
Dinkable
Distress Oxides 
Easy Frame: label 1 


I blended Distress Oxides through the Easy frame, blending it out bottom left
The Pocket Watch and Roman Numerals were stamped in the same Oxide
I stamped the Feather Wings in versafine 
Iced Spruce was randomly blended through the Metal Alpha Inkable 
To finish off I stamped the sentiment in the Versafine 

For my second make I used the Feather Wings and combined them with the versatile Style Wire Heart frames and Borders.

Also used :
Inspirational Words 1
Sparkle pens
Versafine


I created the background using Sparkle pens and water
I stamped the Heart frame in Versafine and then masked it off
The wings were also stamped in Versafine but I used first and second generation stamping to create depth and dimension 
The mask was removed before I stamped the sentiment and the Style Wire Borders in the black onyx versafine 
I drew my own wiggly frame around the card before adhering to card blank 

I love how versatile these beautiful wings are
Thankyou for popping by and I'll be back again soon 

Crafty hugs xx 


Monday, March 18, 2019

Lorre-Anne DT - Wonderful Birthday

Hi bloggers, for my Bee Crafty DT post this week I'm sharing a card I have made using the fabulous gent from the Steampunk Stories stamp range - I thought he'd work really well with the XL Light Bulb Circuit stamp so thought I'd try making a card using them both, and this is what I've came up with!

Materials
What to do
  • Cut some white card slightly smaller than the card blank.
  • Put some of each Oxide on to a blending mat, spritz with water and drag the white piece of card through it.  Dry with a heat too, and repeat until you get the desired look.
  • Stamp the Light Bulb Circuit stamp using Ground Expresso Oxide.  Add some highlights to the image using a white gel pen.  Blend some Ground Expresso around the edges of the card, and then glue to the card blank.
  • Stamp the photographer on to spare white card using Ground Expresso Oxide, carefully cut out and attach to the card blank using glue.
  • Stamp the sentiment using Ground Expresso, cut out and then blend some more Ground Expresso around the edges.  Glue to the card.
That's my project complete for this week, I'll be back next Monday to share a new DT project with you all.

Hugs, Lorre-Anne x

Saturday, March 16, 2019

Jane DT - 'Everyting is Possible..'. Art Journal Spread

Hello!

Today on the Buzzy Goings on at Bee Crafty blog I am sharing a step by step photo tutorial of how I created an art journal spread using some of the beautiful stamps that are part of this week's Wednesday Wow! and the gorgeous Rosie stamp...


* I started out on the first double page of a new 6" square art journal and painted on a strip of colour using 2 different shades of pink acrylic paint.  Before this had a chance to dry too much I used the sunset d'inkable to wipe some of the paint away...


* Next I wanted to add another bright colour so used orange through the stars d'inkable...


* I wanted to add a contrasting colour to the orange so chose turquoise paint and although I tried really hard to choose a different stencil I was drawn back to the gorgeous circles d'inkable...


* To tone down the blue I added some buff coloured paint and white paint pen to the circles...


* For the stamping I wanted to echo the circle shapes so chose two of the stamps from the Texture, Film Strip and Circles set.  I used the edge of the grungy stamp with teal archival ink and one of the circles with black archival ink...


* At this point I felt I needed some more white elements so added some splatters using watered down white paint.  Then I stamped the film strip twice onto tissue paper and cut them out, they were then applied to the page using matte medium...


* Finally I created my focal points using Rosie from the Fashionettes (these stamps can be found at a reduced price in the discontinued stamps section!) and the words from Boy, Girl, Work in the Wordage stamps...


To create this spread I used the following products:

* D'Inkables - Sunset, Stars, Circles
* Art Stamps - Texture, Film Strip and Circles Set
* Wordage - Boy, Girl, Work
* Fashionettes - Rosie
* Archival Inkpads

The Wednesday Wow! will continue through until midnight on Sunday (17th March) and they have a fantastic discount on them!  Also do check out the discontinued stamps section where there are great bargains to be had.

Thank you for looking and happy crafting!

Jane xx

Thursday, March 14, 2019

Karen DT - Dream of Dragons

Hi everyone xx

It's my turn over on the Bee Crafty blog today.
I couldn't resist making another card using the fabulous Dragon stamp set . This time I've gone for the little Dragon stamp as my focal point and can you guess what tv series my inspiration came from 😂

Also used:
Dragon sentiment stamp
Skylines Inkables
Distress Oxides
Shaving foam
Inks/paints/sprays


I created a background using one of my favourite techniques,  shaving foam with inks 😂😂 It's fun, creates unique backgrounds every time, and it smells lovely too lol.
Once dry I used Distress Oxides through my skyline Inkables.
I blended the same inks around the edges you draw your eye into the middle.
The Dragons were stamped in different coloured Distress Oxides.
To finish the sentiment was stamped in brown versafine 

Thankyou for stopping by and I'll be back again soon 
Crafty hugs xx 


Monday, March 11, 2019

Lorre-Anne DT - Thinking of you

Hi bloggers, I'm back up on the Bee Crafty blog today sharing my latest DT project, and I wanted to create quite a nice easy card this week. 


Materials
What to do
  • Cut some black card slightly smaller than the card blank, and some white slightly smaller again.
  • Take the Distress Oxides and apply some to a blending mat, spritz with water and drag the white card through it.  Dry with a heat tool, and repeat until you get the desired look.
  • Stamp the Peony in the bottom right corner using Versafine ink, and the texture border in the upper left corner.  Mat this to black card and glue to the card blank.
  • Stamp the sentiment on to spare white card, cut out to a banner shape and mat to black card.  Affix to the card using foam pads.
  • Add some glitter to the Peony and around the edges of the card and banner with Stickles.
That's it for this week bloggers, I'll be back next week to share another project with you all.

Hugs, Lorre-Anne x

Saturday, March 09, 2019

Jane DT - Marvellous Wildflowers

Hello!
 
I am sharing a card today on the Buzzy Goings on at Bee Crafty blog that was made using distress oxide inks and a range of Inkables...
 

* I started with a piece of white card approximately 5 and a half inches square and chose 3 colours of inkpads...


* Using sponges I applied the colours in strips across the card.  It was then spritzed with water all over to activate the chalky effect.  Once dry I splashed some more droplets of water and blotted it off with some kitchen roll...


* I chose 3 Inkables that are different styles (perspective, metal alpha and mandala 5) that I felt would layer together well and applied the ink colours through each one at a time, making sure to dry the ink between each layer...


* Once this was done I felt that the stencilling needed to stand out more from the background so used a white signo pen to add some lines and dots...


* I wanted to add a focal point that would really contrast to the background so as it is a silhouette chose the Wildflower 2 stamp and used it with Versafine black ink and clear embossing powder...


* Finally I chose a sentiment and stamped and embossed it in the same way as the flowers before putting the card together...


Here are the products that I used:

* Inkables - Perspective; Metal Alpha; Mandala 5
* Beautanicals - Wildflower 2
* Wordage - Everyday Sentiments 1 XL
* Distress Oxide Inkpads

Inkables are currently part of the Wednesday Wow with 25% off until tomorrow night (10/3/19) so a great time to stock up!

Thank you for looking and happy crafting!

Jane xx
Related Posts Plugin for WordPress, Blogger...