Monday, July 30, 2018

Lorre-Anne DT - Hot Air Balloon

Hi everyone, it's Monday so that means I'm up on the Bee Crafty blog sharing another DT project with you all, and for my card this week I'm using the Steampunk stamps again... these stamps would make fab cards for so many people.


Materials
What to do
  • Cut some black card slightly smaller than the card blank, and some white card slightly smaller again.
  • Put the Distress inks on to a blending mat and spritz with water and drag the white card through it, dry with a heat tool and repeat until you get the look you want.
  • Use Versafine ink to stamp the sentiment down each side, and the balloon in the centre.
  • Mat this to the black card, and glue to the card blank.
I'll be back next week to share another card with you all.

Hugs, Lorre-Anne x

Sunday, July 29, 2018

Karen DT - Scenery Winter Owl

Hi my lovely crafters xx

Hope you're all having a lovely weekend?

I know my usual DT weekly blog for Bee Crafty is on a Thursday, but I'm going to be doing an extra weekly blog, most Sunday's, during the summer holidays, over on the Buzzy Goings On At Bee Crafty Blog 
So here i am with another sample using one of the gorgeous Scenery Winter animals...the Owl. A gorgeous image and so versatile.
Yes I know it's summer and this is a Christmas sample 😂 but I can't put these gorgeous stamps down...so bear with me lol

Also used:
Snowflake Flurry
Snowflakes- Feathery
Everyday Christmas circles
Distress Oxides 


The background was created using the Snowflakes with Distress Oxides, first and second generation 
I inked up an acrylic block with Distress Oxides, spritzed with water and stamped 3 panels
The Owl and Sentiment were stamped in Smokey Grey versafine and the Snowflake Flurry in Distress Oxide, slightly off the card panel 

I hope you enjoyed today's post and I'll be back soon with another Bee Crafty make 
Crafty hugs xx 

Saturday, July 28, 2018

Jane DT - Journal Under The Sea

Hello!

I am back on the Buzzy Goings on at Bee Crafty blog today with a bit of art journaling...


I have had these pages in my journal for quite some time after I used them to clean off some jade Dylusions paint that was on my foam applicator.  I didn't really have an idea of what I wanted to do until I looked at the colour and the shape and thought it had a bubbly feel, so I decided to go with that theme...


The colour was a bit too vivid for me at this point as I wanted other layers over the top so I started by brayering some white gesso over them before adding stencilling using vibrant turquoise and fresh lime Dylusions paints through the sunset and circles d'inkables...
 
 
Next I added some doodling with a white posca pen, this is so much fun to do so I had to limit myself to the circles!  For some extra texture on the pages I also added some white and green splatters...
 
 
I then used one of the texture border stamps with white gesso and the bubbles from both of the under the sea sets stamped with archival inks.  I decided to colour the bubbles in with some watercolours to make them appear more solid.  I knew that my main focal image was going to have a lot of black so I decided to add some stamping with black archival ink and a texture circle stamp...
 
 
Finally I stamped the seahorse (of the smaller set) onto acetate and heat embossed with clear powder.  Once this had been stuck onto the page I used some alcohol markers and a gold paint pen to add colour.  After choosing the sentiment this was cut out and added to the pages with some black pen added around the edges to highlight them.  To tie the pages altogether I added some splatters of gold paint and edged all around the pages with black archival ink to help draw the eye into the pages...


To complete these pages I used the following products:
 
 
Thank you for looking and happy crafting!
 
Jane xx


Thursday, July 26, 2018

Karen DT - Warm Wishes

Good morning crafters

I'm back on the Bee Crafty blog today with a card I made using the unique and versatile
Collage ART stamp. Full of so much eye catching detail that can be used in part, as well as a whole image

Also used:
Everyday Sentiments 1 XL
Distress Oxides
Black onyx versafine
White gel pen


Picked Raspberry and Cracked Pistachio Distress Oxides were blended with water to create the background
The beautiful image was stamped in black onyx versafine and a white gel pen was then used to add random highlights and to fill in the street lights

I hope you enjoyed today's make and I'll be back soon, with another Bee Crafty make

Crafty hugs xx

Monday, July 23, 2018

Lorre-Anne DT - Love

Hi bloggers, I'm back with a new Bee Crafty DT project... and this week I've been playing with the Birds & Butterflies stamp set and my Distress Oxides.


Materials


What to do
  • Cut white card slightly smaller than the card blank.
  • Take the white card and apply the 3 Oxides directly to the card, then blend over the card using a wet baby wipe.
  • Take the Inkable and blend Broken China through it using a blending tool.  Add some faux stitching around the letters using a white pen.
  • Blend some Spiced Marmalade through the Hearts Dinkable randomly over the card.  Glue this card to the card blank.
  • Ink up the bird using all 3 Oxides and then stamp onto white card.  Carefully cut out and attach to the card using foam pads.

I'll be back next week to share another project with you all, until then happy crafting!  

Hugs, Lorre-Anne x

Saturday, July 21, 2018

Jane DT - Hand Drawn Leaves Samples

Hello!

Today on the Buzzy Goings on at Bee Crafty blog I am sharing my samples that were made for last weeks HOCHANDA shows...


The MDF art board had crackle paste added for the background then spray inks for the colour.  The leaves and butterflies were stamped and cut out and the sentiment stamped onto acetate to allow the background to show through.


A circle die was used to cut out the middle of the card.  The leaves and butterflies were stamped, cut out and coloured using watercolour markers.


The leaves were stamped with glue and then gilding flakes added.  The larger leaves were stamped directly onto the MDF tag board, the smaller ones cut out and layered using glue gel for extra dimension.


The card was made using the matching Inkables with the maple leaf stamps and distress inks.


The tall art board was coloured with Dylusions paints then the leaves stamped with black ink and stencilling added on top with black paint.

Here are the products used...

* Beautanicals - Maple Leaf Set
* Beautanicals - Oak Leaf Set
* Art Stamps - Large Butterfly
* Art Stamps - Dragonfly and Butterfly
* Wordage - Everyday Sentiments 1 XL
* D'Inkables - Regular Dots, Honeycomb
* Dylusions Paints

Happy crafting,

Jane xx

Friday, July 20, 2018

Emily DT - Seasonal Trees

Hi everyone, yet another week has flown past and it is my turn for some Bee Crafty inspiration.

For my cards this week I have used the tree stamp from the recent Hochanda shows to make a set of three very simple and quick cards.

Here are the cards I have made...


I started by stamping the tree on three pieces of card, then I used Brusho paints spritzed with water to add 'leaves'.

Each one was then finished with a sentiment.

These cards are so simple but so effective and I love making them.

I hope you like them!

Emily x

Thursday, July 19, 2018

Karen DT - Hand drawn leaves and tree samples for Hochanda

Hi crafters xx

I'm on the Buzzy Goings On At Bee Crafty Blog today with my samples for the gorgeous new
Hand Drawn Maple leaves and trees, released on Hochanda earlier this week

These are so beautifully designed and elegant, and my samples have also incorporated the following:

Swallow
Birds on a tree
Trio of Butterflies
Dragonfly
Large Butterfly 
Nettle easy frame
Maple easy frame
Everyday Sentiments 1 XL 
Embossing powder
Dinkables
Distress Oxides 
Distress Inks 
Versafine
Sparkle pens


Gold embossing powder 
Distress Oxides 


Maple easy frame 
Distress Oxides 


White embossing powder 
Distress Oxides 


Distress Oxides 


Distress Inks 
Sparklepens 


Distress Oxides 


Distress Oxides 


Distress Oxides 
Sparkle pens 


Distress Oxides 


Nettle easy frame 
Dinkables 
Distress Oxides 


Mdf Artboard 
Lustre Luxe 
Dinkables 
Distress Oxides 
Sparkle pens 
Gilding Wax 


I hope you've enjoyed looking through today's samples and agree that these hand drawn designs are so beautiful and versatile 

I'll be back very soon with more Bee Crafty makes

Crafty hugs xx 


Monday, July 16, 2018

Lorre-Anne DT - Value of a moment

Hi everyone, it's Monday which means I'm up on the Bee Crafty blog to share another one of my DT makes with you all.

Materials
What to do
  • Cut grey card slightly smaller than the card blank, and white card slightly smaller again.
  • Take the white card and directly apply Evergreen Bough Oxide to the bottom then blend it over the card using a wet baby wipe.  Apply some Broken china directly to the top of the card, and blend this using a wet wipe too.  Dry using a heat tool or leave to dry naturally.
  • Stamp the flower twice using Versafine ink.
  • Finish by adding a stamped sentiment.


That's it for this week... be back soon to share another one of my makes with you all.  

Hugs, Lorre-Anne x

Saturday, July 14, 2018

Jane DT - Life Journal

Hello!

Today on the Buzzy Goings on at Bee Crafty blog I am sharing a project that I created for myself to use!  At the moment there is a real love in the crafting world for journals and notebooks so this week I decided to use my Bee Crafty products to decorate myself a wrap journal...


I started by prepping the board with white gesso and then used my brayer to add layers of Dylusions paints (Vibrant Turquoise, Fresh Lime and Pure Sunshine), leaving some areas of the white still showing through.  Next background stamping was added using archival inks and a mixture of texture and backdrop stamps...


Using the distressed harlequin d'inkable some crackle paste was added and I left this white to create some contrast to the quite busy background.  To create the focal pieces I chose some of the stamps that are elements that I really like or represent the idea of a journal (e.g. the pen nibs).  These were all cut out and then coloured with sparkle pens to match the background colours.  To make them more sturdy I added glossy accents and then left them to dry overnight...


Once these had all fully dried they were added to the cover using glue gel.  The dragonfly and larger cog were then stamped onto shrink plastic to create some charms.  These were added to some beads and jewellery findings to create the dangly accents that could then be joined to the top of the binding elastic...


The closure was created with some more elastic and then the notebooks added to create my final journal...


Here are the products that I used...

* Backdrops Border Stamps - Texture Borders
* Backdrop Stamps - Multi Mini Distressed Diamonds; Franking Marks
* Art Stamps - Dragonfly; Cogs Set; Nibs
* Wordage - Life Words 1
* D'Inkables - Distressed Harlequin
* Dylusions Paints

I will certainly be making more mini books as they are really good fun to decorate.  Thank you for looking and happy crafting,

Jane xx

Friday, July 13, 2018

Emily DT - Throwback Inspiration

Hi everyone,

I have had literally no time to craft this week so I have looked through my early DT cards to provide some inspiration.

I have decided to share a card which I made using some of the Beautanical stamps.

Here is the card I have decided to share...


This card was made with a Brusho background then used the smaller and larger Ground Elder stamps.


The card was finished with a sentiment stamped onto white card and mounted it on black to make it stand out from the background.


I hope you like it!

Emily x

Thursday, July 12, 2018

Karen DT - See clearly in the dark

Hello crafters xx

I'm on the Buzzy Goings On At Bee Crafty Blog today with a sample using one of my favourite stamps. .the Winter Wolf 😘

Also used:
Silhouette Tree with Birds
Distress Oxides 
Versafine
Acetate


I put some masking tape across my card where I wanted the horizon to be
I blended a variety of Distress Oxides in a sunburst effect then using a water brush I bleached rays of light randomly between the colours
I splattered droplets of water over the Oxides and mopped it up with kitchen towel
Having removed the masking tape I blended the Oxides across the card
The gorgeous Wolf was stamped in Versafine, together with the sentiment  
I also stamped the Tree with Birds randomly around the inked card, with Versafine 
I attached some snowfall acetate onto my card, adhering at the back with red tape, before adhering this the card blank

I hope you enjoyed today's post and love this gorgeous Wolf as much as I do 

I'll be back again soon with another Bee Crafty make 
Crafty hugs xx 

Monday, July 09, 2018

Lorre-Anne DT - Brushos Butterfly

Hi bloggers, for this weeks Bee Crafty DT project I've got my Brushos out again... if you've never had a play with Brushos they are coloured powders that are activated by the addition of water.  I love sprinkling the powders on to card, spritzing with water and watching them burst into colour.  


Materials
What to do
  • Cut some black card slightly smaller than the card blank, and some white card slightly smaller again.
  • Take the white card and sprinkle some of the Brushos over it, spritz with water and dry using a heat tool.
  • Stamp the butterfly using Onyx Black Versafine ink in the centre of the card.
  • Stamp the greetings using Versafine ink
  • Mat the white card on to the black card, and glue both to the card blank.
  • Finish by adding some Stickles to the wings of the butterfly.
That's it for this week, I hope you liked my card, and I will be back soon to share another with you.

Hugs, Lorre-Anne x

Saturday, July 07, 2018

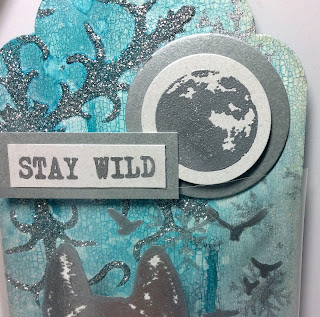
Jane DT - Wolf Tag

Hello!

I hope it is lovely where you are at the moment! The weather here is a total contrast to the snowy project I am sharing on the Buzzy Goings on at Bee Crafty blog today...


I wanted to create a really textured background to my tag to give it a snowy, icy feel, but then needed to have the wolf be able to stand out so I decided to use acetate. 

I started the background by preparing the MDF tag with gesso then painted it with crackle paint.  Once this had dried I added blue spray inks then used the d'inkable snowflakes with silver paint.  This was followed by adding silver sparkle paste through the snowflake 2 inkable across the left side of the tag. 

I then cut a piece of heat resistant acetate that would make a dome around the front of the tag then stamped the wolf using clear versamark ink.  This was then heat embossed using silver powder.  At this point the wolf was quite hard to see properly when against the background so I stippled white gesso onto the back of the acetate so that the wolf stood out...


The words and moon from the same set were stamped and heat embossed in silver powder and mounted onto silver card before adding to the tag.  The final touch was to add some ribbon...


The products I used were:

* MDF Tag
* Art Stamps - Scenery Animals Set Wolf
* D'inkable - Snowflakes
* Inkable - Snowflake 2

Thank you for looking and happy crafting!

Jane xx

Friday, July 06, 2018

Emily DT - Christmas in July!


Hi everyone,

I hope you managed to catch the Hochanda show last week with some gorgeous new stamps. I wanted to share my samples from the show with you.

Here are the samples I made...


I adore these stamps, and love the cards I made. Even though I am not very good at colouring in, I managed to find ways to use the stamps which didn't involve substantial colouring!

See you next week!

Emily x

Thursday, July 05, 2018

Karen DT - Winter Animals samples for Hochanda

Good morning crafters
Hope you're all enjoying a lovely week xx

It's my turn over on the
Buzzy Goings On At Bee Crafty Blog and I'm very excited to be sharing my samples for the fabulous new Winter Scenery Animals that were released earlier this week. I really hope you got yours..they are utterly gorgeous,  versatile and unique. They make stunning Christmas makes as well as being suitable for any other occasion
I got to work with my absolute favourite animal ..the Wolf 😘😘 and also the stunning Owl.

Also used:
Snowflake Inkable
Snowflakes - Feathery
Snowflake Flurry
Everyday Circle Christmas sentiments
Silhouette Trees - Tree with BirdsDeciduous,  Perennial
Distress Oxides
Sparkle pens
Versafine
Dyna Paints
Acetate


Distress Oxides 
Snowfall Acetate
Tree with birds 


Shaker card 
Sparkle pens 
Distress Oxides 
Snowflake Flurry 


Sparkle pens
Snowflake Flurry  


Distress Oxides
Perennial Tree  


Dyna Acrylic Paint 
Versafine 
Gilding Wax 
Snowflake Inkable 


Distress Oxides
Snowflake Inkable  


Distress Oxides 
Snowflake Flurry 


Sparkle pens
Snowflake Inkable  


Sparkle pens 
Tree with Birds
Deciduous Tree


I hope you love these stamps, and other Christmas Yuletide products, as much as I do. They make unique, stunning Christmas cards as well as being suitable for any other occasion 

Many thanks for popping by 

Crafty hugs xx 

Related Posts Plugin for WordPress, Blogger...