Showing posts with label Tags. Show all posts

Friday, January 28, 2022

Sharon GDT - Whatever works!!!


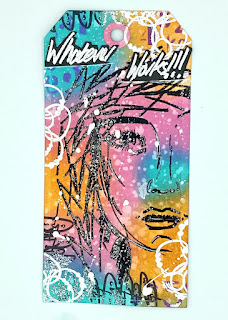
As we have a tag challenge going on in the Bee Crafty FB group I thought I'd make a tag for my post today. I've used some lovely bright colours as we all need cheering up this time of year. 

Stamps:  Faces - Whatever Works

               Journal Art Elements

Stencils: D'inkables set 5

Distress Oxide inks: Picked Raspberry

                                  Ripe Persimmon

                                  Peacock Feathers

Versafine Clair: Nocturne

Ranger embossing powder: Superfine white

Versamark clear ink

Posca white pen

Here's how I made my tag:
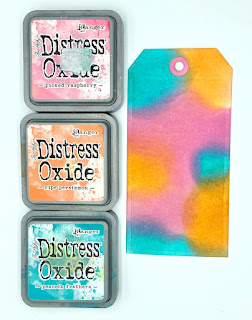

I started off with making my background by blending distress oxides, picked raspberry, ripe persimmon and peacock feathers onto my tag. 
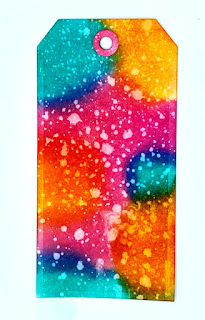
Next I sprinkled over some water to give it some texture. I used the heat gun on it to help it dry before my next step. 
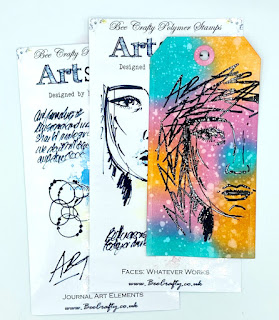

I used the large face from the Whatever works set and stamped it in versafine clair black ink and then embossed with a clear embossing powder. This helped the image to stand out from the bright background. I wanted to build up her hair so I used the Art stamp from the Art elements set and randomly stamped and clear embossed around her face.
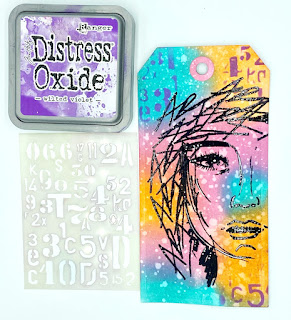

Next using Wilted violet oxide ink and the number stencil from the D'inkables set 5 I stamped at the top corners and bottom right of the tag. 
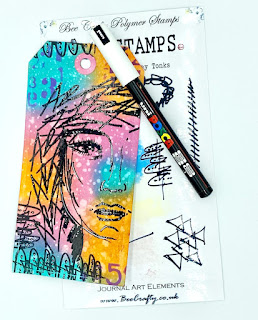

I added a little border to some of the edges using the arched stamp from the Art elements with black ink and clear embossing. With a white Posca pen I added some highlights to her face and hair.
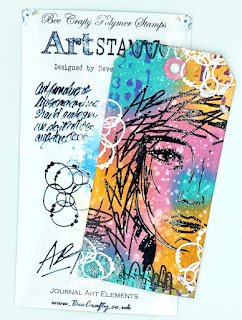


 To add a bit of light to the tag I white embossed the circles from the Art elements set around the edges. The powder stuck to some of the embossed black border but I liked the way it looked so left it as it was. It added some more texture. 


To finish off the tag I stamped the Whatever works stamp onto black card with clear ink and then used white embossing powder, cut around it and adhered it to the top of my tag. Then I just added some white spatters with my white Posca pen. 

Sharon x


Tuesday, January 18, 2022

Caroline - Journey


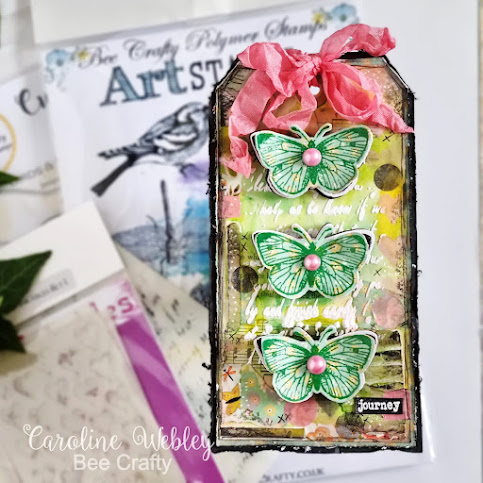
This mixed media tag was created using the brand new TODAY Art Stamps Butterflies & Birds XL!!


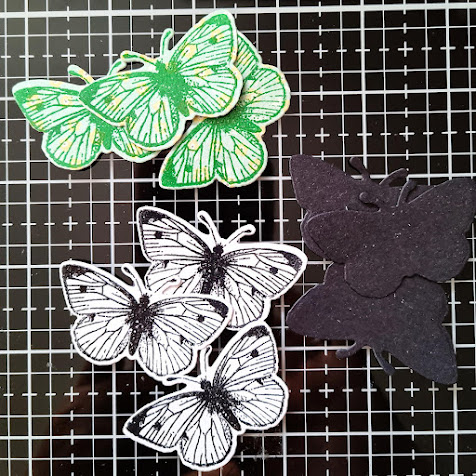
Die cut three solid black butterflies, three butterflies in white and three on patterned paper. 


The white and coloured butterflies were heat embossed and then layered – black on the bottom, white and then the colour.


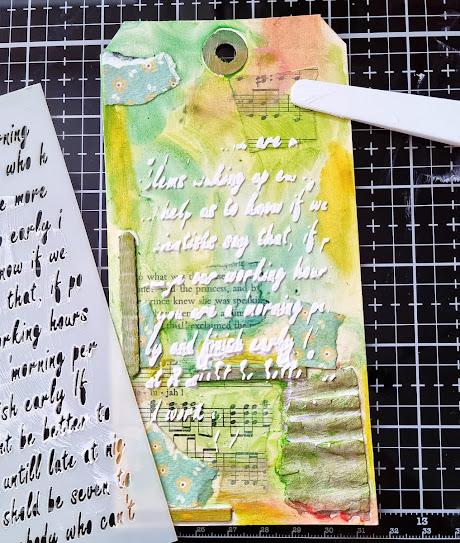
Create the mixed media collaged background.

I used Distress Crayons to create the background colours on the tag, together with coordinating scraps of paper.


Using a stencil and texture paste add to the tag creating dimension.


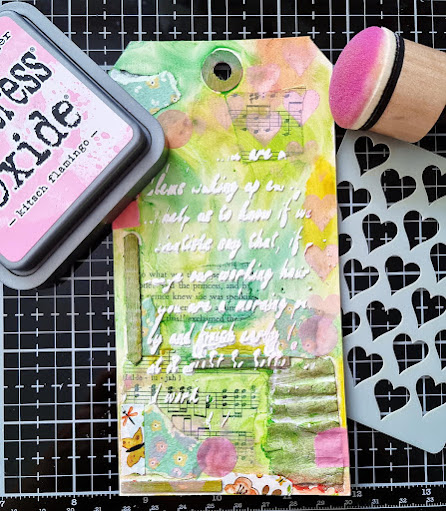
I used a D’Inkable stencil from set one, the hearts, and added to the stencil with Distress Oxide.  Added black ink and the sentiment, and some black hearts.


Back the tag onto some black card to create a frame around the tag.


Add the layered butterflies and a pearl in each centre. Finish off with ribbon.


Tuesday, January 11, 2022

Caroline - One day At a Time Tag


A mixed media tag using Journaling Girl-Sam!


Using a kraft tag as the base I decorated a tag using book paper and music paper, some coloured paper, and some corrugated card which I then covered with Matt Medium before adding more colour with the Distress Crayons.


Using the raindrop stencil from the D'Inkables Set 4 I  added texture paste to part of the tag.


Using Journaling Girls: Borders #1, I used part of one of the stamps on the tag and then heat embossed.


Die-cut a plain white circle and then stamp and heat emboss Sam.


Colour in Sam using Copics.


Stamp, heat emboss and then colour the heart which is part of the Journaling Girl: Sam set.


Assemble everything together using extra bits as embellishments behind and in front of the main circle image.
Finish off with ribbon.

I used:


Caroline x


Wednesday, April 04, 2018

Marleen DT - MDF Tag

Hey Bloggers..

Just a quick post with a bit of inspiration for BeeCrafty..

For this weeks post I've made an MDF Tag.
I've also used a selection of stamps from the BeeCrafty STORE:
I started by adding the Lavender Quarts Lustre Luxe to my tag. I then added Purple Pearl Lustre Luxe through the Dinkable. I used archival ink to do all my stamping apart from my script stamp (which I just realised is very hard to see on the pic) with which I used Distress Oxide in Shaded Lilac.

And thats it really. It looks class but was really easy to make.
And that is it for today. Thank you for popping by and for any comments left behind.
Dont forget to come visit me on FaceBook, Twitter, Instagram, Pinterest, Youtube or my FB page.
 Happy Crafting

Wednesday, July 05, 2017

Marleen DT - MDF tags.

Hey Bloggers..

Well I am officially on holiday all of July as my children are all off school and its time for some quality time, meaning I dont make any projects for my design teams in this month. But but but... I decided to schedule a few posts with a few projects I had lying..

So for this weeks post for BeeCrafty I wanna share a couple of MDF tags.
Both tags was made for past Hochanda shows, but neither was dry and ready to send by my deadline so was left behind..

 This one was made with poly filler. Its a grit one that I got in the £shop and I love using it. I added a thick layer strait to the tag and then took my stencil and pressed into it. Once dry I added lots of guilding wax and distress inks. My girl is also a BeeCrafty stamp and she was stamped, coloured with water colours and fuzzy cut before added to my tag.

 This one here is using the same stencil as above. I used texture paste through the stencil and once dry I added lots of Distress crayon. I love how this one turned out, but honestly would know what to do with it lol

Anyway, here are the goodies Ive used:


And that is all from me today. Thanks for popping by and for any comments left behind.
Dont forget to come visit me on FaceBook, Twitter, Instagram, Pinterest, Youtube or my FB page.
 Happy Crafting

Monday, November 28, 2016

DT Kerrie - Painty Dreams

Hiya and Welcome to my Monday Post for Bee Crafty

Today I am sharing with you a recent make for the Hochanda Show's with Our Bev

 
I used one of the medium MDF Tags which I painted first with white gesso to give a nice surface to stamp and ink onto... I use a brush so I get a nice brush stroke texture.

Next I inked the tag using Spun Sugar distress ink and my Bee Crafty Blending Mat in the middle area working outwards. I then used Scattered Straw distress ink around the edges.

I stamped the Line&Dot texture stamp using a gorgeous purple paint, then the Distressed Dots texture stamp using a lush Teal paint 

I decided to stamp the Inspired by DaVinci Script stamp over the whole tag using archival ink which I love as it stamps so crisp and dark even over paints and inks so it's perfect for mixed media.

To add a bit of an extra textured look I took a few pen lids and straws which I dapped into wet white and black paints to create the circle bubbles this was a sudden brain wave moment for a previous shows samples which I loved so much I had to make some more projects. I love using items from around my home which wouldn't normally be thought of as craft tools/supplies

 
For the sentiment I stamped the Dream Wordage Stamp onto watercolour cards rock that I had already trimmed to size. I then coloured the sentiment first with washes of the same paints from earlier and once dry I inked over two opposite corners using scattered straw distress ink. I matted this onto black cardstock and fixed to the tag using my hot glue gun.

I picked out some paper flowers in similar colours to the paints and inks I used. I dabbed them with black paint and a dry brush to add a darker look to them and fixed to the corners of the sentiment using hot glue gun.

I really like how this one came our as the colours are really lovely and shows mixed media can be pretty too

Thank you so much for visiting today and please come back again soon to see more gorgeous makes from the amazing Bee Crafty Design Team

Krafty Hugs

Wednesday, November 23, 2016

Marleen DT - Hochanda Samples - MDF Art boards

Hey bloggers..

Well?? Did you all catch Bev on Hochanda this past saturday? (19/11-2016)
Was'nt she just amazing as always??

Well today is my inspiration day for BeeCrafty, so although you may already have seen my projects made for the show, I decided to share them here on my blog today with details on how I've made them.

All the goodies I've used you can find in the BeeCrafty STORE and on the Hochanda shop.
 Tag: Mdf tags, Medium.
 Unprimed.
For this one I went strait to the tag with my distress ink. Not priming your mdf will leave your colours a bit more muted (and it may take a bit more ink to get coverage) but I really love the autumn feel this tag got. I used the "Set of backdrops textures" stamp set and stamped in a brown strait over my colours.

Now the tricky bit here is.. drying time!! It takes forever to dry.. ok ok maybe half an hour or so lol, but im a very impatient.. As I used embossing powder over my inking it HAD to be fully dry or else the embossing powder would stick to the whole tag. In the end I had it lying over night just to be sure.

I stamped with versamark and heat set with white embossing powder
I stamped with the "style wire borders" stamps and the "Any Road"greeting stamp.
I finished with a bit of white embossing powder aound the edges of the tag.

 This one took me about 10mins to make. This one is made with the "Victorian Small" tag.
Primed with white acrylic paint.

All I did was taking my guilding wax strait to the primed tag. I just rubbed and blended the wax with my finger till I got the cover I wanted. I then stamped my "Faith" stamp and one of the "style wire borders" stamps with versamark and heat set with black embossing powder.

This tag is mahooosiiive... I'ts the "Victorian XXL" mdf tags.
Unprimed.
For this big tag I went strait in with distress paints. Mine are the dabbers so they are very quick and easy to paint with. (any paint will do may I add).
Once my tag was coated, I left it to dry. Once dry I spred a tiny amount of the paint on to my BeeCraft Blending mat and spread it out. I then tapped my background stamps into the paint and stamped, just like normal stamping, strit onto the tag.
I stamped using a selection from the style wire borders" stamps set and the "Set of backdrops textures" stamp set.

 (All the word stamping on this piece is made with BeeCrafty WORDage stamps.. Its made from many different sets but lets just say it involved cutting up several of my greeting stamps.
I often cut up my stamps to do this and the best thing is, the BeeCrafty stamps are such good quality it matters not. I simply assemble the stamps again on my acrylic block when I want to use the full sentiment again.)

I then went on to make my little notebook. Its a cheap lined pad and I simply cut a piece of card the same size and decorated that. I cover my piece of card with distress paint also and used the same stamps as on the tag to decorate. I then carried on stamping all my words from the different sets to make my greeting. I stamped in versmark and heatset it with back embossing powder.
I added the cardstock to the front of the note book.

Once the note was finished I went on to stamp my greeting onto the tag. I simply just lay down the notebook where I wanted it, lined up my stamp and removed the book while  stamped, again with versamark but with goldembossing powder. I also added gold embossing powder around all the edges of the tag.

To finish the whole project I used an old pencil and rolled it with a piece of cardstock from the "Steampunk Backgrounds" paperpack.
I attached the pencil with some stick on velcro I found in my (never used) sewing kit.

Right the last one for this time.. 
I used 2 tags for this one.
Artboards Portrait Victorian Tag

MDF Tags : Victorian Medium

Primed with white acrylic paint.

This one was actually the first one I made for this show.. Those of you who pops by here will know that Im new to MDF and I find it hard to work with, but as with anything else here in life, the more you do it, the easier it becomes.
I still learning how all the different mediums work on the wood instead of card but its a lot of fun.

I started on the big tag. I stamped the word "beautiful" from the "beautiful things" stamp (once again I cut my stamps apart) repeatedly and heat set with clear embossing powder.
I also stamped a selection from the style wire borders" stamps set and the "Set of backdrops textures" stamp set and also heat set with clear embossing powder.

I then had a play with my Distress Crayons. I simply lay down colour and rubbed it around with my finger to blend the colours. I did the same to my smaller tag and on the base for the big tag. (no background embossing, just crayons). I then left them for a bit to dry..

Once my backgrounds was done I stamped my greetings. the full "beautiful things" stamp and the "Dream" stamp with versamark and heat set with white embossing powder. I outlined the base and both tags with gold embossing powder and finished the whole piece by sticking the tags together..

 And that is it from me for today. Sorry for the long post.
Many thanks for popping by and for any comments left behind.
And dont forget to come visit me on FaceBook, Twitter, Instagram, Pinterest, Youtube or my FB page.
 Happy Crafting


Monday, November 21, 2016

Dreams and Things - MDF Tag

Hiya and Welcome to my Monday Post for Bee Crafty Stamps

We hope you all watched and enjoyed Our Bev's Brilliantly Inspiring demos on the Saturday Show's on Hochanda wowser they were amazing

Today I would like to share another one of my Sample that were on the shows... This was one of my favourite makes using the new MDF tags and the gorgeous stamp sets

Bee Crafty Products used:

MDF large tag
Backdrops; Textures stamp Set
Wordage; Dream, Beautiful Things

I painted the tag first with white gesso and then with a translucent lime green paint. Once dry I used purple and pink paints to stamp the Textures over the tag. I stamped the words using black archival ink. For the bubbles I used various pen lids dipped into white and black paints.

Thank you so much for visiting today... come back soon for more amazing creations from the Vee Crafty Design Team

Kraft Hugs xx
KERRIE

Thursday, November 17, 2016

DT Kerrie - MDF Tag 'Dream'

Hiya and Welcome to my post for Bee Crafty...

I have hijacked the Thursday Spot this Week as I was getting over a flu-bug...

We have an exciting Weekend coming up as Our Bev will be over on Hochanda on Saturday

I am sharing one of my Design Team projects with you today that I made using products that will be live on the Saturday Show's

Bee Crafty Products used:

Textures Stamps - Spots and Line&Dot

Wordage Stamp - Dream

MDF Tag - Medium

Monday, September 19, 2016

Kerrie DT - Yuletide - MDF Tag!!!!

Hiya and Welcome to my Monday Post for Bee Crafty

Yes!!!! more Christmas Makes! - I adore Christmas and all the sparkle and fun so I always make a start on Christmas makes during the Summer Holidays and then continute all through Autumn and right up until the Big Day!! love love love

Over the Weekend 'Our Bev' was over at Alexandra Palace for the Stamping & Scrapbooking Show with her massive stand full of Bee Crafty Goodies loads of Stamps and Yumminess including... Brand New MDF loads of it which was a Big Hit and sold out!!!!

I so wish I could have gone this year but unfortunately my Hubby was working (darn!! I cant drive so I lucked out) 

This Week I have created a Christmassy Tag using one of the Lush MDF Tags! Love!!!!

I had a lot of fun creating this tag with loads of Bee Crafty Lushness!!

The products I used that you can get from the lovely Bee Crafty online shop are...

Bee Crafty - Yuletide Snowflakes - Stamp Set
Bee Crafty - Dots - Inkables Template 
Bee Crafty - Inspired by DaVinci Script - Stamp
Colourcraft - Brusho's - sea green, ost blue, ultramarine & turquoise

I also used White Gesso, and Embossing Powders (opaque white, sparkling snow & chunky silver) from my own crafty stash

First I painted over the whole tag using white gesso, once dry I then sprayed the front using a water spritzer and then tapped the Brusho's over the whole tag removing the excess water with kitchen roll. I then dabbed white gesso through the Inkables Template using a dry stencil brush over one corner. I random stamped the Script Stamp using white ink over the opposite corner. Once dry I then stamped the 2 Snowflakes repeatedly over around the edges of the tag using a clear embossing ink, then used the 3 different embossing powders alternately and heating with my Heat Tool

(I have pierced holes in the tops of my Brusho's so i can use them like salt shakers)

I love how the Sparkling Snow embossing Powder looks on the snowflakes


I ran the clear embossing ink over the tag edges and dipped into the chunky silver embossing powder, which once heated made the edges look like metal


I really love how this tag has turned out - I also love how the colours worked - I am a bit obsessed with blue toned christmas makes this year 


Thank You so much for visiting my Bee Crafty post this week - please visit again soon to see what the other Design Team Members have been creating 

Krafty Hugs xx
 I would love for you to visit my own Blog if you would like to see more by me at... Kerrie's Blog

Wednesday, October 21, 2015

Marleen DT - Halloween tag

Hey blogger friends..

A little post today for

Today Ive used a few of the Halloween stamps from the  STORE.I used "Happy Halloween" & "Halloween"


I had so much fun making this little tag.
I started with a plain manila tag but covered it in clear crackle varnish.Once that was dry I added a coat of red paint and left that to dry. Once all dry i stamped my circle "Happy halloween" stamp strait on top. That too needed time to dry. In the mean time I made my sentiment which is made from parts of the "Halloween" stamp. Simply just stamped on cheap card stock and smothered in distress inks and cut to size. I finished with a glitter spider and a piece of black lace.

And that is all from me for today.
Thanks for popping by and for any comments left behind.


Related Posts Plugin for WordPress, Blogger...