Thursday, May 31, 2018

Karen DT - Samples for Hochanda show. Birds Butterflies and Wildflowers

Good morning everyone xx

As it's' Thursday it's my turn on the
Buzzy Goings On At Bee Crafty Blog

Today I'm excited to be showcasing my samples for the Hochanda show tomorrow, using the absolutely gorgeous
BirdsButterflies and Wildflowers

I just love the detail on these and their versatility ... hope you enjoy looking through xx

Also used:
Pocket Watch stamp
Birds On A Wire 
Moon
Ticker tape sentiments
Everyday Sentiments 
Inkables: Mandala
Dinkables
Distress Oxides 
Distress Inks
Sparkle pens
Mdf Artboard
Embossing powder
Versafine


Swallow
Wildflower 
Distress Oxides 


Mdf Artboard 
Dyna paints 
Butterfly 
Wildflower 
Dinkables 


Swallow
Wildflowers 
Butterfly 
Distress Oxides 


Large Butterfly 
Dinkables 
Distress Oxides 


Mandala Inkable
Wildflower 
Bird on branch
Distress Oxides 


Birds On A Wire 
Wildflowers 
Moon
Distress Oxides 


Mandala Inkable
Butterfly 
Distress Oxides 


Swallow 
Pocket Watch 
Time Flies 

Many thanks for popping by and I'll be back next Thursday with another Bee Crafty blog 

Crafty hugs xx 

Wednesday, May 30, 2018

Charlee DT - Time Flies

Morning crafters. For this weeks blog I got out my texture paste and tried mixing it with some lustre luxes. And the results were stunning.


What you'll need:


Step 1:

First blend the oxides over the 6x6 card. Once your happy on your blending matt, take a small scoop of the lustre luxe and small scoop of texture paste and mix together. Place the metal alpha inkable onto your card and secure down with some masking tape. Spread the texture paste through the inkable. When you've covered it all remove the inkable rinse off with warm soapy water and leave the card to dry.

Step 2:

On the acetate stamp the pocketwatch in versamark and heat emboss with some silver embossing powder. Repeat with the time flies sentiment and then cut them out.

Step 3:

Once the card texture paste is all dry glue the pocket watch and time flies down with some dries clear glue. Then matt with some black card and then adhere to your card blank.

That's all from me for this week. Hope you enjoyed.

Until next week
Crafty hugs
Charlee
X

Monday, May 28, 2018

Lorre-Anne DT - Hochanda samples

Hi everyone, for my Bee Crafty blog post this week I'm sharing the samples I made for Sam's Hochanda shows last Thursday.


MDF, Stamps (Pocketwatch & Time),  Pentart products (white gesso, cracking paste primer, cracking paste, rust effect paints), Onyx Black Versafine ink, rice paper, Golden Gate Lustre Luxe


Stamps (Pocketwatch & Time Flies), Dinkables (Hearts), Onyx Black Versafine inkDistress Oxides (Seedless Preserves, Twisted Citron)


Stamps (Heraldic bannerPrancing LionsPocketwatchTime FliesCogs), Dinkables (Feather 2, Distressed Harlequin), Distress Oxides (Vintage Photo & Mermaid Lagoon)


Stamps (PocketwatchHeraldic bannerCogsTime Flies), Onyx Black Versafine inkDistress Oxides (Mermaid Lagoon, Spiced Marmalade, Aged Mahogany)


Stamps (PocketwatchTime Flies), Dinkables (Stars, Regular Dots, Feather 2), Onyx Black Versafine inkDistress Oxides (Peacock Feathers, Picked Raspberry), Black Soot Distress Ink


Stamps (TimePocketwatch), Dinkables (Stars, Regular dots), Distress Oxides (Squeezed Lemonade, Salty Ocean), Onyx Black Versafine ink.

That's it for this week, I'll be back next Monday to share another make with you all.

Hugs, Lorre-Anne x

Sunday, May 27, 2018

Paula DT - Wishing You Happiness


Shopping List

Inkables Template ~ Mandala 4
Versafine ~ Onyx Black
Inkables Template ~ Mandala 7
WORDage Sets: Everyday Sentiments 2 
Distress Ink Twisted Citron
Distress Ink Peacock Feathers


* I took the card blank and placed a piece of low tack tape across the card. I then took the Mandala 4 (using both pieces in the pack) and placed it slightly under the tape. Inked through with the 2 Distress Ink colours listed above.
* On a piece of scrap white card ink through the centre of the Mandala 7 and then cut round (to me it looks like a flower).
* Remove the low tack tape.
* Stamp the sentiment in black.
* Add a strip of gems across the card, as shown. Place a gem in the centre of the flower then adhere to the card, I used a 3d gel glue.


Saturday, May 26, 2018

Jane DT - Nib Notebook

Hello!

For my post on the Buzzy Goings on at Bee Crafty Blog today I thought I would share one of my favourite DT samples that I made for the feathers shows with Sam last week...


I used a notebook die to cut the covers and spine for this notebook from mount board, but wanted it to be quite bright and funky.  To help achieve that I used some of the Dylusions paints, applying them with a small brayer and making sure I had dried each layer before adding the next.  The colours used were lemon zest, fresh lime and bubblegum pink...


Next I used some of the same paint and stencilled with the d'inkable regular dots, then added some white gesso through the d'inkable chevrons.  Black archival ink was stamped on in patches using the ledger stamp.  I then used the heraldic alpha set to stamp out the word 'notes' and cut them out with a circle punch.  A touch of pink distress ink was brushed around the edges.  The nibs were stamped and clear embossed before adding a touch of colour and cutting out...


I love adding a dangly charm to the side of my notebooks so used some clear shrink plastic with the quill stamp to create one.  I used staz on black ink, then coloured on the opposite side of the plastic with a bright pink alcohol pen.  I then cut the feather out and made sure to punch my hole (something I often forget!!) before shrinking it down with my heat tool.  I then created my charm using some beads, jump rings and an eye pin which was attached to the elastic that held in the pages...


 Here are links to the products I used...

* Art Stamps - Quill Feather
* Art Stamps - Nibs
* Art Stamps - Ledger
Art Stamps - Heraldic Alpha
* D'inkables - Regular Dots
* D'inkables - Chevrons
* Dylusions Paints
* Archival Inkpads

The shows should still be available on HOCHANDA catch up, so if you didn't get a chance to see Sam's demos there is still time!

Thank you for looking and happy crafting,

Jane xx

Friday, May 25, 2018

Emily DT - Feather Samples

Hi everyone,

I hope you managed to tune in to Hochanda yesterday to see the beautiful Feather collection of stamps.

Here are the samples I made for the shows...


I hope you like them!

Emily x

Thursday, May 24, 2018

Karen DT - Time/Heraldic samples for Hochanda

Good morning crafters

It's my turn over on the Buzzy Goings On At Bee Crafty Blog and I'm excited to be able to share my samples for todays Hochanda show,  using the TIME and Heraldic collection. Also incorporating the very beautiful Ladies Profile stamp. All available from the Bee Crafty website

Also used:
Ledger stamp
Distress Oxides
Dinkables
Versafine
Gilding Wax
Gilding Flakes
Metal Markers
Embossing powder


Ladies Profile
Pocket Watch 
Roman Numerals 
Dinkables 
Distress Oxides 


Dinkables : Feathers
Metal Markers 
Time Flies


Pocket Watch 
Heraldic Backdrop 
Cogs
Gilding Wax 


Gilding Flakes 
Heraldic Backdrop 
Ledger
Distress Oxides 


Ladies Profile 
Time Flies
Mdf cogs
Cogs
Glossy photo paper 
Distress Inks 


Pocket Watch 
Ledger 
Roman Numerals 
Time Flies
Dinkables 
Distress Oxides 


Heraldic set
Time Flies 
Dinkables 
Octogon Easy Frame 
Distress Oxides 


Ladies Profile 
Heraldic Crowns
Dinkables 
Gold embossing powder 
Distress Oxides 

I hope you've enjoyed looking through today's samples and I'd encourage you to take a look through the Bee Crafty blog as my fellow DT'S offer some fantastic inspiration 

I'll be back on the Bee Crafty blog next Thursday 

Crafty hugs xx


Tuesday, May 22, 2018

Charlee DT - African Scene


Morning crafters. For this weeks blog I'm sharing this African scene. Hope you enjoy


What you'll need:


Step 1:

Cut down your card to the size you want. Taking the fossilised amber blend across the middle of the card. Then above and below blend the carved pumpkin and then go round the edges with the fired brick. Create some hills in the background using carved pumpkin.

Step 2:

Taking the silhouette tree ink up in a black ink and stamp in the position you want. Then stamp the elephant ( or what other animal you wish ) and stamp also in black ink.

Step 3:

Once happy with how your African scene looks, stamp your sentiment. Then matt and layer how you wish and adhere to a card blank.

That's all from me for this week. Hope you enjoy and are inspired.

Don't forget to share your bee crafty creations on the Bee Crafty Stamps facebook group which you can find HERE

Until next week
Crafty Hugs
Charlee
x

Monday, May 21, 2018

Lorre-Anne DT - Every Accomplishment

Hi everyone, it's Monday and time for me to share another one of my Bee Crafty DT projects with you all... and today I am using the awesome guitar as my focal point.  I wanted quite a bright card so went for orange and purple as my main colours.


Materials
What to do -
  • Cut mat and layers using black and white card.  Mat the largest white layer on to the largest black layer, and glue to the card blank.
  • Take the Distress Inks and dab some on a blending mat, spritz with water and drag the other white square of card through it.  Dry with a heat tool and repeat until you get the look you want.
  • Use the dots Dinkable to blend some Wilted Violet through at random places, and stamp the squiggly lines using Wilted Violet too.
  • Use Versafine ink to stamp the guitar in the centre of the card.  Mat this piece of card onto the remaining black layer, and attach to the card using foam pads.
  • On spare white card stamp the sentiment using Versafine ink, and chop it into separate words before matting on to black card.  Attach using foam pads.
That's my project complete for this week, be back next week with another.

Hugs, Lorre-Anne x

Sunday, May 20, 2018

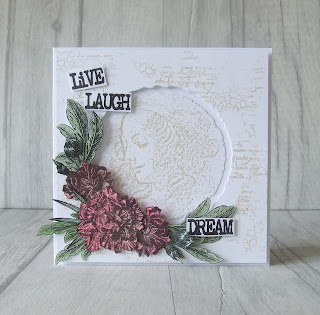
Paula DT - Live Laugh Dream


Shopping List
Bee Crafty Art Stamps ~ Da Vinci: Science of Beauty XL
Backdrops XL ~ Crackle Paint
BEAUtanicals Large ~ Carnation
BEAUtanicals Large ~ Peony
WORDage Sets: Creativity Words Small
Backdrops XL Script
Distress Ink Brushed Corduroy 
Versafine ~ Onyx Black
A couple of circle dies or punches


* Take 6x6 card blank and create a mat slightly smaller. Use a circle die or punch within the centre of the mat.
* Stamp small portions of the script and crackle on to the mat using the Brushed Corduroy.
* Use a smaller die and die-cut a circle. Stamp the Science of Beauty on this circle using Brushed Corduroy.
* Use some foam pads on the mat and layer on to your card base.
* Take the stamped circle and adhere (I made this flat using wet glue) in to the centre of the mat.
* I used patterned paper to stamp the Carnation flowers and the leaves only from the Peony, fussy cut them out and arrange around the bottom half of the circle, as shown.
* Finally, stamp the words "Live Laugh Dream" in black and trim out. Adhere to card, I used a gel type glue to give a bit of dimension.


Saturday, May 19, 2018

Jane DT - The Key to Flying!

Hello!

Last week Bev shared some gorgeous new Da Vinci stamps on HOCHANDA and today on the Buzzy Goings on at Bee Crafty blog I am sharing one of the MDF samples that I made for the shows...

 
I started by preparing the circle art board with gesso then after sticking the MDF cogs and bolts where I wanted them added sand texture paste and crackle paste to the surface.  Once those had thoroughly dried the whole piece was painted with gold paint.  Next the rust effect was created using acrylic paints in yellow, orange and brown tones plus some green and blue for the patina effect...


Gold gilding wax was also added lightly over the top to bring out some of the texture and shapes.  The keys were prepared in the same way as the main board and then the Da Vinci wings stamped and cut out before adding a light wash of watercolour...


I stamped the Da Vinci portrait onto tissue using a permanent ink and used matte medium to attach it to the board, the aim was for it to look a bit like a faded fresco!  Finally the sentiment was stamped and colour added to match the wings...


Here are the products used...

* MDF Circle Art Board
* MDF Cogs
* MDF Keys
* MDF Accessories
* Art Stamps - Da Vinci Leonardo
* Art Stamps - Da Vinci Wings
* Wordage - Art is Never Finished

Thank you for looking and happy crafting!

Jane xx

Tuesday, May 15, 2018

Charlee DT - DaVinci Samples

Morning crafters. For this weeks blog I'm sharing the samples I made for yesterday's DaVinci shows.


For this sample I used a gold sparkle pen and did a wash all over the background. I then used the perspective circles inkable and blended through with vintage photo distress ink. On a smaller piece of card I stamped Science of beauty  in versamark. I then took a dry brush and used some mica pigments over it. To finish the card I stamped DaVinci signature in versafine oynx black.


I blended vintage photo distress ink all over the card for the centre piece and then splattered some water. Once dry I stamped the Leonardo stamp with versamark and heat embossed with gold embossing powder. On some kraft card I heat embossed laurel boarder all round the edge with clear embossing powder. I then used some guilding wax over the top. I took the idea stamp from the creativity words large set and stamped all over also in vintage photo distress ink. I then lightly blended the same colour over the top.


For this one I took all the blue tones and squeezed lemonade distress oxides. I put the different colours on my blended matt spritzed with water and picked it up onto som glossy card. I kept repeating untill I was happy with how the background looked. Once dry I went over the card with some distress micro glaze. I then stamped Leonardo and the Artistry word with nuvo hybrid ink.


I used the Mondrian 1 inkable and blended through with twisted citron, peacock feathers and salty ocean oxides. I then stamped the DaVinci Wings in versafine grey ink all over the bakground. I then took a selection of words from the creativy set and stamped them in the spaces.

That's all from me for this week. Hope you get lots of inspiration. Don't forget to share you're Bee Crafty makes on the Bee Crafty Stamps group on facebook which you can find HERE

Untill next week
Crafty Hugs
Charlee
x

Monday, May 14, 2018

Lorre-Anne DT - Da Vinci samples

Hi everyone, for my Bee Crafty blog post this week I'm sharing the samples I have made for Bev's shows on Hochanda today... tune in at 10am and 2pm to see all the gorgeous Bee Crafty goodies available.

I've used one of the MDF tags and decorated it using Pentart products (gesso, structure paste, cracking paste primer, cracking paste, patina effect paints).  I stamped the image on to tissue paper using Onyx Black Versafine ink, then adhered it to the tag using Matt Mod Podge.  The cogs and keys are also available from Bee Crafty.  I've also used the Hearts Dinkable .


I created the background using Mermaid Lagoon & Spiced Marmalade Distress Oxides, and Dinkables Regular Dots & Sunset.  The stamps I have used from the Da Vinci range are the Vitruvian Man,Science of beauty, and Art is never finished.


I created a very simple background by stamping the Wings in various colours of Distress Oxide (Candied AppleSalty OceanSqueezed LemonadeSpiced Marmalade, & Twisted Citron).  I stamped Leonardo and the sentiment using Onyx Black Versafine ink.


I created a background using Brilliant Red Brusho, then blended some Black Soot Distress Ink through the Stars Dinkable.  I stamped Leonardo and the sentiment using Onyx Black Versafine ink.


I created the background using Distress Oxides (Faded JeansSalty OceanPeacock Feathers, Broken China), and the Circles Dinkable.  I then stamped the Science of Beauty and Life & Rain using Onyx Black Versafine ink.  I added some highlights to the circles using a white gel pen.


I created the background using Distress Oxides (Wild HoneyFrayed BurlapGathered Twigs), then spritzed water through the Vitruvian Man stencil.  I blended some Frayed Burlap through the Distressed Harlequin Dinkable, and stamped both the image and sentiment using Gathered Twigs.


I created this entire card using Vintage Photo Distress Oxide.  Materials used include Vitruvian Man Inkable, Circle Lattice DinkableSforza HorseScience of Beauty and Art is never finished stamps.

I'll be back next Monday to share another project with you all.

Hugs, Lorre-Anne x

Related Posts Plugin for WordPress, Blogger...