Showing posts with label Mixed Media. Show all posts

Tuesday, January 18, 2022

Caroline - Journey


This mixed media tag was created using the brand new TODAY Art Stamps Butterflies & Birds XL!!


Die cut three solid black butterflies, three butterflies in white and three on patterned paper. 


The white and coloured butterflies were heat embossed and then layered – black on the bottom, white and then the colour.


Create the mixed media collaged background.

I used Distress Crayons to create the background colours on the tag, together with coordinating scraps of paper.


Using a stencil and texture paste add to the tag creating dimension.


I used a D’Inkable stencil from set one, the hearts, and added to the stencil with Distress Oxide.  Added black ink and the sentiment, and some black hearts.


Back the tag onto some black card to create a frame around the tag.


Add the layered butterflies and a pearl in each centre. Finish off with ribbon.


Tuesday, January 11, 2022

Caroline - One day At a Time Tag


A mixed media tag using Journaling Girl-Sam!


Using a kraft tag as the base I decorated a tag using book paper and music paper, some coloured paper, and some corrugated card which I then covered with Matt Medium before adding more colour with the Distress Crayons.


Using the raindrop stencil from the D'Inkables Set 4 I  added texture paste to part of the tag.


Using Journaling Girls: Borders #1, I used part of one of the stamps on the tag and then heat embossed.


Die-cut a plain white circle and then stamp and heat emboss Sam.


Colour in Sam using Copics.


Stamp, heat emboss and then colour the heart which is part of the Journaling Girl: Sam set.


Assemble everything together using extra bits as embellishments behind and in front of the main circle image.
Finish off with ribbon.

I used:


Caroline x


Wednesday, January 18, 2017

Marleen DT - Mixed Media

Hi Bloggers..

Time to share my weekly post for BeeCrafty.
Today I had a play with Mixed Media. Its not something I do very often, but something I would really love to get the hang off. So what better way to get the hang of something then to mix it with your favorite stamps ;-)

For today I used only a small stamp. The Butterflies..
They may be "small, but they are the perfect size to add accents to your projects.
There are 4 different sets of butterflies and you can find them all in the STORE, HERE.

I honestly couldnet really tell you how I made the mixed media piece.. Its something I have worked on from time to time until I was happy with it.
There is modgepodge on it, stones, gauge, paints, gelatoes, string and who knows what else lol

The butterflies however.. I remember how I made them lol..~I stamped them with black Archival onto a 300g white card stock. I chose the thick card so they will stay solid. I fuzzy cut them and added gelatoes to them. I added a wee bit of guilding wax over the gelato to give them extra shimmer and stuck them unto my piece with glue gel.

And that is all from me for today.
 Thanks for popping by and for any comments left behind.
Dont forget to come visit me on FaceBook, Twitter, Instagram, Pinterest, Youtube or my FB page.
 Happy Crafting


Monday, January 16, 2017

Kerrie DT - Decision To Try... - Mixed Media Canvas

Hiya and Welcome to my Monday Post for Bee Crafty Stamps

Today I am sharing with you a recent make for one of the Hochanda Shows that I have not Blogged about before... my Mixed Media Canvas

The Bee Crafty Products I used on this project are...


First I covered the canvas with white gesso, Once dry, I trimmed a piece of old music from a piano book and glued this to the canvas and then painted over again using white gesso. I made sure that the gesso was applied thinly so that the music notes could still be seen. Next I painted over with a coat of Magnolia Chalky Paint and left to dry fully.

On a piece of thin corrugated card I drew around the inside and outside of  the 6" Square Inkables Template which I then cut out to create a frame, I covered this frame using music score paper and then I used filler to seal in the corrugated edges and painted over a coat of white gesso. Once dry I painted over the frame again using Mink Chalky Paint and left to dry fully.

Once both pieces were fully dry I used a strong white glue to stick the frame to the canvas at a jaunty angle. I then used filler through the 4" Heart Inkables Template to place hearts inside and outside of the frame and around the canvas. I used a heat gun to speed up the drying process so that I could then paint the Hearts using Damson Chalky Paint.

Next I stamped the Style Wire Border around the edges of the frame, and the Lines & Dots Texture onto the canvas. I then stamped the Decission To Try WORDage onto white cardstock, which I then cut the scetions of the sentiment out, backed them with dark gold mirror board and attached to the canvas inside the frame using a hot glue gun spreading the words out over the space. I picked out some paper flowers, wooden buttons and metal embellishments (one being a little Bee for Bee Crafty... just cause I can) I fixed them into opposite corners of the frame using a hot glue gun.

To seal and varnish the project I painted over everything using Mod Podge.

Thank You so much for visiting my Post today - Please visit again soon to see more from the Amazing Bee Crafty Design Team

Krafty Hugs xx

Monday, November 28, 2016

DT Kerrie - Painty Dreams

Hiya and Welcome to my Monday Post for Bee Crafty

Today I am sharing with you a recent make for the Hochanda Show's with Our Bev

 
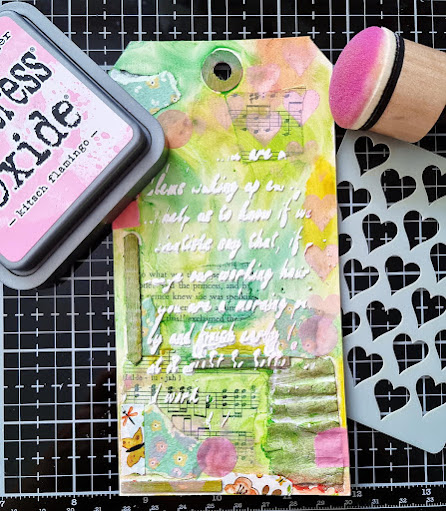
I used one of the medium MDF Tags which I painted first with white gesso to give a nice surface to stamp and ink onto... I use a brush so I get a nice brush stroke texture.

Next I inked the tag using Spun Sugar distress ink and my Bee Crafty Blending Mat in the middle area working outwards. I then used Scattered Straw distress ink around the edges.

I stamped the Line&Dot texture stamp using a gorgeous purple paint, then the Distressed Dots texture stamp using a lush Teal paint 

I decided to stamp the Inspired by DaVinci Script stamp over the whole tag using archival ink which I love as it stamps so crisp and dark even over paints and inks so it's perfect for mixed media.

To add a bit of an extra textured look I took a few pen lids and straws which I dapped into wet white and black paints to create the circle bubbles this was a sudden brain wave moment for a previous shows samples which I loved so much I had to make some more projects. I love using items from around my home which wouldn't normally be thought of as craft tools/supplies

 
For the sentiment I stamped the Dream Wordage Stamp onto watercolour cards rock that I had already trimmed to size. I then coloured the sentiment first with washes of the same paints from earlier and once dry I inked over two opposite corners using scattered straw distress ink. I matted this onto black cardstock and fixed to the tag using my hot glue gun.

I picked out some paper flowers in similar colours to the paints and inks I used. I dabbed them with black paint and a dry brush to add a darker look to them and fixed to the corners of the sentiment using hot glue gun.

I really like how this one came our as the colours are really lovely and shows mixed media can be pretty too

Thank you so much for visiting today and please come back again soon to see more gorgeous makes from the amazing Bee Crafty Design Team

Krafty Hugs

Thursday, November 17, 2016

DT Kerrie - MDF Tag 'Dream'

Hiya and Welcome to my post for Bee Crafty...

I have hijacked the Thursday Spot this Week as I was getting over a flu-bug...

We have an exciting Weekend coming up as Our Bev will be over on Hochanda on Saturday

I am sharing one of my Design Team projects with you today that I made using products that will be live on the Saturday Show's

Bee Crafty Products used:

Textures Stamps - Spots and Line&Dot

Wordage Stamp - Dream

MDF Tag - Medium

Monday, August 17, 2015

Kerrie DT - Artsy with Inkables & DaVinci Script

Hiya and welcome to my Monday Post for Bee Crafty

I have been away with no Internet Access it was a bit of a nightmare to be without but the Family Holiday was Fun

So I am back this week with a Mixed Media Artsy Make using 3 of my Favourite Inkables Templates and the DaVinci Script Stamp

For this project I upcycled the chipboard from the back of an art sketch pad - I love making projects with these as I hate throwing anything away if I can help it


First I painted the board using white chalk paint - then I chose my 3 Inkables Templates and used polyfiller and a scraper through the templates - 'Love' in the middle, the corners with 'Circles' and 'Metalwork Alpha' - once dry I coated the whole board using Gesso. I then applied Teal and Powder Pink chalky paint using small sponges randomly for just a hint of colour, I then sponge dabbed Charcoal Grey chalky paint to add like an aged effect. I also used a small paintbrush to apply some Charcoal Grey paint around the letters of 'Love' to add shadows so the lettering stands out against the background. Using an Archival Ink Pad I randomly stamped the 'DaVinci Script' stamp. To add texture I rubbed a candle over the whole board then heated with a heat tool and sanded it back a bit over the raised parts of the Artsy Project - this brought out some of the white from underneath. I rubbed Silver Guilding Wax over to create a metallic look almost like this project was created from embossed metal. To finish I painted over the whole project with Mod Podge to seal it.


I really like how this project turned out - I'm getting a bit more confident now with Mixed Media which was something I hadnt really done much of before this year as I was always a bit terrified but I have learnt that there is no wrong and its the enjoyment of making the project that is the most important thing being free to let go and try out new ideas and push that comfort zone 

Thank You so much for visiting my Post today and i hope you will come back to the Bee Crafty Blog soon for more Amazing Projects by the Gorgeous Design Team

Krafty Hugs xx

Related Posts Plugin for WordPress, Blogger...