Showing posts with label Bee Crafty Polymer Stamps. Show all posts

Friday, January 28, 2022

Sharon GDT - Whatever works!!!


As we have a tag challenge going on in the Bee Crafty FB group I thought I'd make a tag for my post today. I've used some lovely bright colours as we all need cheering up this time of year. 

Stamps:  Faces - Whatever Works

               Journal Art Elements

Stencils: D'inkables set 5

Distress Oxide inks: Picked Raspberry

                                  Ripe Persimmon

                                  Peacock Feathers

Versafine Clair: Nocturne

Ranger embossing powder: Superfine white

Versamark clear ink

Posca white pen

Here's how I made my tag:


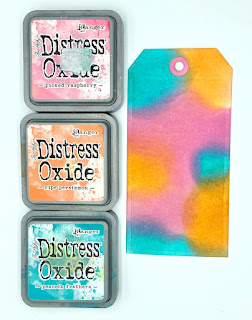
I started off with making my background by blending distress oxides, picked raspberry, ripe persimmon and peacock feathers onto my tag. 

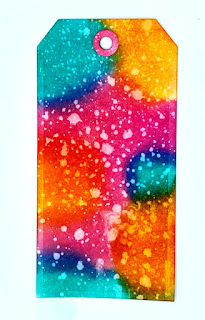
Next I sprinkled over some water to give it some texture. I used the heat gun on it to help it dry before my next step. 


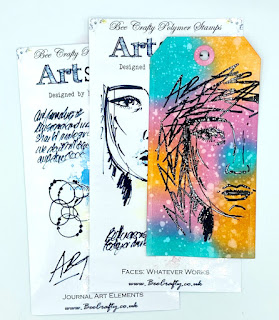
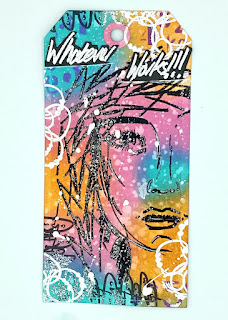
I used the large face from the Whatever works set and stamped it in versafine clair black ink and then embossed with a clear embossing powder. This helped the image to stand out from the bright background. I wanted to build up her hair so I used the Art stamp from the Art elements set and randomly stamped and clear embossed around her face.


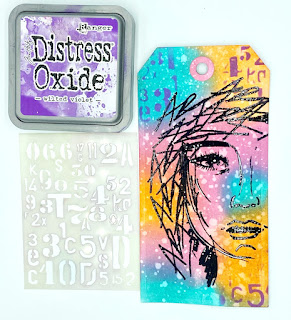
Next using Wilted violet oxide ink and the number stencil from the D'inkables set 5 I stamped at the top corners and bottom right of the tag. 


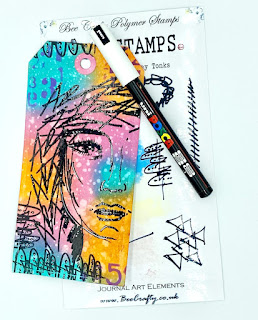
I added a little border to some of the edges using the arched stamp from the Art elements with black ink and clear embossing. With a white Posca pen I added some highlights to her face and hair.


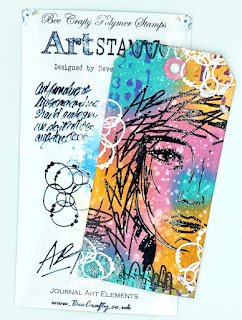
 To add a bit of light to the tag I white embossed the circles from the Art elements set around the edges. The powder stuck to some of the embossed black border but I liked the way it looked so left it as it was. It added some more texture. 


To finish off the tag I stamped the Whatever works stamp onto black card with clear ink and then used white embossing powder, cut around it and adhered it to the top of my tag. Then I just added some white spatters with my white Posca pen. 

Sharon x


Friday, May 19, 2017

Emily DT - Poppy Border

Hi everyone,

I hope you're all having a nice week. This week I have made a beautifully simple card, which takes no time at all to make.
Here it is...


I started by cutting a square of card the size I wanted. I inked my poppy border stamp using Distress Inks. I used my mini inks which meant I could use it like a pen to colour the parts I wanted each colour. You could also do this using Distress pens or something similar. I spritzed it with water to make sure the ink was wet and stamped it down one side of my card.


I stamped a sentiment in the top left corner and finished it by mounting it onto black card.


This card took literally a few minutes to make and I think it is so effective. I love how it turned out and I hope you do too! 

See you next week

Emily x

Monday, May 08, 2017

Kerrie DT - Wordage - 'Never Regret' - and some Beautanicals too

Hiya and Welcome to my Monday Design Team post for Bee Crafty

Oh my Word!!! It has been a crazy week here at KraftyKezzlaHQ - we have no broadband at home for 3 weeks so I am having to use my mobile as a Wifi Hotspot which I do not have too much data left so I am having to use my internet sparingly - not good for a social media geek lol

So while I can not be online as much as I would like I have been moving all the bedrooms around in my house!! which is nuts as its 4 rooms that are now all topsy turvy while I sort through and delclutter... but it also means some good news... Hubby and I are moving our bedroom to the back of the house which will then leave me free to use the front room we are now in as my Work/Office/Kraftroom like we always intended to eventually... it is going to be amazing to be able to leave all my stuff out where I like and be able to shut the door at night without having to shift ot all away each night YAY!! It is going to be mega!!

Now back to my post after all that chatting lol

This week I am sharing with you an older make from me where I have used the fabulous 'Never Regret' - WORDage Stamp as the main focal point of the card and then created a flower from the leaves of the 'Maple - solid' stamp and the larger branch from 'Branches' stamp set both from the BEAUtanical Collection


For the flower I repeat stamped the maple leaf onto pearlescent card, fussy cut them, embossed them from the reverse and layered them up overlapping to create the bloom, the leaves I stamped using the branche stamp which I also fussy and fixed under the flower.

I teamed these lush stamps with some pink, brown, kraft and cream cardstock, some circular dies, flatback pearl and some polka dot ribbon, on a 7x7" cardblank

Thanks You so much for visiting my post today - please come back to the Bee Crafty Team Blog again soon for more yummy inspiration from the Amazing Design Team

Krafty Hugs xx
Visit Kerrie's Blog - HERE - to see more of her Projects

Monday, April 24, 2017

DT Kerrie - Planning with Bee Crafty Stamps

Hiya and Welcome to my Monday Post for Bee Crafty Stamps

This week I have been getting ahead with my 'Filofax - Planning' and I have decorated this week's pages and my May monthly spread using some of my favourite Bee Crafty polymer stamps


Bee Crafty Products used:

BEAUtanicals - Branches - polymer stamp set
BEAUtanicals - Tall Elder - polymer stamp
WORDage - Dream - polymer stamp

I really love to use my non-planner crafty stash in my planners as it helps me to expand on what I have brought for my planning, but also as I love to use my planner for memory keeping as well as planning my day to day stuff

I chose colours of stamping ink to complement the mushroom coloured leather of my current planner (I have a big colletion to choose from each month) 

I decided to use the same stamps for my weekly layouts in May as I used for my Monthly spread.


I stamped using versamagic chalky ink's in the following colours

Wheat: for the script stamp
Sage: for the larger branch stamp from the set
Sahara Sand: for the Tall Elder stamp (I just used the top part)
Jumbo Java: for all the Wordage stamps

I stamped them around the edges and over the notes section to leave the main pages blank for filling in the details of my week


I used the same stamps and colours for the my Monthly spread


I really like how the colours work with my chosen planner for May

Thank You so much for visiting the Bee Crafty Blog today I hope I have inspired you to use your Bee Crafty Stamps in more of your projects as well as your Cardmaking

Come back soon to see more inspiring makes from the Brilliant Bee Crafty Design Team

Krafty Hugs xx
Please stop by 'Kerrie's Blog' to see more of her Projects

Monday, April 17, 2017

Kerrie DT - Love & Chocolate - Black & White


Hiya and Welcome to my Monday Post for Bee Crafty Stamps

Bee Crafty Products used:

Wordage - 'All You Need is Love' - polymer stamp
Fabulous Flowers - Star Flowers - polymer stamp set
Beautanicals - Branches - polymer stamp set

I hope you are all having a lovely Easter with your families & friends - I was inspired but Easter Chocolate for this make but went with a Black & White, Classic look instead of the traditional bunnies and eggs for Easter


Firstly I crocheted some white flowers and stitched through some buttons using white yarn. Then I repeat stamped the Star Flowers and larger Branch onto white cardstock using black versafine ink. I then spent some time fussy cutting them out


I then trimmed a piece of black card to 1/2 cm smaller than my 7x7 card blank. Then I trimmed a piece of white cardstock to 1/2 cm smaller than the black piece. I ran some black card stock through my embossing machine using a burlap embossing folder and cut a strip of this to fit the width of my card. I layer the black and white card pieces onto the card blank using strong glue, I stamped the Love and Chocolate sentiment onto the top corner and mounted the black embossed strip to the card front using foam tape.


I then arranged the Branches, Crocheted Flowers and Star flowers and when i was happy with how they looked I fixed them down using my hot glue gun


I then fixed some gems using glossy accents to the flower centres, and scattered some around


I love how this project turned out as I really love non-traditional themes and colours during the seasonal occasions through the year


I made 2 more slightly altering the layout each time


Thanks You so much for visiting the Bee Crafty Blog please do visit again soon to see more Awesome Projects from the Amazing Bee Crafty Design Team, they are such a Talented Bunch 

Krafty Hugs xx
Visit Kerrie's Blog to see more examples of her work

Monday, April 10, 2017

DT Kerrie - Simplicity - Beautanicals - Black & White


Hiya and Welcome to my Monday Post for Bee Crafty Stamps

Today I wanted to share with you a make that is a Simplistic make from black and white cardstock
I love the Black & White look its simple but dramatic as well


Bee Crafty products used:

BEAUtanicals - Tall Elder - polymer stamp
WORDage - Simplicity is Sophistication - polymer stamp
Inkables - Oval Lace - Template


First I stamped the Tall Elder stamp onto a piece of Linen Card using Versafine Ink, I then trimmed this piece about 1cm around the edge of the image. I stamped the Simplicity is Sophistication stamp onto an off cut of white card. I matted both these pieces using black card.


I then took a piece of pearlescent white card and trimmed to 5mm smaller than a 6x6 card blank, I ran this card through my embossing machine using the Oval Lace template underneath it to create a raised pattern on the card


In this picture you can see the pretty shine from the pearlescent card and the pattern from the template shows well too

I matted the pearlescent backing I created with some black cardstock and stuck to the front of the card blank using a strong glue. I layered up the Tall Elder image and the sentiment using some foam tape. I finished the card with some jet black flat backed gems.

Thank You so much for visiting the Bee Crafty Blog today... please do come back again soon to see more of the Gorgeous Samples and Projects from the Brilliant Bee Crafty Design Team

Krafty Hugs xx
Visit Kerrie's Blog to see more examples of her Work

Monday, March 20, 2017

Kerrie DT - Steampunk Stories - Hochanda Samples

Hiya and Welcome to my Monday Post for Bee Crafty Stamps

We all hope you enjoyed watching the Bee Crafty Shows on Hochanda with Our Bev & Our Sam weren't they just amazing and so inspiring, I always love to see their Demo's... Unfortunately I missed the last post so my Samples didnt make it to the shop on time so they were not shown on the show so I am sharing them with you here instead... I shared one last week but in case you missed it... they are all here today...


This is the one I shared here on the Blog last week... If you havent seen the post click on the link below to see how I made it


For this make I have inked the Background cardstock using Peeled Paint and Tumbled Glass distress inks, Then stamped one of the Style Wire Borders around the edge. For the main Image I stamped the beautiful 'Steampunk Stories - Rosie' onto white linen cardsstock using archival ink. I then inked around the edges with the 2 distress inks again. I then tapped the Peeled Paint distress inkpad onto my glass craft mat, spritzed with water, picked up the colour using a paint brush and painted over her eyes and her dress. I then stamped 'Wordage 'Love Love' onto an offcut of the linen cardstock using archival ink and inked the edges using Tumbled Glass distress ink. I matted all the pieces using black cardstock and layered them up on a 7x7 inch Cardblank.


For this one I used a piece of grey board which I prepped using white gesso on a dry brush to create a distressed look background. I then stamped the Bolt from 'Steampunk Stories - Cog Set' just onto the edges of 3 sides and fully onto the 4th side. I inked over using Tea Dye distress ink. I then trimmed a piece of the Steampunk Background Papers, inked the eges and glued to the background. On leftover greyboard that I had prepped using white gesso, I stamped 'Steampunk Stories - Rosie', I then coloured over her hair using some brown coloured pencils, trimmed her out using sharp scissors, inked the edges and fixed to the background but overlapping the background paper. On another leftover piece of greyboard which I left unprepped I stamped 'Wordage - Making Memories' I then roughly painted gesso around the edges and lightl inked using Frayed Burlap distress ink. To finish I added some paper flowers that I inked using Frayed Burlap distress ink and fixed to the project using a hot glue gun.


For this one I trimmed a piece of linen cardstock to a half cm smaller than a 5x7 cardblank. I inked this piece of cardstock using Squeezed Lemonade & Tattered Rose distress inks. I stamped the postcard script from 'Steampunk Stories - Post Card Set' in the corner along the long side on the right of the cardstock piece. I stuck down some 'Jointing Tape' (pinched from hubby's toolshed) under where I would attach the main image. For the main image I stamped 'Steampunk Stories - Violinist' onto watercolour card which I had pre-trimmed to a nice size for the card front. I then watercoloured her using Victorian Velvet, Tattered Rose & Frayed Burlap distress inks that I dabbed onto my glass craft mat, I painted them on using a water spritzer first and lifting the colours from the mat using a paint brush. I had stamped the image using a pale inkpad so when I painted over her she looked more like a painted sketch. To finish my card I inked a few paper flowers using a makeup sponge and Frayed Burlap distress ink.

I hope these have shown you a few other ways to use your 'Steampunk Stories' stamps, I'm a big fan of soft vintage colours so these were perfect to use with the stamps

Please visit again soon to see more gorgeous makes from the Bee Crafty Design Team

Krafty Hugs xx

Monday, March 06, 2017

DT Kerrie - Fashionette's on Fabric - Bee Crafty

Hiya and Welcome to the Bee Crafty Blog

Today I am sharing with you one of my recent makes for the Bee Crafty Show's on HOCHANDA

Bee Crafty Products used...

Fashionette's 'Vera' - polymer stamp
Fabulous Flowers 'Star Flowers' - polymer stamp

This make is something a little different to show that the Bee Crafty Polymer Stamps are not only for paper crafting


I used my sewing machine to create a fully lined Tote Bag, I used some pretty floral fabric and and white fabric. 

I stitched a piece of pink dotty fabric onto the centre of the bag.

I stamped 'Vera' onto printable canvas fabric (which I had pre-trimmed to fit) using black Archical Ink. I used fabric paints to colour 'Vera', mixing and repainting to create layers and highlights. Once dry I ironed over the painted image using a travel iron and a piece of scrap fabric to fix the paint.

I stamped the 'Beautiful Things' sentiment stamp at one corner using archival ink and painted 'Julie-Ann' by hand with a fine paint brush and black paint. I stitched this panel to the front of the bag into the centre of the dotted fabric... I used a loose running stitch on my sewing machine but free stitching and over lapping for texture.

Next I picked out some fabric flowers in colours to match nicely with the painted image and also with the floral fabric. I stitched them onto the bag front at the corners of the image using free motion stitching just in the centre's, I layered a few up, I added some flowers that I had stamped onto fabric scraps using archival ink which I had fussy cut out.

To finish I added some flat back gems into the flower centres and opposite corners of the the painted panel using Ranger Glossy Accents glue

Thank You so much for visiting my Post today, Please come back again soon to see more gorgeous makes from the Amazing Bee Crafty Design Team

Krafty Hugs xx
Please visit Kerrie's personal Blog HERE to see more of her work x

Monday, January 16, 2017

Kerrie DT - Decision To Try... - Mixed Media Canvas

Hiya and Welcome to my Monday Post for Bee Crafty Stamps

Today I am sharing with you a recent make for one of the Hochanda Shows that I have not Blogged about before... my Mixed Media Canvas

The Bee Crafty Products I used on this project are...


First I covered the canvas with white gesso, Once dry, I trimmed a piece of old music from a piano book and glued this to the canvas and then painted over again using white gesso. I made sure that the gesso was applied thinly so that the music notes could still be seen. Next I painted over with a coat of Magnolia Chalky Paint and left to dry fully.

On a piece of thin corrugated card I drew around the inside and outside of  the 6" Square Inkables Template which I then cut out to create a frame, I covered this frame using music score paper and then I used filler to seal in the corrugated edges and painted over a coat of white gesso. Once dry I painted over the frame again using Mink Chalky Paint and left to dry fully.

Once both pieces were fully dry I used a strong white glue to stick the frame to the canvas at a jaunty angle. I then used filler through the 4" Heart Inkables Template to place hearts inside and outside of the frame and around the canvas. I used a heat gun to speed up the drying process so that I could then paint the Hearts using Damson Chalky Paint.

Next I stamped the Style Wire Border around the edges of the frame, and the Lines & Dots Texture onto the canvas. I then stamped the Decission To Try WORDage onto white cardstock, which I then cut the scetions of the sentiment out, backed them with dark gold mirror board and attached to the canvas inside the frame using a hot glue gun spreading the words out over the space. I picked out some paper flowers, wooden buttons and metal embellishments (one being a little Bee for Bee Crafty... just cause I can) I fixed them into opposite corners of the frame using a hot glue gun.

To seal and varnish the project I painted over everything using Mod Podge.

Thank You so much for visiting my Post today - Please visit again soon to see more from the Amazing Bee Crafty Design Team

Krafty Hugs xx

Monday, December 05, 2016

DT Kerrie - Christmas Fete Makes with Bee Crafty Stamps

Hiya and Welcome to my Monday Post for Bee Crafty

During the last week I was busy getting ready for Our School's Christmas Fete and I had a lot of fun getting inky with some of my Bee Crafty Yuletide Stamps and Distress Inks

I am sharing with you a sample of the cards that I made for the Fete...


For all the cards above I used some of the Gorgeous SnowFlake Stamps from the Yuletide Collection sets 'Snowflakes - Feathery', 'Snowflakes - Spikey' and 'Snowflakes'. For blue tone cards I used 'Stormy Sky', 'Broken China', 'Faded Jeans' & 'Tumbled Glass' distress inks. For the purple tone cards I used 'Seedless Preserves', 'Milled Lavendar' & 'Dusty Concord' distress inks

These cards were simple and quick to make but I really love how they turned out.

For all the cards I used the 6inch Circle Inkables Template (the inner part) which I used lowtack tape underneath to prevent slipping while inking onto smooth cardstock. I inked up the stamps and stamped randomly over the card and off of the circle template to fill up the background. Once dry I then inked the edges of the card and off the edge of the circle template to soften the backgrounds. I stamped the 'Merry Christmas' sentiment from the Yuletide Wordage collection using black archival ink into the centre of each card. I finished them using colour matching flat back gems.

The Fete went really well... I made back the stall charge and a little profit on top which for my first Fete in a long time wasn't too bad at all. 

Thank You so much for visiting today to see my examples. Please visit the Bee Crafty Blog again soon to see more gorgeous work from the Bee Crafty Design Team 

Don't Forget to join the Bee Crafty Facebook Group - there are always lots of inspiration form the Team and the Bee Crafty Fans. We also have a Monthly Challenge where you could win an Amazing Prize 

Krafty Hugs xx
Please do visit Kerrie's Personal BLOG to see more of her work

Monday, November 21, 2016

Dreams and Things - MDF Tag

Hiya and Welcome to my Monday Post for Bee Crafty Stamps

We hope you all watched and enjoyed Our Bev's Brilliantly Inspiring demos on the Saturday Show's on Hochanda wowser they were amazing

Today I would like to share another one of my Sample that were on the shows... This was one of my favourite makes using the new MDF tags and the gorgeous stamp sets

Bee Crafty Products used:

MDF large tag
Backdrops; Textures stamp Set
Wordage; Dream, Beautiful Things

I painted the tag first with white gesso and then with a translucent lime green paint. Once dry I used purple and pink paints to stamp the Textures over the tag. I stamped the words using black archival ink. For the bubbles I used various pen lids dipped into white and black paints.

Thank you so much for visiting today... come back soon for more amazing creations from the Vee Crafty Design Team

Kraft Hugs xx
KERRIE

Thursday, November 17, 2016

DT Kerrie - MDF Tag 'Dream'

Hiya and Welcome to my post for Bee Crafty...

I have hijacked the Thursday Spot this Week as I was getting over a flu-bug...

We have an exciting Weekend coming up as Our Bev will be over on Hochanda on Saturday

I am sharing one of my Design Team projects with you today that I made using products that will be live on the Saturday Show's

Bee Crafty Products used:

Textures Stamps - Spots and Line&Dot

Wordage Stamp - Dream

MDF Tag - Medium

Related Posts Plugin for WordPress, Blogger...