Saturday, September 30, 2017

Jane DT - Unfinished Art...

Hello!

I am really excited to be posting my project today on the Buzzy Goings on at Bee Crafty Blog as it is also the day that Bee Crafty are on HOCHANDA (10am and 3pm) with their gorgeous Da Vinci stamps!

When choosing which of my design team projects to share today there was no contest.  I love working with MDF as it allows me to use so much texture and lots of different mediums so I had to choose this mixed media piece incorporating my favourite of the stamps (the wings!) plus two pieces of MDF...


To create this project I used...
 
* Art Is Never Finished - Inspired by Da Vinci
 
I started by creating the background on both pieces of MDF.  They were first primed with gesso then texture paste applied.  I initially attempted to stamp into the paste with the XL Script stamp.  This didn't really work as I think the paste was too thick and the design too detailed, but it did create a great texture which I really liked, and where the paste was thinner you could see some elements of the script.  I then used the paste through the diamond D'inkable for even more background texture...
 
 
I painted it all with brown acrylic paint and next used patina antiquing cream over the top which was  rubbed back after drying with a wrung out baby wipe.  Gold gilding wax was added to create highlights on the texture.
To create the background for the stamps I chose cracked pistachio and walnut stain distress oxides and coloured a piece of card.  The wings, portrait and sentiment were all stamped with sepia archival ink, a touch of gilding wax added to the edges and the pieces then matted onto gold card.  These were added to the MDF with glue gel for extra dimension...
 
 
I like to use moulds and resin so to continue the art theme I coloured one of my resin frames using gold paint and a bit of patina gilding wax and added it to highlight the face of the portrait.
 
The smaller tag was stuck to the main piece then when dry I added some rusty wire through both holes and coiled the pieces at the top.
 
Hopefully you will be able to catch the shows today, or if not they should be available on the website on rewind for a couple of weeks, I will certainly be watching!
 
Thank you for reading, happy crafting,
 
Jane xx


Friday, September 29, 2017

Emily DT - Wildflowers

Hello everyone, I hope you are having a good week.

I have used a technique this week that I have been using a lot recently and this week's blog features two cards which are made in the same way.

Here is the first card I have made:


I have created the background by colouring some stripes onto my Bee Crafty blending mat with Distress markers. I then spritzed it with water and placed my piece of card into it. I absolutely love the effect this technique gives you, and you can do it with any water based ink. I like using the markers as you have more control over the colour placement.


I stamped the moon onto a random scrap of card which had pale blue ink on and cut it out. I stuck it onto my card and then added the Wildflower stamps in a dark blue.


I didn't want to put a sentiment onto the front of this card so I stamped a 'happy birthday' sentiment on the inside. 

Here is another card I have made using the same technique to get the background colour.


I love that you get a different outcome everytime using this technique and I have lots of pieces of card coloured like this ready to be turned into cards.

I hope you like the cards this week.

See you next week with some Hochanda samples.

Emily x

Thursday, September 28, 2017

Karen - DT samples for Da Vinci Hochanda show

Good morning everyone xx

It's time for my weekly blog post at
Buzzy Goings On At Bee Crafty  for
Bee Crafty  and I am SO excited to be allowed to share my DT samples for the
Da Vinci inspired stamps that are coming up on the show this Saturday on Hochanda!

I have to say these were a challenge for me, a style I've not crafted with before, but I fell in love with them... so inspiring and versatile too. I hope you enjoy what I've made with them as much as I do x

Stamps I used:
Leonardo
Leonardo Signature
Vitruvian  Man
Da Vinci  Wings
Sforza Horse

Also used:
Cogs stamp set
Mdf Artboard
Inkables
Dinkables
Distress Inks 
Distress Oxides  
Versafine
Lustre Luxe 
Gilding Wax


Using the Vitruvian Man and Leonardo Signature,  with Smokey Grey versafine


Another using the Vitruvian Man over a masked panel, using Peeled Paint and Twisted Citron Distress Oxides, with the Metal Work Alpha template.  The Leonardo Signature was stamped in the Peeled Paint


A frame was cut from card.  The cut out panel from this was blended with Antique Linen, Brushed Corduroy and Walnut Stain Distress Inks.  Leonardo was stamped in Vintage Sepia versafine.  The frame was inked in the Distress inks and edged with Golden Gate Lustre Luxe and Gold gilding wax. Leonardo Signature was stamped in the versafine


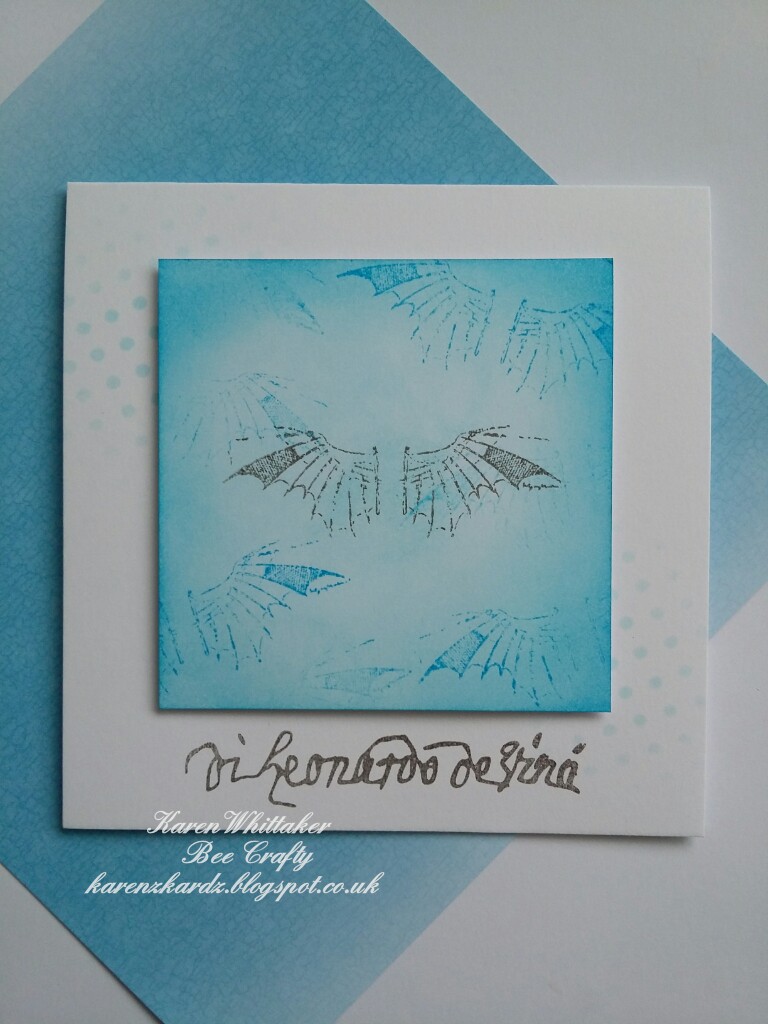
The inked panel was created by blending Tumbled Glass and Salty Ocean Distress Inks.  The Angel Wings were stamped in the background using Faded Jeans Distress Oxide and the focal wings and Leonardo Signature were stamped in Smokey Grey versafine. The offset dots Inkables added a few subtle dots to the sample


Fossilized Amber and Spiced Marmalade Distress Oxides were inked through the Heart easy frame stencil, the Distressed diamonds and metal work alpha stencils. The Sforza Horse and Leonardo Signature were stamped in Vintage Sepia versafine


A frame was cut out then adhered to card with temporary adhesive. The images were stamped over the card blank,  and frame, in Vintage Sepia versafine. Antique Linen Distress Ink was blended around the card and over the frame and used through the metal work alpha stencil to add some depth. The frame was removed and then adhered permanently with foam pads


The panel was masked off using tape. Tumbled Glass and Salty Ocean Distress Inks and Iced Spruce Distress Oxide were blended to create background.  The metal work alpha stencil was also used to add interest.  The cogs were stamped in smokey grey versafine ink, first and second generation stamping to add depth.  Leonardo and the Signature were also stamped in the Smokey Grey versafine.


The Square easy frame Inkable was used to create a panel, using Iced Spruce DO and Weathered Wood distress inks.
Leonardo was stamped in Iced Spruce DO and the Signature in Smokey Grey versafine
The XL crackle paint and script stamps were stamped randomly in both the inks, to add some depth and dimension
Once dry I carefully removed the square easy frame
I wanted go create the impression of a Book, so I moved it up slightly at an angle, then inked two of the edges in the Iced Spruce.  I used the edge of the Inkable to get an angled edge and then used a ruler and pencil to draw "pages"


Iced Spruce Distress Oxide was the only ink pad used for this sample
The Square easy frame Inkable was taped in place, then the Vitruvian Man was inked up in in the DO and stamped randomly within the square. I did not want a clear image so just pressed lightly in different areas of the stamp, to get a sketchy drawn look
The script and crackle paint stamps were inked up and randomly stamped within the panel
The signature was stamped clearly
On a seperate piece of card the Vitruvian Man was stamped again then a circle die used to cut out the circle part off the image only. This was adhered with a foam pad to add dimension


For my last sample the Artboard was painted in brown acrylic paint then I used Spiced Marmalade DO and Walnut Stain abd Black Soot distress inks around the edges.
I used an old scourer to dabble Fossilized Amber DO randomly over the Artboard.
Leonardo was stamped in Vintage Sepia versafine ink
The crackle paint was randomly stamped all over in Fossilized Amber and Spiced Marmalade Distress Oxides.  A few random areas were stamped with the Script
To complete the Leonardo Signature was stamped in the Vintage Sepia versafine

And there we have it... all my samples for these fabulous and versatile Da Vinci inspired stamps.
And by the end of my samples I am well and truly in love with them all... I hope you are too.

Thankyou soo much for stopping by and PLEASE leave a comment and let me know what you think.

Crafty hugs xx

Wednesday, September 27, 2017

Marleen DT - Tulip & Journey

Hey Bloggers..

Its once again wednesday and my turn to share some inspiration for
BeeCrafty..

This week I have a card made using one of my favorite ways of using some of the backgrounds I love to make.
I made a youtube a while back sharing how I did it and you can find it HERE.

I used 2 BeeCrafty Stamps this wee. The "Tulip" and the "Journey" stamp. Find them in the STORE with all the other amazing goodies..

My stripy background is made just like i dod in the youtube. I simply just then stamped my tulip over it. I added my panel to my black card and stamped and heat embossed my Journey stamp.
And that is it.. Another very simple but effective card.

And that is all from me today. Thank you for popping by and for any comments left behind.
Dont forget to come visit me on FaceBook, Twitter, Instagram, Pinterest, Youtube or my FB page.
 Happy Crafting

Monday, September 25, 2017

Lorre-Anne DT - Distress Oxide butterfly

Hi everyone it's Monday so that means I'm up again on the Buzzy Goings on at Bee Crafty blog to share another Bee Crafty DT project.  This week I am having another play with my Distress Oxides.

What you need to make this card 


What to do -
  • Take the card blank and cut it to 4" to give a tent fold card.
  • Cut black card slightly smaller and white card smaller again.
  • Place the inkables template over the white card and run through a die cutting machine to emboss the pattern.
  • Use blending foam to add some Distress Oxides to the card, and flick some water droplets on to this.  When dry, mat on to the black card and glue to the card blank.
  • Stamp the large butterfly using Versafine ink and colour in with Oxides and a water brush, cut out and glue to the card (only add glue to the centre of the butterfly so you can raise the wings to give some dimension to your card).
  • Stamp a sentiment using Versafine ink, cut out and mat on to black card.  Attach to the card using foam pads.
I'll be back next Monday with another project for you, thank you so much for dropping by.

Hugs, Lorre-Anne x


Saturday, September 23, 2017

Jane DT - Autumn Tag

Hello!

As the weather is turning much more autumnal now I thought that this week for my design team blog post at Buzzy Goings on at Bee Crafty Blog I would share one of the recent makes for the HOCHANDA shows that has a very autumnal feel...


The products used were...

* MDF Tags
* Birds and Butterflies Set 1 - Art Stamps
* Birds on a Wire - Art Stamps
* Moon - Art Stamps
* Ticker Tape Sentiments - Wordage Stamps
* Regular Dots - D'Inkables Stencil
* Maple Leaf - Inkables Template
* Distress Oxide Inkpads


My main aim with this tag (as well as to show the stamps) was to show the variety of ways that stencils can be used.  I started by using the stencil to put texture paste onto the MDF before painting it over and highlighting with gilding wax.  I then used the stencil to stipple paint through and finally I used the stencil as a template to draw around and cut out the leaves (these were then coloured using the distress oxide inks).
The tag was painted using a shimmery acrylic paint in autumnal colours and the birds and moon were stamped using versamark and then heat embossed.
To add extra interest to the background the d'inkables are ideal and on this one I used the regular dots with paint.


As well as the leaves I also wanted the beautiful bird to be a main feature.  I stamped and then clear embossed the bird before cutting it out.  Next I used alcohol markers to create some colour, choosing more autumn tones, before using glue gel to create dimension.

I hope you are enjoying the changing of the seasons.

Happy crafting,

Jane xx

Friday, September 22, 2017

Emily DT - Ally Pally Make and Take

Hi everyone, I had a lovely time at the weekend at Ally Pally. I met lots of lovely people and had a great time running the make and takes.

There were a lot of people who wanted to do the make and take and didn't get a chance because it was full so I thought I'd do a blog this week showing the technique we did at the weekend.

Here are the samples I made:


I started by using ripped paper to mask off the area I wanted to colour. I used Distress Inks and a blending tool to colour the exposed area.

I then used the same colour inks and some of the inkables to add a layer of texture. I used two inkables on each sample and my favourites are the brick wall, the honeycomb and the stars.

I then used a mixture of background stamps in the same colours again to add another layer, still just to the masked off area. The script and crackle background stamps work really well for this.

Once I was happy with the coloured panel, I removed my paper mask and stamped the focal point. I think this looks best in black but it does work in other colours too. I used various Beautanicals stamps and also used the butterflies set on one of them.

I then finished them with a sentiment and mounted them onto black card.

I love this technique and use it a lot. I think the finished effect looks so much more complicated than it actually is and it looks great in any colour and with most stamps.

I hope that everyone liked doing this technique at the weekend and I look forward to seeing lots of cards on the group and in the competition album!

Have a great week!

Emily x

Thursday, September 21, 2017

Karen DT - Life

Good morning everyone

What's everyone got planned for today?  Hope you all get some crafting done 😊

I'm back today with my weekly Bee Crafty DT blog over on
Buzzy Goings On At Bee Crafty Blog

I just love to mix up all my stamps and see what I come up with.
Today I'm showcasing a card I made using the following stamp sets :

Splatter Swirl Upright Rectangle Frame
Ground Elder 
Life & Rain

Also used:
Dinkable: Honeycomb
Distress Oxides:  Cracked Pistachio, Wilted Violet, Picked Raspberry
Distress Ink: Tumbled Glass
Versafine black onyx ink


  • I stamped the Rectangle Frame in the Versafine in the centre of my card blank 
  • Masking off the edges, I blended the DI from darker, to lighter, towards  the centre of the frame
  • I blended Cracked Pistachio DO through the Dinkable around opposite corners of the frame
  • Whilst the frame was still masked off, I inked up the Ground Elder in Cracked Pistachio and Wilted Violet DO and stamped it inside the frame. I also added a hint of Picked Raspberry DO onto the heads of the flowers and re stamped it
  • I stamped the LIFE part of the sentiment across the middle of the stem, in Cracked Pistachio DO and the remainder of the sentiment in black versafine 

I hope you like the combination of these stamps and colours. 
Many thanks for popping by and please leave a comment 
Crafty hugs xx 

Wednesday, September 20, 2017

Marleen DT - Butterflies and oxides

Hey Bloggers..

Once again wednesday and my turn to share inspiration for
BeeCrafty
For today I've had a play with a couple of stamps and my Oxides.
I used the "Birds and Butterflies set 1" and "Splatter Swirl Elongated rectangle"
The background is made using the mop up tecnique. I simply just added some oxide to my mat and sprayed a bit of water over the ink. Then simply just mopped up the ink with my card stock.

I then stamped my rectangle and made a lustre luxe spray by mixing a bit of lustre luxe and water into a mini mister and sprayed over my background.

 
 My butterflies are stamped, fuzzy cut and then smothered with Oxides.
I finished by matting and layering my background and arranging my my butterflies.

And that is all from me today. Thank you for popping by and for any comments left behind.
Dont forget to come visit me on FaceBook, Twitter, Instagram, Pinterest, Youtube or my FB page.
 Happy Crafting
 

Tuesday, September 19, 2017

Charlee DT - Balloon Girl

Morning everyone. Hope you've all had a good week. Here's my blog for today. Hope you enjoy. As ever if you have any questions, leave a comment below and I'll do my best to answer.


What you'll need:


Step 1:

Cut some white card down to the size you wish. Scribble the pink and purple sparkle pens onto the card. Taking a large flat wet brush, do a wash over the card moving the colour all over the card.

Step 2:

Once you're happy with how your background looks. Lightly spritz the moon stamp with water and stamp onto the card. Don't put too much pressure onto the stamp. Leave for about 30 seconds remove and then blot with a paper towel.

Step 3:

Ink up the balloon girl stamp in versafine and stamp her in the position you want her on the card. Stamp the shoot for the moon sentiment in the bottom right corner, also using versafine.

Step 4:

Using just the smaller stars on the dinkable, blend some black soot distress ink through the dinkable in random places all over the the background. Then once your happy, simply matt onto some black card and the adhere to your card blank.


Hope you like this week inspiration. If you don't have any sparkle pens, you could get a similar look with whatever ink,pens etc you may have that react with water.

Until next week
Crafty Hugs
Charlee
x

Monday, September 18, 2017

Lorre-Anne DT - Hochanda samples

Hi everyone, for this weeks Bee Crafty blog post I'm sharing the samples I made for Sam's recent shows on Hochanda.  

Materials - 


I cut white card slightly smaller than the card blank, and blended a circle of Squeezed Lemonade DI in the centre of the card.  I then used Versafine ink to stamp the moon on this yellow circle, masked it off then carefully blended Chipped Sapphire and Dusty Concord distress inks all over the rest of the card - heavier at the edges and lighter towards the centre.  I then used Versafine to stamp some wildflowers along the bottom, then blended Black Soot DI around the edges of the card.  I finished by adding some ticker tape sentiments, and some white gesso paint flicks.


I cut various mats and layers from white and black card stock.  I took the smallest white square and blended Candied Apple Distress Oxide through the heart easy frame, I then flicked water droplets on this and dabbed with some kitchen roll.  I placed the inkable heart over, then flicked some Black Soot Distress Oxide over the card.  I finished by adding some faux stitching with a black pen, some ticker tape sentiments and a few butterflies.  I matted and layered and glued to the card blank.


I cut various mats and layers from white and coloured card.  On the smallest white square I blended some Spiced Marmalade through the maple leaf, I then placed the actual leaf over the blended leaf and blended some Vintage Photo around the edges... this gave the 3D effect seen above.  I stamped a bird using Vintage Photo, used a water brush to add some colour, and added a few ticker tape sentiments.  I finished by adding some gems, matted and layered and glued to the card blank.


I masked off an area of the card and blended some Salty Ocean and Twisted Citron in it, I kept the masking tape in place and then using Versafine ink to stamp the wildflowers.  I carefully removed the masking tape, added a few stamped butterflies and a ticker tape sentiment.  I finished by adding some gems, before matting to some black card and attaching to the card blank.


I cut black card slightly smaller than the card blank, and white card slightly smaller again.  On the white square of card I blended some Seedless Preserves and Dusty Concord through the circle easy frame.  Keeping the circle template in place, I used Versafine ink to stamp the wildflowers.  I finished by adding some ticker tape sentiments and a few gems before matting to the black card, and attaching to the card blank.


I cut brown card slightly smaller than the card, and white card slightly smaller again.  I used a scoreboard to score lines across the white card, then blended some Vintage Photo around the edges before matting it to the brown card and gluing to the card blank. On spare white card I blended various colours of Distress Ink through the maple leaf template, and cut each leaf out.  I arranged these around the card, and finished by adding a sentiment and some stamped butterflies.

I really enjoyed playing with these stamps, and I hope you like what I designed using them.  Please pop over to the Buzzy Goings on at Bee Crafty blog and you can see the fabulous creations my team mates have came up with.  I'll be back next week to share another project with you all.

Hugs, Lorre-Anne x

Saturday, September 16, 2017

Jane DT - A Kaleidoscope of Butterflies

Hello!

Once again it is my turn to share a project on the Buzzy Goings on at Bee Crafty Blog and this week I have chosen my favourite design team sample from last weeks HOCHANDA shows...


There may be a bit of a pattern emerging with my posts in that it is becoming very obvious that I love butterflies!!  Here are the products that I used...

* Circle MDF Art Board
* Moon - Art Stamp
* Birds and Butterflies - Art Stamps
* Wildflower 2  - Beautanicals Stamp
* Ticker Tape Sentiments - Wordage Stamps
* Regular Dots - D'Inkables Stencil
* Acrylic Paint
* Crackle Paint
* White Embossing Powder
* Silver Gilding Wax


1) After priming the art board with gesso I put texture paste through the regular dots stencil, then added some blue acrylic paint to crackle paint and painted the whole piece.
2) Once dry I stamped on the moon and wildflowers using versamark ink then heat embossed with white powder.
3) To highlight the stencilling I added some silver gilding wax.
4) Then the time consuming part!! I stamped lots of the 3 smallest butterflies in black Versafine ink and clear embossed with powder over the top.
5) After cutting them out I coloured them using different shades of blue alcohol markers and then used clear sparkle pen to add a gentle shimmer.


6) I planned out where I wanted the butterflies to be, then attached them using glue gel.
7) I chose the sentiment I wanted from the ticker tape set and stamped using versamark onto black card, then heat embossed again in white.
8) I cut the words and phrases out then placed them where I wanted them to go.


I hope you were able to catch the shows last week.  If not they do remain on the HOCHANDA website to rewind for about 2 weeks so there is still time to watch them!

Have a lovely weekend and happy crafting!

Jane xx

Thursday, September 14, 2017

Karen -DT samples for Wildflowers, Birds and Butterflies

Good morning everyone.
Hope you're all having a lovely week.

I'm back with my weekly blog for Bee Crafty, also over on their Buzzy Goings On At Bee Crafty blog 

Today's post showcases my samples for the products from the recent Hochanda show. I hope you got yours because they are all really beautiful

BEAUtanicals Wildflower 1
BEAUtanicals  Wildflower 2
Moon
Birds and Butterflies 
Ticker tape sentiments 
Birds on a Wire
Easy Frames- maple

Also used:
Distress Inks 
Distress Oxides 
Black onyx versafine
Kuretake clean colour pens
Dinkables : Honeycomb, distressed diamonds


  • Mask off a panel across front and back of your card blank 
  • Blend background using Squeezed Lemonade, Worn Lipstick and Spiced Marmalade Distress Inks. Splatter water droplets and dry off
  • Ink through honeycomb stencil
  • Stamp moon in Spiced Marmalade and Wildflower 2 in Fired Brick DI,  first and second generation 


  • Background is created by blending Distress inks onto white card - Peacock Feathers, Mowed Lawn, Wilted Violet, Picked Raspberry, Spiced Marmalade, Squeezed Lemonade 
  • Stamp the Wildflower 1 & 2 and bird, in black onyx versafine 
  • The ticker tape sentiment was stamped in the black versafine 


  • Mask off panel and a half moon, then blend Squeezed Lemonade and Worn Lipstick Distress Inks. Remove moon mask only.
  • Stamp Wildflower 1 & 2 in Worn Lipstick DI, first and second generation. Also stamp the dragonfly in the same ink
  • Remove masking tape
  • Stamp Ticker tape sentiments in Spiced Marmalade DI and the Wildflower 1 and dragonfly in Worn Lipstick DI  


  • Mask off a square panel on front of card blank and stamp Moon in Iced Spruce Distress Oxide. Mask off Moon
  • Blend Tumbled Glass,  Salty Ocean and Chipped Sapphire Distress Inks 
  • Create rays using a water brush and drying off with a paper towel,  to blot out the inks
  • Remove mask and stamp Birds On A Wire in black onyx versafine 
  • Stamp Ticker tape sentiments in black onyx versafine,  cut out and adhere


  • Mask off a wavy panel and ink with Tumbled Glass and Cracked Pistachio Distress Inks 
  • Stamp Wildflower 1 in Cracked Pistachio and Faded Jeans Distress Oxides and in Iced Spruce DO coming down from the top
  • Stamp bird in Iced Spruce DO and colour in with your inks and a water brush 
  • Stamp Ticker tape sentiments in Faded Jeans DO and the butterflies in the Cracked Pistachio DO 


  • Mask off a panel on front and back of card blank and blend Distress Oxides - worn Lipstick, Peacock Feathers and Wilted Violet. Stamp Retro dash and dots randomly, in Iced Spruce DO 
  • Stamp Wildflower 2 in black onyx versafine, first and second generation. Stamp Wildflower 1 in Iced Spruce DO and the butterflies and Ticker tape sentiment in black onyx versafine. 

  • Ink through Easy Frame in Peeled Paint and Spiced Marmalade Distress Oxides 
  • Stamp Wildflower 1 in Peeled Paint and Twisted Citron DO and the Butterfly in Spiced Marmalade DO
  • The Ticker tape sentiment were stamped in Peeled Paint 
  • Splatter ink drops all over 


  • Mask off a panel on card front and blend Faded Jeans,  Twisted Citron and Fossilized Amber DO 
  • Blend through distressed diamonds Dinkable
  • Ink through Easy Frame in same 3 inks
  • Ink through Easy Frame on left side of card blank in same colours. Bleach out a moon and stamp Wildflower 1 in Faded Jeans DO.  Stamp Ticker tape sentiment in Faded Jeans DO 


  • Moons were stamped in Versmark ink and heat embossed in white embossing powder 
  • Tear a piece of vellum, stamp and heat emboss ticker tape sentiment in white embossing powder and adhere round back of kraft card then adhere to card blank


  • Use Pixie Powders to create a panel background  which is adhered to gold mirri 
  • Stamp butterflies. Colour in with pens and cut out. 
  • Adhere to card, adding butterfly trail dots with black pen
  • Stamp Ticker tape sentiments in black onyx,  cut up and adhere 
I hope you've enjoyed seeing all my samples for these beautiful products.  Check out their website to get yours. Xx

Many thanks for popping by 
Crafty hugs xx 
Related Posts Plugin for WordPress, Blogger...