Showing posts with label Heat Embossing. Show all posts

Tuesday, January 04, 2022

Caroline - One Day

 Hello!  This is my first post as part of the Bee Crafty Design Team!


I used one of the Art Stamps Journaling Girls for this card.  I had found a lovely wooden frame and thought it would be perfect to create a portrait type effect!  I also used a D'Inkable stencil to create the sun in the background.


First of all I cut all layers for the card:


Using the stencil and Distress Oxide I inked the background, blending the sun first and then the sky around.


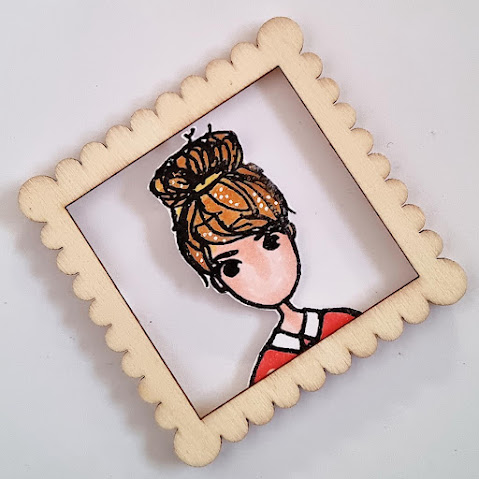
I stamped Journaling Girl-Sam and heat embossed.  I only stamped the top part as this is all I would need.  I coloured with Copics.


I then glued her to the back of the wooden frame:


I used one of the flower stamps and stamped and heat embossed onto kraft before fussy cutting and adding to the side of the frame.


I then added a part of the sentiment from the stamps 'One Day at a Time' and thought that just 'One Day' would be enough.  I added to the layered card with small foam pads, and added a little bit of twine around the frame and tied into a bow.


I used:
Distress Oxides - Stormy Sky, Speckled Egg, Squeezed Lemonade, Mustard Seed, Wild Honey

Caroline x


Wednesday, April 11, 2018

Marleen DT - Together we so rock. 2 tone embossing tecnique

Hello Bloggers..

A quick card for today.. A friend of mine asked me just the other night if I by any chance could whip her up a quick card she could give to  her husband. She had a surprise for him and wanted a card to go with it. All she asked was that it was music themed..  
I knew strait away which stamps to use.. The music ones from BeeCrafty of course..
The Bee's has a fantastic range of music themes stamps. check them out HERE.


Right, forgive the bit weird selection of pics lol.. I did my best to try and capture the magic of this card.. 

First thing first.. the background.. its a play with distress ink in a couple of the red colours and water.. 

I then did all my stamping with black versa fine.. Versafine, I personally find is best of this tecnique due to its speed of drying and its crisp black colour. 

I didnt rush to add the silver embossing powder, I wanted to make sure some of the ink had started to dry already.. Where the powder came on solid, I rubbed a bit of it off just with a finger. (The finger is the best tool for this job as you dont want to brush of the full coat of powder, just a bit of it)
The key (and the tricky part) is to add only enough powder to "outline/enhance" the image. You dont want a solid embossed image.

The magic of this tecnique is that depending on how the light falls on the card, you either have a silver image or a black image.

Once I heat set the powder I matted and layered my card with black card, just to really make it all pop.

Right thats it really.. I love revisiting older stamps I have in my stash and trying out new tecniques and this one came in handy when a friend needed a wee favour.
That is it for today. Thank you for popping by and for any comments left behind.
Dont forget to come visit me on FaceBook, Twitter, Instagram, Pinterest, Youtube or my FB page.
 Happy Crafting

Wednesday, March 21, 2018

Marleen DT - Journal page with NEW ART STAMP

Hey Bloggers and Welcome..

Once again my turn to share a bit of inspiration for  BeeCrafty..
For today I've made a journal page with one of the new Art Stamps. You can find them all in the STORE


 I started by stamping my art stamp right in the centre of the page and heat set it with white embossing powder. The stamp I used is called "Circle of life". I love this stamp. Its so unusual, but it was also the inspiration for this page. I used a few more stamps to finish the page. I used the "Texture Circles" and I used the bottom of the "Fly Away" stamp. I stamped using the "Picket Fence" Distress ink hence the smokey colour of the stamping. I finished the page using the "Circles" Dinkable with a white gel pen.

And that is it for today. Thank you for popping by and for any comments left behind.
Dont forget to come visit me on FaceBook, Twitter, Instagram, Pinterest, Youtube or my FB page.
 Happy Crafting

Wednesday, February 21, 2018

Marleen DT - More Egyptian cards

Hello again Bloggers..

For todays post for BeeCrafty, I want to share a few more cards Ive made using the amazing Egyptian stamps. I just love love love this series of stamps.


This one.. well I cant take all the credit for it.. This card is made using ideas form 2 of my teamies samples.. Lorre-Ann made a card with the background, only hers was black on white, but I loved it so I decided to try it out.. Paula however, made a card with gold embossing on black card stock and I loved that too. So I combined their ideas and came up with this. Do pop over on the DT blog to see all the girls amazing samples.

Anyway, this one is made with lots of stamping with versa mark and heat setting it with gold embossing powder. I did the same with the sentiment. The Life symbol I stamped in versamark, heatset also with gold and then fuzzy cut. Once cut I added another 2 layers of embossing powder to give it real dimention.
This one isnt much different really. Just stamping with versamark, heat setting with gold embossing powder and then smothering the whole thing with distress ink.
And once again the same.. More embossing powder and distress ink..
I made my mats the same way too. Just cut the mat to the right size and then added gold embossing powder around the egdes..

And that is it for today. Thank you for popping by and for any comments left behind.
Dont forget to come visit me on FaceBook, Twitter, Instagram, Pinterest, Youtube or my FB page.
 Happy Crafting


Wednesday, October 12, 2016

Marleen DT - even more snowflakes

Hey bloggers..

Have you guessed that Im in love with the new snowflake stamps from BeeCrafty??
Well I am lol.. And today Im sharing even more cards made with these yumy stamps..

I love christmas, and I love making christmas cards. But like many others, I send out so many cards each year that in order to have them all hand made, I have to be frugal with the supplies I use. Crafting is'nt cheap BUT with some AMAZING timeless stamps and a few supplies, you can make a mass of cards on a very small budget..

Both of these cards have been made using:
* plain white card stock
* Distress inks
* Embossing powders
* BeeCrafty Stamps. Find them HERE..
 This one was made by first putting down "Wilted violet" distress ink on my card. I then took the "Dusty Concord" and stamped the single snowflakes. (leave your background now to REALLY dry or your embossing powder will stick to the whole lot)
Once REALLY dry, I then took the script stamp and inked with versamark, stamped randomly on my background and heat embossed with gold embossing powder.
I did the same with the "Snow" greeting.
I finished this card by making a mat with the same gold embossing powder and mounted onto my card base with foam pads.

This one is made pretty much as above. "Wild Honey" and "Rusty Hinge" distress ink.
Its hard to see here on the picture, but the whole background is stamped with the script stamp using "Rusty Hinge". (Again, leave your background now to REALLY dry before adding embossing powder.) (Distress ink can be used as an embossing ink instead of versamark)

Once dry I did my stamping with versamark. I used the BIG grungy snowflake stamp. I love this stamp. Its so versatile. You can use a section like I have here, or the whole stamp. (I have a card coming next week using the whole stamp) I added added my embossing powder and heat set it.
I did the same with the greeting.
And as the card above, I made a mat using the embossing powder also before mounting onto my card blank with foam.

So as you can see. 2 VERY easy cards, using not a lot of supplies. They dont take too long to make either and could be made in bulk using different colours.

And that is it from me for today. I hope you like my creations.
Many thanks for popping by and for any comments left behind.
And dont forget to come visit me on FaceBook, Twitter, Instagram, Pinterest, Youtube or my FB page.
 Happy Crafting

Wednesday, October 05, 2016

Marleen DT - More snow flakes....

Morning bloggers..
Following on from last weeks post, using the brand new polymer clear stamps from BeeCrafty, I've had another play with the stamps..
The designs I made for the Hochanda shows, I really loved, so I decided to keep the same style while making cards for my own christmas stock pile..

Find the yummy scrummy stamps HERE..


Both cards have been made by first stamping the snowflake border with versamark and then heat embossed with silver embossing powder.
After that I used distress ink, 3 different colours of the same family, to colour my background.
Just take a papertowel or a cloth and wipe over the card to remove any ink from the embossing.

I continued by die cutting a circle and heat emboss that, also with the silver embossing powder.
I stamped my greeting and coloured it with one of the colours I used for the background.

Before putting it all together, I decided to layer my card. Normally I mat on to black, but I decided to repeat the silver embossing. I just cut my at to size and heat emboss the edges with the same silver as on the card.

I then layered all my pieces up and cut my circle to sit off the side of the card. I rolled up some twine and stuck under my greeting (I used glue gel to hold the twine in place) and voila.. all done..

Its a very simple card, but I personlly think it looks stricking and can be done in all colour combinations.

And that is it from me for today. I hope you like my creations.
Many thanks for popping by and for any comments left behind.
And dont forget to come visit me on FaceBook, Twitter, Instagram, Pinterest, Youtube or my FB page.
 Happy Crafting


Monday, September 19, 2016

Kerrie DT - Yuletide - MDF Tag!!!!

Hiya and Welcome to my Monday Post for Bee Crafty

Yes!!!! more Christmas Makes! - I adore Christmas and all the sparkle and fun so I always make a start on Christmas makes during the Summer Holidays and then continute all through Autumn and right up until the Big Day!! love love love

Over the Weekend 'Our Bev' was over at Alexandra Palace for the Stamping & Scrapbooking Show with her massive stand full of Bee Crafty Goodies loads of Stamps and Yumminess including... Brand New MDF loads of it which was a Big Hit and sold out!!!!

I so wish I could have gone this year but unfortunately my Hubby was working (darn!! I cant drive so I lucked out) 

This Week I have created a Christmassy Tag using one of the Lush MDF Tags! Love!!!!

I had a lot of fun creating this tag with loads of Bee Crafty Lushness!!

The products I used that you can get from the lovely Bee Crafty online shop are...

Bee Crafty - Yuletide Snowflakes - Stamp Set
Bee Crafty - Dots - Inkables Template 
Bee Crafty - Inspired by DaVinci Script - Stamp
Colourcraft - Brusho's - sea green, ost blue, ultramarine & turquoise

I also used White Gesso, and Embossing Powders (opaque white, sparkling snow & chunky silver) from my own crafty stash

First I painted over the whole tag using white gesso, once dry I then sprayed the front using a water spritzer and then tapped the Brusho's over the whole tag removing the excess water with kitchen roll. I then dabbed white gesso through the Inkables Template using a dry stencil brush over one corner. I random stamped the Script Stamp using white ink over the opposite corner. Once dry I then stamped the 2 Snowflakes repeatedly over around the edges of the tag using a clear embossing ink, then used the 3 different embossing powders alternately and heating with my Heat Tool

(I have pierced holes in the tops of my Brusho's so i can use them like salt shakers)

I love how the Sparkling Snow embossing Powder looks on the snowflakes


I ran the clear embossing ink over the tag edges and dipped into the chunky silver embossing powder, which once heated made the edges look like metal


I really love how this tag has turned out - I also love how the colours worked - I am a bit obsessed with blue toned christmas makes this year 


Thank You so much for visiting my Bee Crafty post this week - please visit again soon to see what the other Design Team Members have been creating 

Krafty Hugs xx
 I would love for you to visit my own Blog if you would like to see more by me at... Kerrie's Blog

Monday, September 12, 2016

Dt Kerrie - Christmas in September - Chandelier

Hiya and welcome to my Monday Post for Bee Crafty

I really like the colours in this project I do so live non traditional Christmas colours

For this card I used the 6" Circle Inkables Template to first ink through the centre and then also around the edge of the piece of card stock I was using to create a circle and a frame but inked in shades of blue distress inks

I then stamped the Yuletide-Chandelier stamp into the centre of the inked circle using clear embossing ink, tipped some silver pearl embossing powder over and heated with my heat tool

I used some silver pearlescent cards rock for some matts and layers which I built up on the front of a 7x7 card blank. I added some little pearls to finish

Thank you so much for visiting my post today please visit the Bee Crafty Blog again soon to see more gorgeous makes from the talented design team

Kraft Hugs xx
KERRIE

Monday, August 08, 2016

DT Kerrie - Christmas in August

Hiya and Welcome to my Monday Post for Bee Crafty

Now that my Children's Birthday's are done its my tradition to begin my prep for Christmas which includes beginning my shopping plans for their gifts but also the start of my Christmas Cards so today I am sharing one of these new makes for the Festive Season...

I have used some of the Bee Crafty Stamps from the 'Yuletide' Collection


I created a background using the 'Yuletide' - Snowflakes' set along with light and dark blue chalk inks for some of the flakes and then clear embossing ink with a mixture of blue, silver pearl and tinsel white embossing powders which I then heated using a heat toolto create some texture, shine and sparkle.

I then stamped the 'Yuletide' - Believe' large sentiment using blue chalky ink which I sprinkled a little of the tinsel white embossing powder over. I trimmed the seniment, inked the edges by running a clear embossing ink pad accross them, I then dipped into tinsel while embossing powder to add sparkle. I matted the sentiment onto blue cardstock.

To finish my card I matted the background I created onto the same blue cardstock as the sentiment and attached this to a 7x7 card blank. I fixed the Sentiment to the card front using foam tape at a jaunty angle.


Next I repeat stamped the Snowflakes onto offcuts of cardstock in the same inks as before adding ebossing powders including some clear this time for the darker blue. I fussy cut them, used an embossing tool on the reverse of them to create dimention. I then arranged them at the corners of the sentiment layering them up a bit and adding gems to the centres. I added some extra gems to opposite corners of the card to finish


Thank you so much for visiting the Bee Crafty Blog today, please come back again soon to see more gorgeous makes from the Design Team x

Krafty Hugs xx
I would love for you to visit xx

Tuesday, July 12, 2016

Tree of Life Lamp

Morning. I have some Home Decor to share this today. For this piece I have used the lovely Oak and Maple leaves drawn by Sam from Bee Crafty along with the amazing Wonder Embossing Crystals and wonder sheets from Be Creative, both shown on Hochanda. It's been a really exciting project and I am over the moon with the results.

In order to use as little Hessian and wonder sheets as possible I first stamped the smaller Oak and Maple Leaves onto Wonder Sheets.

I then roughly cut out the leaves, peeled off the backing and stuck to the hessian, then I cut them out properly and peeled of the top sheet and covered with more hessian, then cut around the existing shape.


I used Turquenite and Goldstone Wonder Crystals and embossed half the leaves in each of the colours. While some of them were still hot I shaped them to be more realistic and to let the light shine through later. I then covered the whole shade with Wonder Sheets, covered with hessian and painted with Black Gesso, this would give a really dramatic background for the leaves.


Then I moved onto the lamp base, using the 50 mm Wonder Tape, I twisted it in lengths to form into a branching tree shape. I wrapped the tree around 2 1/2 sides of the base.

I coated this in Goldstone Wonder Crystals and heated until melted, then added more here and there to create the tree trunk and branches.


Finally I arranged the Oak and Maple leaves around areas of the lamp. I am so pleased with this project and it looks even nicer in the flesh so to speak.


I hope that you have enjoyed this step by step and another way to use the lovely stamps from Bee Crafty. I hope you will join me for my net post. Thank you.xx

Monday, January 18, 2016

Kerrie DT - Star Flowers - Wake Wonderful

Hiya and Welcome to my Monday Post for Bee Crafty

I have been struggling for the last few weeks to get making again after slowing down over the festive period... so this called for some much needed Inkiness and my lovely Bee Crafty Stamps

Today's colour theme is Pink, Brown & Gold I loved playing with my stencils, embossing powders and distress inks and I really hoped that this was the push I needed to get back to crafting - messy inky fun!! so of course it has helped xx

Here is my project for today using the lovely 'Fabulous Flowers -Star Flowers' and 'WORDage - Wake Wonderful'


I trimmed down a piece of white pearlised cardstock to ink onto. I first inked the whole piece using 'Abandoned Coral' distress ink, I used a heat gun to speed up the drying process. I inked around the edges again to bring in more colour. I then used one of Bev's brilliant techniques of laying a stencil over my work, spraying with water and then taking off the excess with tissue this added a lovely textured look into the coral background. I think inked through the stencil using 'Tea Dye' distress ink, lightly in some areas and darker in others. I then inked the edges using 'Tea Dye' and then 'Walnut Stain' distress inks to add some depth to the colours. 


Using embossing ink I stamped the 'Star Flowers' into the corners but off the page as I wanted them to peek out a bit from the corners, I also stamped the edges using just the leafy swirl part of the stamp. I tipped gold embossing powder over the inked areas and then tapped off the excess, where the distress ink was a little wet still a dusting of embossing powder clung to it... a happy accident really though as I think it looks really pretty like that. I heated the powder using my White Heat Gun until it was all melted and shiney. 


I stamped the 'Wake Wonderful' WORDage stamp onto the centre of the page using brown dye ink. I matted this inked up page onto some brown pearlescent cardstock from my stash and then mounted onto a 7x7 cardblank. I finished the card with some Brown and Gold Ribbons and some Brown Gems... I didnt have any brown so I coloured in a few plain white gems using an Alcohol Marker.

Thank You so much for visiting my Post Today i really appreciate it. Please visit again soon for some more Gorgeous Projects from our Amazing Bee Crafty Design Team xx

Krafty Hugs xx
Related Posts Plugin for WordPress, Blogger...