Showing posts with label Archival Ink. Show all posts

Wednesday, June 19, 2019

Caz Harwood - Prehistoric samples for Hochanda Show


Triceratops art board made using air dry clay with the scales Ink'able pressed into it. X-Large triceratops stamp set and embellishments. 


MDF tag using the cobbled Ink'able with crackle paste. Regular triceratops stamp set and tyrannosaurus rex embellishments. Fossil is the ammonite pressed into air dry clay and encased in resin. Sentiment is typewriter alpha stamp set. 


3D box made using an empty cotton bud pot. 
Decoupaged the outer with tissue stamped with the tyrannosaurus dictionary definition stamp.
Inside is air dry clay with ammonite impression pressed into it. Painted and accented with gilding wax. Regular tyrannosaurus rex stamp set and MDF Wording stomp. 


Grey board fossil plaque made using the regular tyrannosaurus stamp set pressed into air-dry clay re stamped over in brown archival ink. fossils created by pressing the ammonite embellishments into air-dry clay painted and accented with gilding wax. MDF sentiments extinct used to finish.


Extra large triceratops stamp set on acetate. Background technique 'inside a crystal' created using clear gel medium on acetate, mix dye based ink, sprinkle of glitter and cover with tissue - leave to dry. It's a magical effect. 
Triceratops coloured with green posca paint marker.


Dinosaur card created using the typewriter alpha sentiment stamps, versamark ink through the scale Ink'able, (embossed with stampendous frantage antique cream and gold powder. Regular tyrannosaurus rex stamp embossed in centre on Kraft card. Tyrannosaurus rex dictionary definition stamp used for background. 


T-rex card made using the regular tyrannosaurus rex stamp set, texture discs and oxides, horizon mask to ink the centre panel and typewriter alpha stamps.


Triceratops card - made using the regular Triceratops stamp set and foliage, oxide inks for background - added a googley eye for a fun look. 


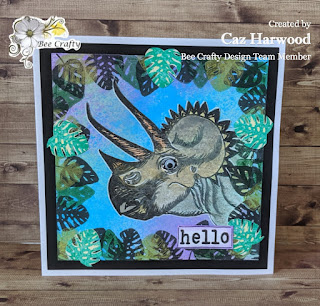
Triceratops card using the regular size stamp, background is the sunset Ink'able with foliage stamped in gesso around the border. Sentiment is the triceratops dictionary definition stamp. 


T-REX card made using oxides through the cobbled Ink'able. Regular tyrannosaurus Rex stamp and silhouette T-REX. Footprints for interest and dictionary definition stamp. Copper heat embossing around the border. 

Thanks for looking.
❤️

Monday, March 06, 2017

DT Kerrie - Fashionette's on Fabric - Bee Crafty

Hiya and Welcome to the Bee Crafty Blog

Today I am sharing with you one of my recent makes for the Bee Crafty Show's on HOCHANDA

Bee Crafty Products used...

Fashionette's 'Vera' - polymer stamp
Fabulous Flowers 'Star Flowers' - polymer stamp

This make is something a little different to show that the Bee Crafty Polymer Stamps are not only for paper crafting


I used my sewing machine to create a fully lined Tote Bag, I used some pretty floral fabric and and white fabric. 

I stitched a piece of pink dotty fabric onto the centre of the bag.

I stamped 'Vera' onto printable canvas fabric (which I had pre-trimmed to fit) using black Archical Ink. I used fabric paints to colour 'Vera', mixing and repainting to create layers and highlights. Once dry I ironed over the painted image using a travel iron and a piece of scrap fabric to fix the paint.

I stamped the 'Beautiful Things' sentiment stamp at one corner using archival ink and painted 'Julie-Ann' by hand with a fine paint brush and black paint. I stitched this panel to the front of the bag into the centre of the dotted fabric... I used a loose running stitch on my sewing machine but free stitching and over lapping for texture.

Next I picked out some fabric flowers in colours to match nicely with the painted image and also with the floral fabric. I stitched them onto the bag front at the corners of the image using free motion stitching just in the centre's, I layered a few up, I added some flowers that I had stamped onto fabric scraps using archival ink which I had fussy cut out.

To finish I added some flat back gems into the flower centres and opposite corners of the the painted panel using Ranger Glossy Accents glue

Thank You so much for visiting my Post today, Please come back again soon to see more gorgeous makes from the Amazing Bee Crafty Design Team

Krafty Hugs xx
Please visit Kerrie's personal Blog HERE to see more of her work x

Wednesday, December 14, 2016

Dream

Morning. I hope you are all well. I am sure everyone is frantically getting ready for Christmas. Bev will be back on Hochanda tomorrow with some more wonderful stamps, so make sure you tune in at 11 am, 3 pm and 6 pm. Today I am sharing a card I made for the Bee Crafty show on Hochanda, using the Dream stamp. I wanted a very simple card and decided on Black and white, although any colour would look great or even multi coloured. It would be a nice idea to maybe stick with black and then pick out a specific word with a bright colour.

Stupidly, I forgot to take photos as I was making up the design. It's such a simple card so it will be easy to explain step by step.

I started off with my white 8'' square card blank and stamped separate letters from the 'Dream' stamp all across the card, using black Archival ink. Be careful to clean after each letter to avoid any unwanted marks on your card.

On another piece of white card, I stamped the main word 'Dream' and then positioned my 'Any Road' sentiment beneath. Finally using one of the 'Style Wire' border stamps, I created a box for it.

I then backed it onto black card giving a strong edge to separate it from the background. Then I attached it to my base card using foam tape.

A very strong look, but very clean and simple at the same time.

Thank you for taking a look today, I hope you like the finished card. I will be sharing some launch designs tomorrow on my blog, so I hope you will take a look and please dont miss the shows. Take care and Happy Crafting.

Tuesday, September 20, 2016

Vintage Wishes

Morning, I am sharing a card I made using the Christmas Collection that Bev brought to Hochanda. I wanted to make a card with a vintage style, I thought that it would really suit the sentiment that I chose to use.

I must apologise for the lack of photos for this one. I am not sure where they went but somewhere between taking them and downloading them to my laptop they disappeared. I will just have to explain today and share the pictures that survived. I started by stamping the beautiful Elegant tree using Cobalt Archival ink. I stamped it four times, lining it up and joining them in the centre, to give the lovely pattern. Next using a brayer, I randomly rolled over the whole piece with Mowed Lawn, Twisted Citron and Picket Fence Distress Ink. I didn't want this perfect as it was supposed to look like a pressed image.

Next using the fancy Merry Christmas, I stamped it in the corner, using black Versafine Ink.

Finally to finish, I back the piece onto black card to form a nice frame.

I hope you like the finished card, I am sorry that all the photos weren't available and that you can understand my explanation. Thank you so much for your visit and hope to see you very soon. Take care and Happy Crafting.xx

Tuesday, June 07, 2016

Life's Work

Morning, Today my card is made from the beautiful feather collection, drawn by Sam. A fantastic job, I am sure you will all agree.


I started of by dying/ageing some papers using cold strong tea. Hung to dry overnight.


Next I stamped the old invoice stamp onto the paper. I did the original stamp in brown ink, but felt that the Black Archival would suit this project better.


Next I masked off the end of the large straight feather as I wanted the nib to be at the end to make the pen. I stamped this with Versamark and embossed using black fine detail powder and heated using a heat gun. I had previously done the same with the nib only with gold fine detail powder. I cut this out and set aside.


Separately I stamped the ink bottle with black Archival and now had all the elements I wanted for the card, including 3 old invoices in black.


For the background, I took a sheet of tissue paper and built u a pattern using a mixture of stamps across the collection, along with the words Life & Memory, both from sentiments found in the Wordage section of Bee Crafty. Obviously you can change the words depending on the theme of your project. There are some really amazing sentiments on the website.I used a selection of inks to stamp the tissue: Black Archival,Walnut Stain, Brushed Corduroy and Blueprint Sketch Distress Ink. I wanted the colours to come from the background and therefore these colours are fairly muted.


To provide the background colour, I took a sheet of A4 watercolour card and saturated it under the tap. The took Violet, Emerald Green and Cobalt Blue Brushos and added them here and there with the end of a mini screwdriver. I let the colours spread naturally before taking a straw and blowing to get some trails.


I wanted an 8'' square for my finished project, which gave me ample left over to stamp my sentiment.


I cut the sentiment to size, cut a mat for it approximately 5 mm larger and blended Chipped Sapphire Distress Ink around the edges.


I covered the watercolour card with PVA let down 50/50 with water. Scrunched my tissue paper, unravelled it and stuck it down, keeping creases and folds to add texture to the card. Leave this aside until completely dry before trimming the excess or you wont get a nice sharp edge.


Having played around with the composition, I decided something else was needed so I stamped the same straight feather onto shrink plastic, coloured with a red pencil and heated until completely shrunk. I also coloured my Quill pen with a selection of alcohol markers.


I layered my sentiment with cosmic shimmer, I arranged the old invoices and also secured them with cosmic shimmer glue. I shaped the ink bottle and used 3D glue get to secure, I then stuck the shrunk feather so it was sitting in the ink bottle.Finally I added the sentiment and large quill feather pen with 3D glue gel.


I really hope you have enjoyed my post today and hope that you will join me again next week. xx

Tuesday, May 24, 2016

Feathery Forest

Hello Everyone, I am Nick and today I am sharing a card I made using the beautiful new Stamps by Bee Crafty. I hope you managed to catch the Launch Shows On Hochanda on Friday. If you missed them, don't worry, they are still available at Hochanda on their catch up feature. You can find this by visiting the TV Schedule and picking Friday 20th May. These really are beautiful set of stamps and the detail is amazing.


To start I cut a piece of parchment and a piece of velvet card, both 8'' Square. The I cut 1 cm from each side of the velvet card. This was done so that when the parchment is folded later they will end up identical in size.


I stamped the large twisted feather 3 times onto copier paper and cut out to make my masks. Then using stazon white ink I stamped the feather around my parchment to make a frame, I used the masks whenever  needed, when there was an overlap.


When I had finished this I took a medium and larger ball tool and embossed the feathers to highlight areas, especially around the edges being careful to keep all of the detail. 


When this was complete and after the parchment had rested, I scored and folded each edge at 1/2 cm and 1 cm to give a raised frame with a tab to secure to my base card. Taking a two pin tool, I pierced around the inner feather design and then using my pergamano snips, I removed the centre.


I traced around this onto copier paper to make a mask for the images I was going to make on the velvet card.


Then I carefully lined up the parchment frame with my card so I could accurately place the mask and secured lightly with temporary adhesive.. Then I took my Black Soot Distress Ink and blending tool and coloured around the mask. This was done to enhance the parchment and show the lovely detail in the feathers. Then I removed the mask.


Then taking the medium curled feather and the two smaller feathers, I stamped them onto my card. Going from large to small to add perspective. I then placed a moon mask  where I was going to add my night sky, slightly over one of the stamped images.


I started at the bottom of my landscape and added the hills, making sure I matched up wherever there was a feather/tree. For the hills I used Peeled Paint and Forest Moss Distress ink and blended from darker on the edges and lighter where the moonlight would be and to add a path effect.

For the sky, I used Faded Jeans first, getting lighter towards the moon, Then blended through with Blueprint Sketch and Finally Chipped Sapphire, keeping darker towards the edges and lighter towards the focal point and moonlight. I finished off with a few starts that I added using a Sharpie White marker. I used red liner tape to secure the parchment to my stamped card.


I hope you have enjoyed my step by step and the card I have shared today. Take care  and look forward to sharing with you next week. xx

Wednesday, March 06, 2013

DT Project: Tinman & Scarecrow by Suze Jo

Good Afternoon All, 

Today we have a brilliant card for you by Suze~Jo


This is a gorgeously bright card, a blended background done with gorgeous bright Distress Inks which are now available at Bee Crafty for only £3.99 each.

The Tinman and Scarecrow stamp has been stamps seperately, coloured and then layered on, as well as the Love & Romance Topiary Tree, which instead of the topiary has been topped with the Unbreakable Heart Stamp.

The sentiments is the Memory Large sentiment stamped directly on with Archival Ink 

This is a lovely card, which could be adapted for a postcard or even canvas project.

Thanks for Looking

Bev x

P.S The NEW Wizard of Oz range appear on page 7 of the April edition of Making Cards

Wednesday, January 23, 2013

Abi Tag by Pauline

Evening Crafters,

Tonigh I bring you this gorgeous tag made by Pauline, using


Pauline had stamped and coloured Heartfelt Abi in gorgeous orange and yellows and embellished her hairband and top with gems, and has layered up to create dimension.

The tage background was created using the Double Heart from the Love & Romance range and the Love Scallop stamp has been stamped in black archival and coloured in a tonal orange and also had a lovely gem attached.

I hope you like her we think she's lovely

Bev x

Also don't forget to leave your name on the Blog Candy post below and you could win a FREE Abi Grace stamp and TWO sentiments

Monday, January 14, 2013

Love Memory by Suze~Jo

Happy Monday Everyone,

Have a look at this gorgeous creation by Suze Jo.

Using stamps for the Love & Romance and WORDage ranges


Suze has stamped the Double Hearts stamp using Archival Black and coloured in and has also used the memory from the Value of a Moment (Lg) WORDage stamp.

I love all the embellishments used here and inked corrugated card or stripped cardboard is a gret way to add texture to a project.

We have LOADS more gorgeous samples to show you from the fab Bee Crafty Design Team, so make sure you keep your eyes on the blog and facebook page.

Bev

P.S Don't forget the 'Monthly Secret Stamp' is now available if you order online too, so don't forget to 'like' the Bee Crafty Facebook Page so you know the name of the secret stamp on the first of every month.

Friday, January 11, 2013

Lottie & Harry by Pauline

Good Evening Crafters,

We've got a but of Friday fabulousness today, we have a stunning card made by Pauline.


from the Abi Grace & Kaitie Mai range


This is a 6x6 straight edge card which are available online in packs of 5 for Only £1

Layered up using Bee Craty A4 Coloured Card Stock

The Live Laugh Love Circle stamp is new too from our Wordage Circles

Both stamps are stamped with Archival Ink and coloured using the fabby Letraset ProMarkers.

I know you will love this card as it is gorgeous, if you have any questions please comment below or hop on over to the Bee Crafty Facebook Page.

Bev x

Related Posts Plugin for WordPress, Blogger...