Showing posts with label Dandelion. Show all posts

Wednesday, August 10, 2016

Marleen DT - Dandelion CAS

Hey blogger friends..

Todays post is my weekly spot for

Ive made a CAS (Clean & Simple) card for this week.
Its not a style Im very good at, nor a style I do often but just once in a while it comes over me lol..

This week I pulledout my "Tall Dandelion" stamp, and the  "Every hour is a dream" stamps.

This one was very sinple to do. I cut my mat and drew little dots the whole way around the edge with a black fineliner. I then cut a smaller rectangle and stamped my dandelion a bit off the card. I covered up most of my greeting so i only inked up the word dream and stamped it in the corner.
I finished by matting my dandelion on to silver mirri card and added it to my card.

And that is all from me for today.
Many thanks for popping by and for any comments left behind.
And dont forget to come visit me on FaceBook, Twitter, Instagram, Pinterest or my FB page.
 Happy Crafting

Monday, June 06, 2016

Kerrie DT - Every Hour Is A Dream - 'BEAUtanicals'

Hiya and Welcome to my Monday Post for Bee Crafty

Wowser such a Busy Half Term that was with our 4 Buzzy Bee's - Hubby booked the week off so that he could spend time with us all but also to get the garden ready for Summer - he also managed to put a new ceiling up in the Bathroom. along with trips out with the Kiddies and Movie Nights he did so well to get it all done.

Why though after a Holiday do I find it so hard to get my Work Head back on?? I very nearly forgot to post this Make for you....Doh! 


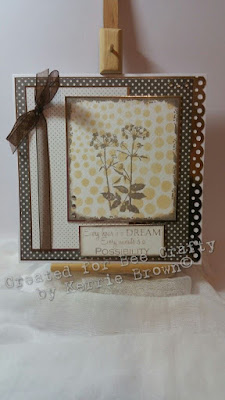
So this weeks make to share is a Quick and Simple card using up more of my Offcuts from my Crafty Stash (im such a hoarder) 

I chose to use lots of Dotty-yumminess this time with my spotty papers and a Dotty template which I inked through using Distress Inks in nice brown tones to match the papers.

I even used a Dotty Lace punch on the Mirror Board I used as Matt & Layers.

I used the gorgeous 'Ground Elder' stamp from the 'Ground Elder - BEAUtanicals' stamp set. I stamped around the edges using the edge of  the 'Dandie's Border' stamp from the 'Backdrop Borders' collection for a bit of texture

The Sentiment 'Every Hour is a Dream' is from the 'Dandelion - BEATtanicals' stamp set

Thank You so much for visiting the Bee Crafty Blog today - please do visiti again soon for more Gorgeous Makes from the Amazingly Talented Design Team

Krafty Hugs xx
I would love for you to visit and follow my BLOG too if you get a chance xx

Monday, March 21, 2016

DT Kerrie - Make a Wish - Dandelion

Hiya and Welcome to my Monday Post for Bee Crafty

I would love to share with you how I made this shaped card 

I have used the 'BEAUtanicals - Dandelion' stamp set


First I diecut 2 sizes of Giant Label shapes using some of my larger die's from my stash
One I cut using white pearlescent card and one from gold pearlescent card. I fixed the smaller gold shape to the front of the white shape - to make this card front stand up like a portrait I fixed an A6 cardblank to the reverse to work as a stand.

I stamped the large Dandelion Seeds stamp from the set onto a piece of kraft card which I then tied brown organza ribbon around and matted brown mirror board

I stamped the large Dandelion onto a piece of linen card but with the stem curved on the stamp block. I then stamped the smaller Dandelion twice along the bottom of the card. I stamped the smaller Dandelion Seeds around the top corner to look like they are blowing away from the large flower. I inked around the edges and then matted with brown mirror board.

I stamped the 'Make a Wish' sentiments, trimmed them, inked the edges and matted on brown mirror board. I then fixed all the pieces onto the card front at jaunty angles.

Thank You so much for visiting my post today - please do visit the Bee Crafty Blog again soon for more Gorgeous Makes from the Amazing Design Team 

Krafty Hugs xxx


Monday, March 14, 2016

DT Kerrie - BEAUtanicals 'Dandelion' - Family Masterpiece


Hiya and Welcome to my Monday Post for Bee Crafty

I wanted to share with you one of my makes showing how to use up off-cuts of pretty papers. If like me and you horde pretty paper off-cuts because you don't like to waste them - teaming them up with Beautiful Stamps from Bee Crafty is the perfect way to use them up and make Pretty Cards


I've had this pretty piece of paper for about a year and its such a shame for it not to have been used. It was an odd sized piece of paper so I made a cardblank to fit it using a piece of white pearlescent cardstock 

I then chose a chalky ink to match one of the colours in the paper for this one I picked a cloudy blue, I inked the edges of the pretty paper using the cloudy blue ink and then stamped the large 'Dandelion' stamp from the 'BEAUtanicals - Dandelion' set onto an off cut of white pearlescent cardstock

I matt & layered using a chalky grey pearlescent cardstock which tied all the colours together - I love this sentiment from the 'BEAUtanicals - Ground Elder' stamp set - to finish the card nicely I used some pale blue flat back pearls

Thank You so much for visiting my Post today - Please do Visit the Bee Crafty Blog again soon for more Gorgeous Makes from the Amazing Design Team 

Krafty Hugs xx

Monday, March 07, 2016

Kerrie DT - Ground Elder - 'Every Hour is a DREAM'


Hiya and Welcome to my Monday Post for Bee Crafty

Today I wanted to Share one of my Samples from Last Week's 'Hochanda Shows' and give you some details of how I made it

I used the Ground Elder from the 'BEAUtanicals - Ground Elder Set' and one of the Sentiments from the 'BEAUtanicals - Dandelion Set


I have been on a declutter and using up crafty stash mission of late and part of that has been to use up some of my offcuts from my storage drawers - so for this card I chose this pretty pink and brown paper offcut and teamed it up with a pink dotty offcut and a sheet of brown pearlescent cardstock to tie the colours together - I cut two large flag shapes for the background and then used some round dies from my stash to cut the topper. on a plain piece of watercolour cardstock which again was an offcut I stamped the 'Ground Elder' using brown archival ink, I then die cut the watercolour cardstock using a smaller round die and inked around the outside using 'Spun Sugar' 'Worn Lipstick' and 'Abandoned Coral' distress inks and a round inking tool

I layeered up all the elements making sire to back them all using the brown pearlescent cardstock to tie all the colours together - I also coloured some white flatback pearls using a brown alcohol marker to tie these into the colour scheme too - I always buy these perals in white and my gems in clear so I can colour them to any theme rather than trying to match up the papers to random coloured gems 

Thank You so much for visiting the Bee Crafty Blog today - I hope I have inspired you to use up any of those offcuts you keep for 'Just in Case' I know we all have them

Krafty Hugs xx

Wednesday, March 02, 2016

Marleen using the Dandiloion Stamp

Hello blogger friends..

The days are ticking by here and before I know it, it's once again wednesday..
And wednesday means...

Did you catch our Bev on Hochanda monday last? Was'nt she great.. as usual.. :-) 
Great inspiration and some fantastic samples from the whole Design Team..
It really makes my day when I see my cards on TV..

Anyway.. if you follow my on FaceBook, Twitter, Instagram or have liked my FB page, you will have seen all my samples I made for the show.. And if you dont, COME AND JOIN ME :-)
For today I decided to to have a go at BRIGHT colours used with the new stamps.
I was inspired by my teamie's colourful samples. Im more of a sepia tone girl myself, but I do love colours as well so thought I'd have a go..

I used the Dandelion set as seen on Hochanda. But make sure you check out the STORE for all Bev's amazing stamps. 

This is a very simple card. Simple matting and layering. I used a textured card to work on and simply smothered it in my distress ink in 2 bright colours. I did the ghosting tecnique Bev was showing on the show with a stencil, as well as some water splashes and let them dry before stamping with black Archival. I finished with a couple of hand drawn lines around the card to frame it.

Ghost tecnique: once you made your background with distress ink, lay a stencil over your project. Mist with WATER. Remove stencil and either leave to dry or roll a kitchen roll over your project to remove excess water. Careful not to drag kitchen roll over project as it will romove more ink then in the desired places

And that is all from me today. 
Thank you for popping by and for any comments left behind.

Monday, September 07, 2015

DT Kerrie - Planning with my Bee Crafty Stamps

Happy Monday and welcome to my Post for Bee Crafty

Wowser its been such a busy week with my 4 kiddies starting back at school today, all the uniform sorting and finishing up projects - nice to be back to routine but I miss them all - its so quiet today - but that does mean more time to craft so its all good 

I have been using some of my Fave Bee Crafty Stamps in my Purple Planner this week, hense why my post is a bit late as I was finishing up filling in Sunday xx


I stamped them using Chalk Inks, going over some details using my coloured fine liner pens - some across the tops and bottoms of the pages and some as accents on the plan days - I love to add colour and doodles to my planner pages but stamps are by far my favourite planning tool and im always on the look out for more designs and sets to use 


I couldnt resist filling these pages up using my 3 fave colours, Teal, Pink & Purple 


I hope I have given you a few ideas for using your stamps in other crafts - decorating planners is all the rage across instagram, facebook and blogs Im addicted but I have always loved to plan&list daily 

Thank You so much for visiting today to see my post - I hope you will come back soon to see more Gorgeous Makes by the Brilliant Design Team 

Krafty Hugs xx

Monday, July 06, 2015

Kerrie DT - Phoebe FASHIONettes

Hiya and welcome to my Monday Post for Bee Crafty

This week I have made a card for my littlest Daughter reBecca as its her 7th Birthday in a few week's she may only be young but she is already a shopping diva who knows exactly what she wants lol she has more handbags than I do 

I have chosen to colour FASHINettes - Phoebe this week her hair is a lot like reBecca's all long and wavy


I coloured Phoebe using my big collection of alcohol markers - she took best part of a day to colour but I loved every minute


I chose a pretty backing paper which I colour matched with my markers - thats the joy of having a big collection being able to colour match to pretty much any paper i choose - the Shopping List was created using the packaging from some stickers I got online last week it was too nice to throw away I stuck some washi tape across the bottom to hide the brand info. The writing is my own messy writing but I quite like how it turned out


I also used the front half of a shaped cardblank to create the layer behind the shopping list - which I stamped onto using 'Yuletide - Holly Swirl', 'Beautanicals - Dandelion' and the tiny butterfly from 'The Village - Elm Road' - I added a sentiment 'Happy Birthday' which I mounted onto a panel that I had covered using the same washi tape as earlier. The punched edge on the Mirror Board is from Martha Stewart.

I hope I have inspired you today to mix up your crafting materials with a few things you might not normally use

Thank You for visiting today, come back to the Bee Crafty Blog soon for more makes from my Amazing Design Team Buddies

Krafty Hugs xx

Monday, June 01, 2015

Kerrie DT - Bee Crafty Stamping in my Planner's x

Hiya and welcome to the Bee Crafty Blog 

Today I am sharing with you a few different ideas for using your Bee Crafty Stamps

I have a slight, oh ok I mean huge! Planner Addiction and I have been using various stamps to decorate them up - I also love to upcycle jars, tins, bottles and tubs are not safe in my house and I also sometimes buy jars/boxes of things purely because I want to use them in my Kraft Korner 

So here are a few examples of this week's planning and upcyling


Planner Pages, a Project Life Card and a Paperclip Jar all decorated using the following Bee Crafty stamps...

'Decision to Try' (Lg) - Wordage
'Cow Parsley' - Beautanicals
'Dandelion' - Beautanicals
'Holly Swirl' - Yuletide
'Dandies' - Backdrop Borders


These are the pages for next week in my planner (handbag size) - I have stamped across the top and bottom of the pages using the Beautanicals stamps and the Wordage sentiment


This Jar that I now keep my shaped paperclips in - was a sweetie jar from Christmas. I have wrapped a stamped piece of cardstock around the middle, tided ribbon around twice, I stamped and distressed a tag and attached it using a glue gun - simple but pretty


This project life card was a little boring with just the quadrile background and coloured edges, so I randomly stamped round the edges using beautanical's stamps and the holly swirl then distressed the edges using distress inks

Thank you for visiting the Bee Crafty Blog today - come back soon for more inspirational makes by the Design Team 

Krafty Hugs xx

Tuesday, March 17, 2015

Kerrie DT - BEAUtanicals 'Dandelion'

Hiya and welcome to my Tuesday post for Bee Crafty 

For my card today I have used a mixture of my favourite Bee Crafty polymer stamps


I stamped the Script stamp over the background using 'Pumice Stone' distress ink, then the Bubble Wrap stamp into the corners using 'Walnut Stain' distress ink.

Using 'Spun Sugar' distress ink using one of the small round blending tool in circular motions darker into the corners and lighter around the sides, then using a piece of blending sponge i inked the edges using 'Walnut Stain' distress ink.

I stamped the Bubble Wrap again using White chalky paint 


I stamped the Dandelion using 'Black Soot' distress ink, then stamped just the blown away seeds randomly around the outside of the card. Using 'Black Soot' again I stamped the Being Happy sentiment near the corner.


I have used some Pink textured cardstock and some Mink mirror board from my stash for the layers and before i fixed the stamped section I inked over all the edges of the layers and card blank using 'Spun Sugar' distress ink.

Thank you for visiting today please do visit again soon to see more Bee Crafty makes from the team 

Krafty Hugs xx


Tuesday, January 13, 2015

DT Kerrie - BEAUtanicals Dandelion With Love

Hiya and welcome to my Tuesday blogpost for Bee Crafty Stamps today I ams sharing with you 2 makes using a stamping techniques I havent used in a while Bleaching & Lemon Juice and the lovely BEAUtanicals Dandelion and Wordage Minis - With Love


For this first one I used watercolour card trimmed to fit a 6x6 cardblank, I used Tim Holtz Distress Inks  and a blending tool to randomly colour the watercolour card. I then used the Da Vinci Script stamp with some bleach to stamp over the background - this removes the colour of the ink and gives a nice effect. I matted this background panel uaing black mirror board and fixed to the card front. I stamped the Dandelion stamp onto stamping cardstock using black inkpad and randomly inked the edges using the distress inks again. I matted this topper onto black mirror board and attached to the card front using foam tape at a jaunty angle. The sentiment was stamped, inked and matted in the same way and fixed to the cardfront with foam pads. I used an off cut of black mirror for the strip down the side and 2 dazzle flat backs to finish off the card.


For my second make I wanted to show a way of using the stamps to create a vintage effect.
I cut a nice sized bookmark from watercolour card. I tipped a few drops of lemon juice onto my non-stick craft mat and dipped a piece of cut & dry foam into it and sponged onto the Dandelion stamp and pressed this onto the watercolour card. I then did the same using the With Love sentiment and stamped it underneath the dandelion. Using the damp cut&dry foam I dragged it around the edge of the bookmark. I then heated the bookmark using my heat tool to heat the lemon juice as it burns it turns brown. I love this effect. I then matted the bookmark onto gold mirror board. made a hole using a hole punch, added an eyelet and threaded some ribbon through. 

Thank you so much for visiting my post today and I do hope you will visit again soon

Krafty Hugs


Friday, July 04, 2014

Another dandelion ...

... but why wouldn't I!!

Had a good week peeps?

You might remember a few weeks back I did this in an orange and yellow mix.

This time it's a bit darker and totally different whilst being exactly the same.

I always find that doing a project "the same but different" gives me the chance to use it for more, and different, occasions.

I used the dandelion stamp from the BEAUtanical range. Stamping it in my Tuxedo Black memento inkpad. The background was a range of distress ink in blues and purples with my lovely black soot all around the edges...

Hope you like it

Sam xxx

Related Posts Plugin for WordPress, Blogger...