Thursday, October 03, 2019

Karen DT-Doodle Art samples for Hochanda

Good morning crafters xx

It's Thursday which means I'm on the
Bee Crafty blog today 😁
I'd like to share my samples for the fabulous new Doodle Art stamps that our Sam and Bev
launched earlier this week. I hope you got your orders in... you will love them xx

Products used:
Doodle Art stamp sets: Ladybird (XL and Regular), Toadstools (regular), ButterflyBirdSunflowerFace
MDF: Flowers, Toadstool, mixed flowers
XL Creativity words 
Ticker Tape 2
Everyday Sentiments 1
Dinkables
Texture Discs
Dylusions Sprays
Distress Oxides 
Gilding Wax
Sparkle pens
Bleach!!

Dylusions Ink and Shimmer sprays
Sharpie black pen


Dylusions Ink and Shimmer Sprays
Black Sharpie pen
Sparkle pens

Distress Oxides 
Dinkables: stripes and dots, splatter, honeycomb
Sparkle pens
Bleaching technique 

Distress Oxides 
Dinkable:Honeycomb
Texture Disc 
Bleaching technique 
XL Creativity words 

Distress Oxides 
Gelli Plate 
Dinkables: leafy branch
Ticker Tape 2
Sparkle pens 

Distress Oxides 
XL Creativity words 
Sparkle pens 

Acrylic paint 
Gelli Plate 
Dinkable: Sunset
XL Creativity words 
Clear embossing powder 

Ink
Gelli Plate 
Sparkle pens 
Everyday Sentiments 1
Bubblewrap 

Distress Oxides 
Dinkables: leafy branch, honeycomb
Ticker Tape 2
Sparkle pens 

I absolutely love Doodle Art stamps and these latest two sets are just as fabulous.  Hope you enjoyed looking through my samples 

Crafty hugs xx

Wednesday, October 02, 2019

Caz Harwood - Ladybird/mushroom Doodle art samples


Samples made for the Hochanda show...

Cobbled Ink'able background with stamped images from the accessories on the new sets. 
Mushrooms, flower and ladybird fussy cut and left monochrome to stand out more. Creativity word sentiment.

Distress oxides used for the background and colouring. I smoothed the ink on using a sheet of acetate. Ticker tape sentiment.

Watercolor background, stamped border. Dotty D'Inkable details. Large lady bird fussy cut. Small word sentiment. 

Brick wall D'Inkable details, inked in vintage photo distress, mushrooms stamped and coloured with intense blocks and pencils. Ticker tape sentiment.

Acrylic paint and posca paint pens used to decorate this MDF flower. Stamped elements on the base. 

Cobbled Ink'able details on the body of the toadstool - acrylic paints, 3D enamel accent and UTEE used to decorate the top and elements. 

Stamped and coloured images onto a gift box. Inked edges with vintage photo distress ink. Tag is the flower from the Ladybird set. Heat embossed and coloured. 

Heat embossing for the ladybirds. Contrast of colours on a grungy painted background. Ticker tape sentiment.

Rust effect paints used to decorate, enamel accents for rivet details. Cogs used to embellish. Gilding wax and ticker tape sentiment. 

Gherkin jar lid, ladybird stamp and ticker tape sentiment. Encased in resin and aluminium wire adhered to back to hang. 

Hope you like
♥️
Thanks for looking 

Monday, September 30, 2019

Lorre-Anne DT - Doodle Art Hochanda samples

Hi everyone for my weekly Bee Crafty blog post I'm sharing the DT samples I have made for Bev and Sams shows on Hochanda today at 10am and 2pm. The girls will be bringing some fabulous new Doodle Art stamps and here is what I came up with using them...


Distress Oxides (Mustard Seed, Ripe Persimmon), Alcohol pens


Candied Apple Distress Oxide, Rustic Rose Amazing Spray


Distress Oxides (Peacock Feathers, Carved Pumpkin, Ground Expresso)


Distress Oxides (Candied Apple, Frayed Burlap, Twisted Citron)


Onyx Black Versafine ink, Watercolour pencils


Acrylic paints


Acrylic paints

That's it for this week.  Happy crafting!

Hugs, Lorre-Anne x

Saturday, September 28, 2019

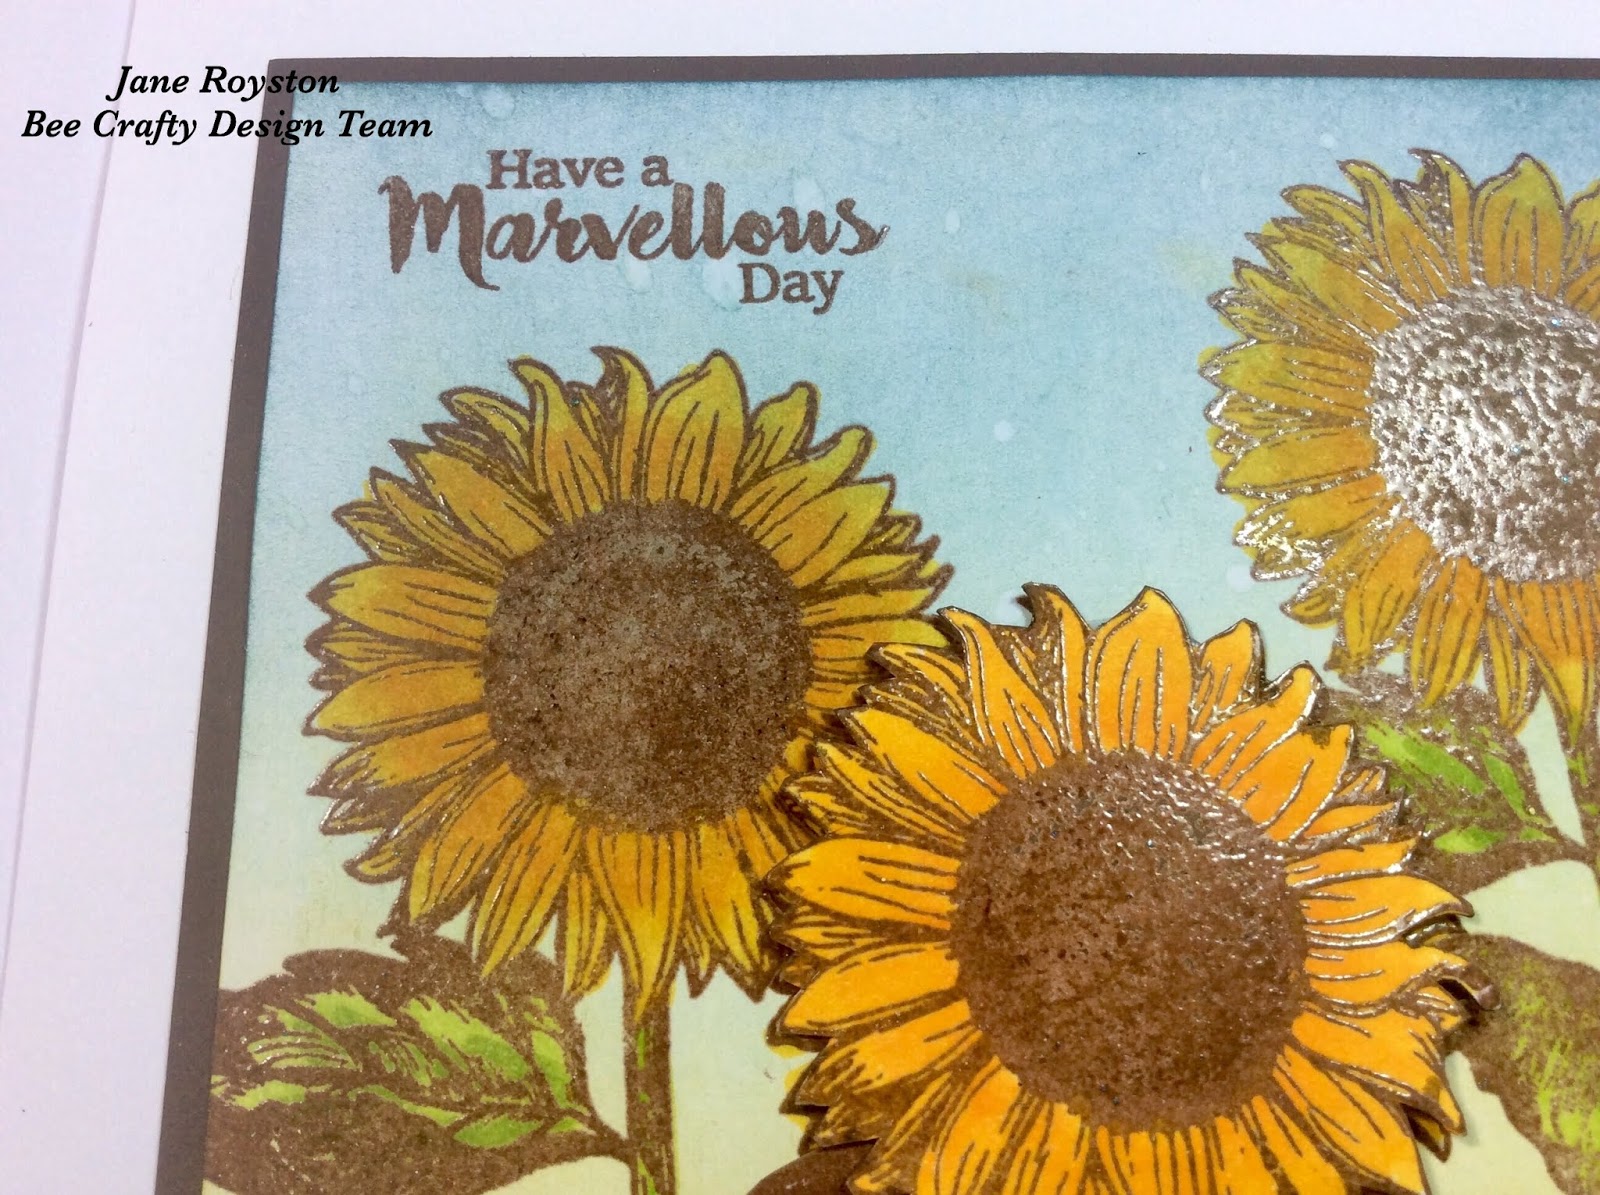
Jane DT - Sunflower Days

Hello!

Today on the Buzzy Goings on at Bee Crafty blog I am sharing a sunny sunflower card...


I started by blending some distress inks onto a piece of stamping card using my blending brushes.  The colours used were Broken China, Faded Jeans, Crushed Olive and Peeled Paint.

Then I splashed on some droplets of water and after leaving for a few seconds blotted them off.

Using the Large Sunflower stamp from the Beautanicals range I stamped the sunflower onto the card 3 times with Sepia Versafine and then heat embossed with clear powder.  Next I coloured the flowers with my Pitt Pen markers...


After this I stamped out the flower and a couple of the leaves again and cut them out before colouring them in.  These pieces were then stuck over the top of some of the elements then a sentiment stamped directly onto the card...


To create this card I used:


Thank you for looking and happy crafting!

Jane xx

Thursday, September 26, 2019

Karen DT- With Love

Hello everyone xx

As its Thursday I'm on the Bee Crafty blog with a new make for you xx

I couldn't resist getting out my Doodle Art stamp sets. Absolutely love these and I've mixed and matched all the different elements together xx

Products used:
Doodle Art sets: DragonflyButterflyBee
Texture, Film Strip and Circles stamp set
Everyday Sentiments 2
Distress Oxides 
Sparkle pens
Gelli Plate


I created an inky background using my Gelli Plate, Distress Oxides and the Texture Circles.(You can create a similar background without the Gelli Plate, smooshing the Distress Oxides on a mat etc).
The focal images were stamped in Black onyx Versafine. 
I coloured them in using my Sparkle pens.... love a bit of Sparkle lol.
The sentiment was stamped in the Versafine.
I matted my card onto black card and then to my card blank, to complete this weeks make.

Thankyou for stopping by

Crafty hugs xx

Wednesday, September 25, 2019

Caz Harwood - Doodle Bee tag


PRODUCTS USED:

Doodle bee stamp set
Doodle butterfly stamp set
Small words sentiment stamps
D'Inkable diamonds
Pearlywinks sprays
White gesso
Archival ink grey
Stickles
Stazon inks
Blank tag
Versafine onyx black ink

HOW TO MAKE:

Spritz the tag with pearlywinks sprays to create your background

Stipple gesso through the diamonds D'Inkable to add interest

Using grey archival ink stamp some decorative elements, I used the honeycomb from the doodle flower set

Stamp the bee onto the tag and onto a separate piece of card so you can fussy cut and layer up

Once coloured in, fussy cut and glue over top of the stamped image. Add stickles for shimmery wings
Stamp and add sentiments. 
That's it! 

Hope you like! 
❤️
Thanks for looking. 

Monday, September 23, 2019

Lorre-Anne DT - Being Happy

Hi everyone for my Bee Crafty DT post this week I'm sharing a card I have made using some of my favourite Inkables and my Gelli plate.


Materials
What to do
  • Cut black card slightly smaller than the card blank and 2 pieces of white card slightly smaller again.
  • Apply some of each Oxide apart from Black Soot to the Gelli plate and lightly brayer over the colours then place the inkable over the top.  Place a piece of white card over this and brayer over the top.  Remove this piece of card and retain for a future project.
  • Take another piece of white card and place this over the Gelli plate and brayer over the top of the card.  Carefully peel the card off.
  • Blend some Black Soot through the Metal Work Alpha inkable randomly over the card.
  • Stamp the Retro Dash and Dots using Mermaid Lagoon, and the two different texture strips using Mustard Seed and Peacock Feathers.
  • Blend some Black Soot around the edges of the card, and add some highlights with a white gel pen.
  • Mat the white card to the black and glue to the card blank.
  • Stamp the sentiment using Versafine ink, mat to black card and affix to the card with foam pads.
That's my project complete for this week, I'll be back next week with a new card.  Until then, Happy Crafting!

Hugs, Lorre-Anne x


Saturday, September 21, 2019

Jane DT - 'Snowflake Blues'

Hello!

Today on the Buzzy Goings on at Bee Crafty blog I am sharing with you a card that developed from some ink spray play...


Like most crafters there are times for me when I am not sure what I want to make and at these times I usually find that the best thing to do is something!  So when I didn't know what to do this week I decided to just grab a piece of glossy card stock and a couple of Dylusions ink sprays (bubble gum pink and calypso teal) to see what would happen.

I sprayed the inks onto the card then blotted and wiped away the excess using a piece of kitchen roll...


At first when I looked at the background I thought I would use the wildflower silhouette stamps in a dramatic black but wanted to add some texture first, so I pulled out my texture discs and chose one that appealed to me before stencilling through with white gesso...


Once I saw the effect I revised my idea and decided that this was now a wintry, snowy background and got out my Doodle Art Snowflake set.  I used some of the smaller snowflake stamps and the text (I love text stamps!!) with the Archival inkpads in distress colours...


To create some texture and add some sparkle I then used the snowflake d'inkable with silver glitter paste...


I always like to create a focal point to my projects so stamped the 2 largest snowflakes, cut them out and coloured them using Faber Castel Pitt markers.  To match the silver snowflakes I added a silver gem to the centre of the smaller one...


Finally I layered these images up and added them to the card along with a sentiment from the Everyday Christmas sentiments with a few more gems to finish the project...


To make this card I used the following products:

* Yuletide - Doodle Art Stamps Snowflake (regular)
* Yuletide - Everyday Christmas 1
* D'Inkable - Snowflakes
* Texture Discs Set 1
* Dylusions Ink Sprays
* Tim Holtz Distress Archival Inkpads

I hope you enjoyed finding out about my project and that you get time to have a play with some crafty goodies this week, happy crafting!

Jane xx

Thursday, September 19, 2019

Karen DT- Believe in magic

Hi everyone xx

It's my turn on the Bee Crafty blog today with a card I made using the gorgeous Unicorn Magic stamp. Love this collection, what is there not to love about Unicorns 🤣

Also used:
Bubblewrap Positive stamp 
XL Doodle Art Baubles stamp
Distress Oxides 
Gelli Plate


To begin my card I grabbed my beloved Gelli Plate. Not had it long but I'm loving it lol.
(You can create similar backgrounds by creating your inked panel and then stamping/stencilling each component). 
But I love the printed one layer effect you get with the Gel Plate.  

I used Distress Oxides on my plate, spritzed with water, and stamped the bubblewrap stamp in a different colour. 

I then printed my background on to the front of my card blank


I stamped the Unicorn, sentiment and the silhouette Unicorns, in Versafine Onyx Black. I also stamped the little stars from the Doodle Art Baubles set.

Using the bleaching effect, I lifted some of the ink from the Unicorn. I then added a hint of sparkle from my clear Sparkle pen. 

To complete I drew a wiggly frame around my inked panel. 

I hope you enjoyed todays post and I'll see you again soon 

Crafty hugs xx 

Wednesday, September 18, 2019

Caz Harwood - Creativity brusho butterfly card


PRODUCTS USED:

Brusho
Versafine onyx black
Versamark clear
Embossing powder clear
Card blank 7x7


Pounce the clear Versamark ink over the Ink'able, sprinkle clear embossing powder over and heat set.

Spritz the card with water and sprinkle over some blue tone brusho. The embossing will resist the colour. 

Once dry, ink around the border with peacock feather distress oxide to frame it.

Then using the time measure stamp, add some elements to the edges for interest on the background.

Stamp out some butterflies onto the background and onto separate card as they will be fussy cut and mounted on top.

Stamp out the sentiments. 

Fussy cut the butterflies and sentiments.

Colour the butterflies in, I used twisted citron oxide and a pink sparkle pen.

Add these elements to your card, mount onto a card blank and you're done. 

Hope you like! 
❤️
Thanks for looking. 

Related Posts Plugin for WordPress, Blogger...